Archive Page 4

Older Posts

Automated Viewer Frame Handles in Nuke

When working on a VFX shot, more often than not, the plate's image sequence will include frame handles; an additional 8 or 12 frames at the start and end of the shot. The extra half or third of a second at the ends of the shot give us the flexibility to adjust in and out points later without having to come back to our compositing application and re-render the shot with a new frame range. Which is great.

But, when working on a shot in, say, Nuke, you'll often want to play back the shot without viewing the currently-extraneous frames. Lucky for us, Nuke has a these fun little red triangles on its timeline that you can drag around to set custom in and out points as you see fit. It's a great feature for focusing on a smaller range of frames for a specific task.
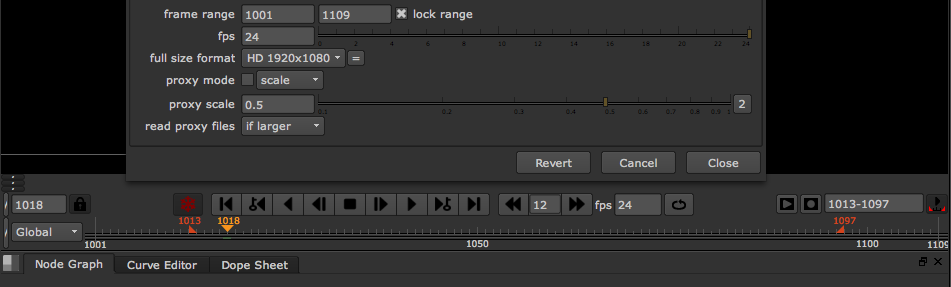
But, if you're trying to see eactly the frames that are currently in the edit, and only those frames, dragging around tiny red triangles isn't terribly precise. And the other option, typing in the first frame plus the handle, a hyphen, then the last frame minus the handle, is slow and requires math (yuck).

This being a well-defined, menial, and repetitive task, it's a perfect candidate for automation. With help, again, from my good friend Jake at The Foundry Support, I've added two new items to the bottom of my Viewer menu.
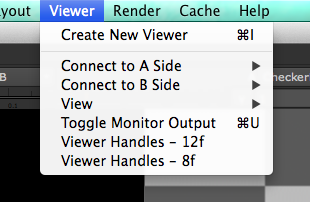
Now, all it takes is a single click (or keyboard shortcut, if you're so inclined) to quickly add 12 or 8 frame handles to my Viewer Timeline Range.

Here's the code to add to your Menu.py file in your .nuke folder:

def newViewerRange12():
  # Get the node that is the current viewer
  v = nuke.activeViewer().node()
  # Get the first and last frames from the project settings
  firstFrame = nuke.Root()['first_frame'].value()
  lastFrame = nuke.Root()['last_frame'].value()
  # get a string for the new range and set this on the viewer
  newRange = str(int(firstFrame)+12) + '-' + str(int(lastFrame) - 12)
  v['frame_range_lock'].setValue(True)
  v['frame_range'].setValue(newRange)


def newViewerRange8():
  # Get the node that is the current viewer
  v = nuke.activeViewer().node()
  # Get the first and last frames from the project settings
  firstFrame = nuke.Root()['first_frame'].value()
  lastFrame = nuke.Root()['last_frame'].value()
  # get a string for the new range and set this on the viewer
  newRange = str(int(firstFrame)+8) + '-' + str(int(lastFrame) - 8)
  v['frame_range_lock'].setValue(True)
  v['frame_range'].setValue(newRange)

# Add the commands to the Viewer Menu
nuke.menu('Nuke').addCommand('Viewer/Viewer Handles - 12f',
"newViewerRange12()")
nuke.menu('Nuke').addCommand('Viewer/Viewer Handles - 8f',
"newViewerRange8()")

Naturally, if you only ever deal with one duration for your frame handles, you can add just one of the functions, but I like having the flexibility of both options.

That Jake, he sure is good with the Python code, isn't he?

Update - 2014-10-25

The release of Nuke 9 is just around the corner and its revamped Viewer interface brings with it a small bug in my Viewer Frame Handles code (allegedly).

Design decisions in Nuke's new big brother, Nuke Studio, have made their way into the standalone app (reportedly) and now require the Frame Range Lock to be set before the new Frame Range is defined (or so I hear). Keen observers will notice that the last 2 lines of the newViewerRange functions above have been swapped to reflect this change.

According to a friend who's not me, the old code will still work in Nuke 9, but requires you to have existing In and Out points prior to running the command or run the command twice.

If you're planning on using this tool with Nuke 9 and Nuke Studio, you should update your Menu.py file now. The updated code will run properly in both Nuke 8 and Nuke 9 (so the story goes).
A Better FrameHold for Nuke

Update: March 22, 2021

This gizmo is broken in Nuke 13, but it's okay! After almost 7 years (yikes), Nuke has added this feature to its native FrameHold node.


The FrameHold node in Nuke is one of my most commonly used tools when doing Roto/Paint/Clean-Up VFX work. When I'm creating patches to replace objects I've removed, I scrub through the sequence, looking for a frame that will work for my patch and, when I find one, I add a FrameHold node and start working.

Since, 99% of the time, my play-head is sitting on the frame I want to use for my FrameHold when I add the node, it would seem smart for the node to have the ability to grab that frame number, rather than requiring me to suffer the indignity of typing it into a parameter box.

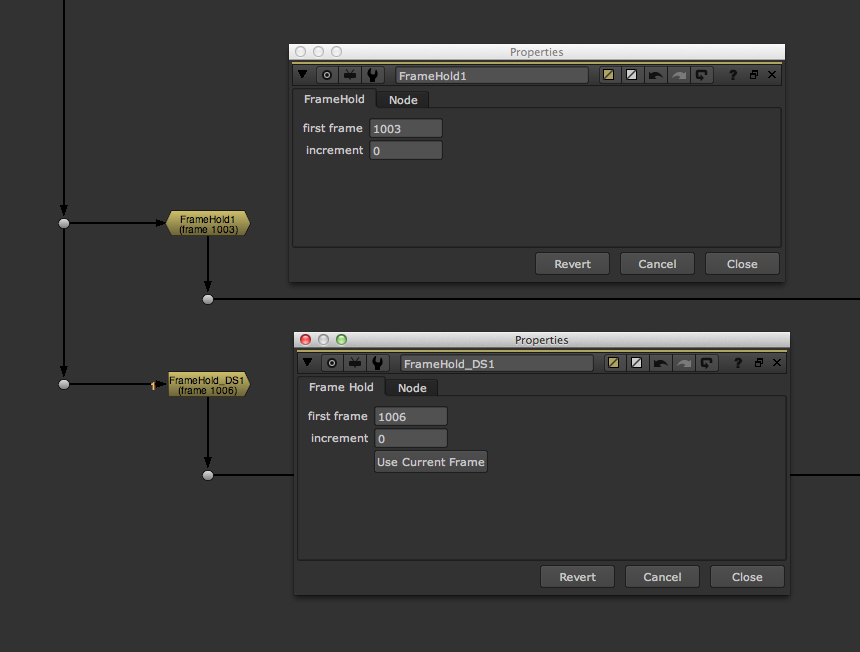
 On top, the old, dumb FrameHold. Below, my smart, handsome, new FrameHold.
On top, the old, dumb FrameHold. Below, my smart, handsome, new FrameHold.

I've created a gizmo called FrameHold_DS that adds exactly one feature to the standard FrameHold node; a "Use Current Frame" button. I submitted this as as feature request to The Foundry a few months ago, but why wait for a software update for such a simple feature.

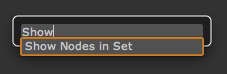
As ugly as it is to use the "_DS" suffix for the node name, I wanted to make sure my version of the node would always show up in the Tab+Search tool when I started typing "FrameHold".

To Gizmo, Or Not To Gizmo

I've mentioned, on numerous occasions, that I prefer to create ToolSets over Gizmos because of their ease of installation, modification, and general use. Well, one thing Gizmos can do that ToolSets cannot is automatically open their properties pane as soon as the node is added to the node graph. And since the entire point of creating a custom FrameHold node is to make mine more efficient than the built in node, it would seem that use of a Gizmo is required to give this single-node-tool feature parity with the original.

To that end, here is the code required to add the Gizmo to the interface. Drop it into your menu.py file in your .nuke directory.

toolbar = nuke.menu("Nodes")
gzmos = toolbar.addMenu("Gizmos")
gzmos.addCommand("FrameHold_DS", "nuke.createNode('FrameHold_DS')")

And here is the link to download the Gizmo. Save it in the same .nuke folder, with your menu.py file.

Download: FrameHold_DS Gizmo

Node Sets in Nuke

UPDATE: A newer version of this plugin exists here.

The story goes like this. It may sound familiar.

You're working on an animation in your favorite node-based compositing application, and you want to make a timing change. The first half of the animation is perfect, but it should hold a little longer before it finishes, to better match the background plate.

Problem is, you've got animated nodes all over your script, and all of their keyframes need to move in sync. Transform nodes, Grade nodes, GridWarp nodes.

You zoom in and move around your script, looking for nodes with the little red "A" in the upper right corner.

No, not that node. That one's for that other asset and it doesn't need to move.

Okay, got 'em all open? Now switch the the Dope Sheet, grab everything after frame 75 and slide it to the right a few frames. Done?

Let's watch the new timing.

Shit. Forgot one.

Which one?

Oh, here it is. Wait. How many frames did the other 6 nodes move?

Sigh.

CMD+Z. CMD+Z. CMD+Z. CMD+Z. CMD+Z. CMD+Z.

Okay, are they all open this time? Good. Now slide them all together.

Done? Let's watch it.

Better.

10 Minutes And 20 Additional Nodes Later.

Well...now I need a little less time between frames 30 and 42.

Dammit.

Feature Request

This is the annoying scenario I found myself repeating about a dozen times on a recent project, so I sent an email to The Foundry's support team, requesting the addition of a feature I described as "Node Sets".

A Node Set is an arbitrary collection of nodes that can be opened all at once with a single command. New nodes can be added as the script grows, or removed if they're no longer needed.

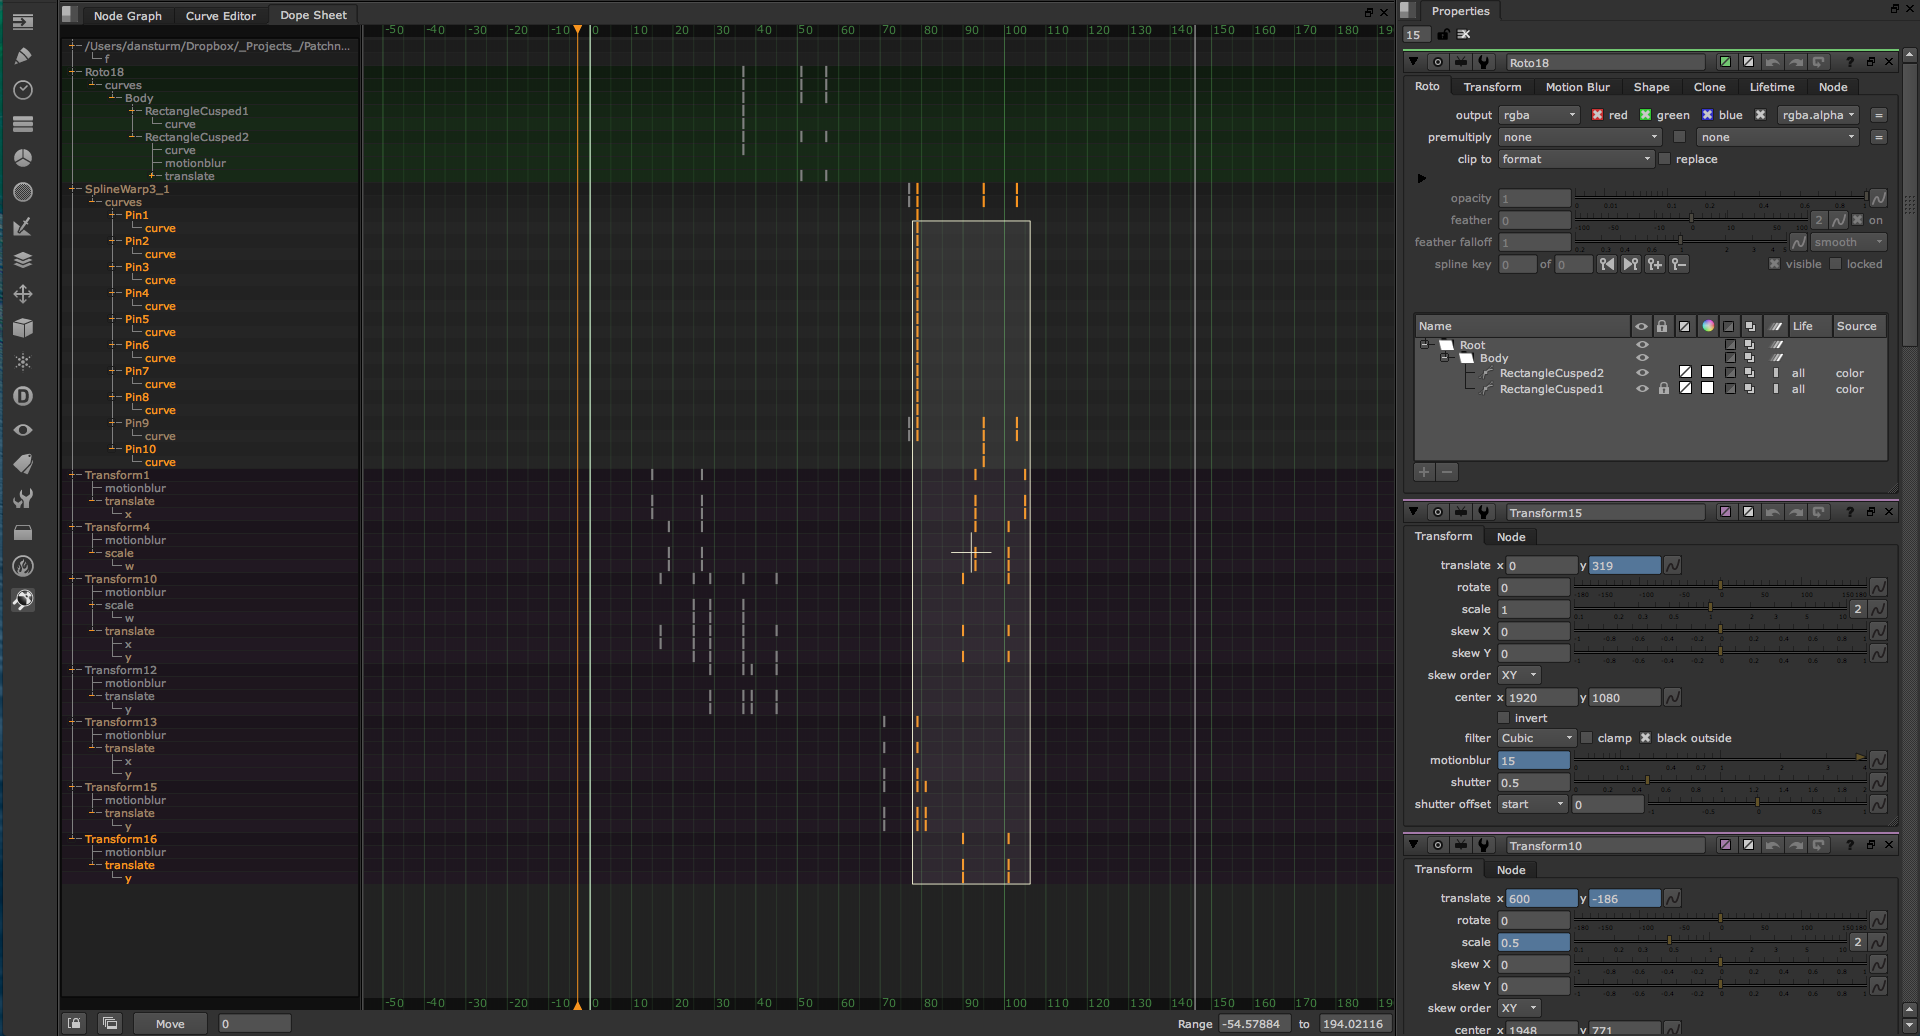
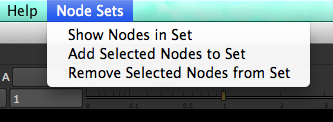
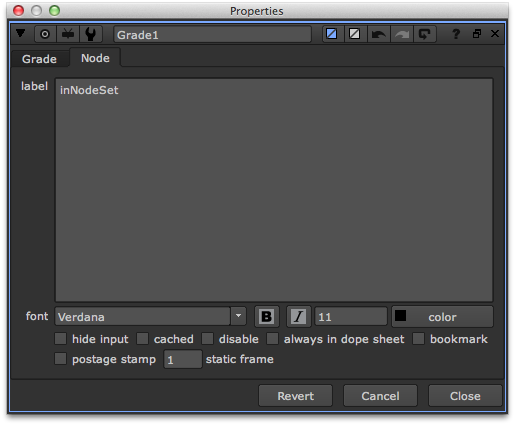
Along with my feature request, I provided these two screenshots to help explain:

What I received back from Jake, my new best friend at The Foundry Support, was the following script:

# This function opens the control panels of
# all the nodes with "inNodeSet" on their label

def showOnlyChosenNodes():
  for node in nuke.allNodes():
    if "inNodeSet" in node['label'].value():
      print node.name()
      node.showControlPanel()
    else:
      node.hideControlPanel()

# This function adds "inNodeSet" to a
# new line on the label of all the selected nodes

def labelNodes():
  for node in nuke.selectedNodes():
    label = node['label'].value()
    if 'inNodeSet' not in label:
      node['label'].setValue( label +  '\ninNodeSet')

# This function clears the label of
# all the selected nodes

def unLabelNodes():
  for node in nuke.selectedNodes():
    label = node['label'].value()
    if 'inNodeSet' in label:
      node['label'].setValue( label.replace('\ninNodeSet','') )

# These commands create a new menu item with
# entries for the functions above

nuke.menu('Nuke').addCommand('Node Sets/Show Nodes in Set', "showOnlyChosenNodes()")
nuke.menu('Nuke').addCommand('Node Sets/Add Selected Nodes to Set', "labelNodes()")
nuke.menu('Nuke').addCommand('Node Sets/Remove Selected Nodes from Set', "unLabelNodes()")

For those of you who don't speak Python, allow me explain what's happening here. Once added to your Menu.py file, the script creates 3 tools in a new menu within Nuke.

Just as I requested, I have the ability to add or remove selected nodes from the group, then, when I need to make a change, open all of those nodes with a single command.

Magic.

Not Magic

What the script is actually doing is tagging the nodes. No, Nuke did not suddenly or secretly gain the ability to add tags to things, it's cleverly using the label section in the Node tab to hold the inNodeSet text. The Show Nodes in Set command simply scans all the nodes in your script for nodes with inNodeSet in their labels, and opens them. Simple. Smart.

As a result, yes, you can add the inNodeSet text to the label field manually, rather than using the new menu command, and the Show Nodes in Set command will find it, but who would want to do such a barbarous thing?

Customization

As with all commands in Nuke, a keyboard shortcut can be added to these commands to make the process even quicker. But, since I don't particularly enjoy cluttering up my menu bar with unnecessary menus, nor do I enjoy having more keyboard shortcuts than I can remember (I totally already do), I opted to move the commands into the Nodes menu. This is easily done by swapping the last 3 lines of Jake's script with these lines:

toolbar = nuke.menu("Nodes")
nsets = toolbar.addMenu("Node Sets")
nsets.addCommand('Show Nodes in Set', 'showOnlyChosenNodes()')
nsets.addCommand('Add Selected Nodes to Set', 'labelNodes()')
nsets.addCommand('Remove Selected Nodes from Set', 'unLabelNodes()')

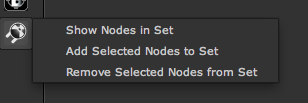
Here's where my tools now live.

I do this for one major reason; having these tools available in the Tab + Search tool. For those unfamiliar, Nuke has a built in tool similar to Spotlight or LaunchBar that allows you to press Tab then type the name of the tool you're looking for, avoiding the need to have keyboard shortcuts for every type of node.

Current Limitations

This being a bit of a hack, there are naturally a few limitations. First and foremost, using this tool will delete anything you already had in the label field of a node. I doesn't support the ability to add a tag to the text in the label field. The tag has to be the only thing in the label field.

Secondly, once you realize how useful this is, you may want to have more than one Node Set at your disposal. The good news about this current limitation is that you can very easily create as many node sets as you want by duplicating the code and changing the inNodeSet tag to something like inNodeSet2.

Of course, with multiple node sets, it'd be ideal if you could include a given node in multiple sets at the same time, but like I mentioned, this is not a real tagging system. If real tagging ever makes its way into the application, I imagine such a thing will then be possible.

Update - 2014-06-25

I emailed my pal Jake again, telling him how much I appreciate his work on this script, and you'll never guess what he did. He sent me an updated version of the script that adds the tag to the node label without overwriting the current text in the field.

Not only is this great for general usability, it means we can add a node to multiple Node Sets at the same time. We now have a real tagging system built into Nuke. How great is Jake? Seriously.

One thing I will note; if you are planning on using multiple Node Sets, you'll want to change the default tag to inNodeSet1. If you leave it as inNodeSet, it will also show up in results for other tags, like inNodeSet2.

Attribution

If it wasn't clear before, all credit for this script goes to The Foundry and their awesome support team. They continue to be one of my favorite companies, specifically because they offer great support in addition to their great products.

I'm incredibly happy to have this annoyance removed from my workflow, and I hope you are too.

Creating Unique Footnotes with MultiMarkdown Metadata

Footnotes. Writers love ’em. But if you’re not paying proper attention when creating them, you can quickly make a mess of your website or blog. In fact, until very recently, this site had broken footnote links all over the place. I’m going to pretend like none of you noticed, and tell you about how I fixed the problem, gently glossing over my past stupidity.

Each post on this site starts as a MultiMarkdown document in Sublime Text 2. When it’s complete, I preview it in Marked, then copy the HTML code and paste it into a new Squarespace post.

The Problem

Thing is, since I’m creating the post locally on my Mac, with no reference to the site as a whole, Marked has no way of knowing which footnote IDs have already been used, and which have not. Therefore each post labels its first footnote fn:1 and subsequent footnotes increase by 1, as you’d expect. The problem occurs when viewing the home page that shows 10 posts on a single page, each with their own fn:1. When you click on the [1] link in the body text, where do you think it’s going to take you? That’s right, to the first footnote it finds with the label fn:1, regardless of which post it was intended to link to [1].

Now, Marked has a setting in its preference pane called Use Random Footnote IDs which is used “to avoid conflicts when multiple documents are displayed on the web.” So this is already a solved problem, right? Probably, but there’s a part of my brain that feels uneasy about using randomly generated IDs. I’m sure using this feature would solve my problem and everything would be fine, but since I’m a nut, I want to control exactly how these unique footnotes are created.

Enter MultiMarkdown. MultiMarkdown includes a number of enhancements to the original Markdown syntax [2], including support for customizable metadata fields [3]. So, I created a custom metadata key called footnote:. Here’s what my boilerplate MultiMarkdown header looks like [4] :

Title:            
Author:         Dan Sturm      
Date:           %snippet:ddate%  
Marked Style:   ds_doc  
footnote:         

Now, whatever keyword I choose to add after the footnote: label will show up in the HTML header as [5].

Make With The Magic

The next thing I needed was a script to scan the HTML for the metadata key, and add it to all the footnote IDs, turning fn:1 into fn:my-footnote-key1.

import sys  
import re  
import subprocess


#   Open the file and convert it to searchable text  

fileText = open (sys.argv[1], "r+")  
searchText = fileText.read()


#   Pull the MultiMarkdown metadata key from the header  

mmdkey = re.search("(?<=\"footnote\" content=\")(.*)(?=\"/>)", searchText, re   .I)  
mmdkey = mmdkey.group()


#   Create the new footnote IDs  

fnnew = ("fn:", mmdkey)  
fnrefnew = ("fnref:", mmdkey)  

fnnew = "".join(fnnew)  
fnrefnew = "".join(fnrefnew)


#   Swap the footnote IDs for the new ones  

fnfix = re.sub("(fn:)", fnnew, searchText)  
fnreffix = re.sub("(fnref:)", fnrefnew, fnfix)


#   Strip HTML Header and Body tags. Copy the result to Clipboard  

def setClipboardData(data):  
  p = subprocess.Popen(['pbcopy'], stdin=subprocess.PIPE)  
  p.stdin.write(data)  
  p.stdin.close()  
  retcode = p.wait()  

fixStripped = re.sub("(?s).*(\n)\n", "", fnreffix)  
fixStripped = re.sub("(?s)\n\n\n().*", "", fixStripped)  
setClipboardData(fixStripped)


#   Write the updated code to the same file  

# fileText.seek(0)  
# fileText.write(fnreffix)  
# fileText.truncate()  
# fileText.close()  

Click here to download the script.

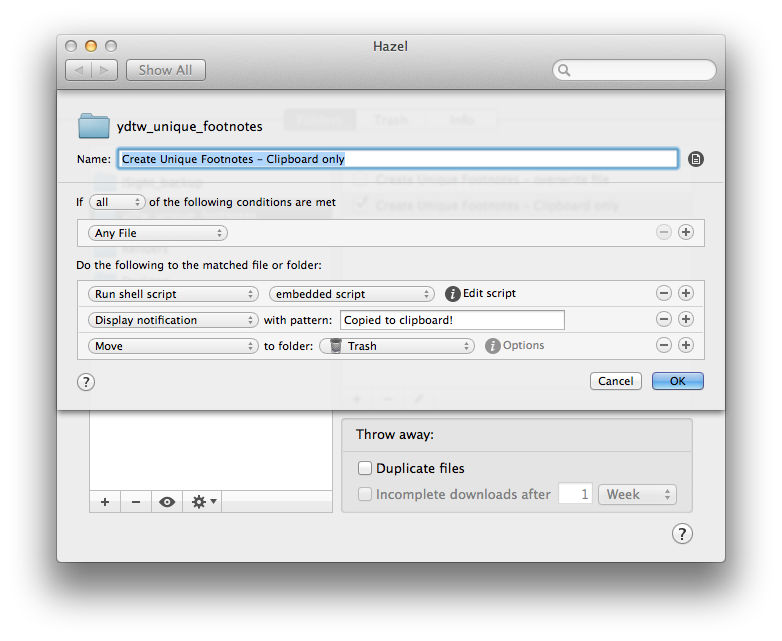
Now that we have that out of the way, let’s talk about how to actually use this code. I’m using a Hazel [6] rule pointed at a folder called Create Unique Footnotes. It looks like this:

Simply put, it watches the folder for a new file and, when it sees one, it runs the script, displays a confirmation message, then trashes the now-unnecessary file, leaving the cleaned up, new code on the clipboard for easy pasting into your CMS of choice. So, when I like what I see in Marked and I’m ready to post, I hit CMD+S and save the HTML file to my Create Unique Footnotes folder, head over to my site, and hit CMD+V into a new post.

A Small Rabbit Hole

There are a few specific things I want to point out, just to make sure we’re clear.

The new HTML code is copied to the clipboard by the Python script, not by the Hazel rule. My workflow involves pasting HTML code into Squarespace, not uploading an HTML file and, since my MultiMarkdown file is the master copy of the post, that’s why I’m deleting the HTML file after running the script.

The HTML file being used as input for the script is a complete HTML document with a header, body tags, the whole shebang. I don’t need those extra bits when I’m pasting the code into Squarespace, so the Python script removes them before placing the code on the clipboard. In fact, the code on the clipboard looks exactly like what you see when you toggle the Switch to HTML Source View button in Marked [7] while previewing your MultiMarkdown document.

Another important note; keen observers will notice the last four lines of the Python script are commented out. That code is there for people who actually want a fully processed HTML document with fixed footnote IDs. Un-commenting-out [8] those four lines will write the fixed code over the original HTML document, while maintaining the header, et cetera. If you plan on using this workflow, you’ll want to remove the step in the Hazel rule that throws away the HTML document. I’d suggest you change that part of the rule to move the new HTML file to the Desktop as a sort of visual confirmation that the file has been updated.

I Believe Some Recognition is in Order

When I initially conceived of this idea I hadn’t the slightest idea how to best go about tackling it. I am not a programmer in any sense of the word. A Twitter conversation with my pal Sid O’Neill revealed that REGEX is the method by which I could find and replace items in the code. I don’t know how to do that, so…

Patterns is a Mac app for creating Regular Expressions that I’ve heard a number of people compliment in the past. It lets you see a live preview of the current pattern matches and, when you’ve got the selection you want, will generate the appropriate code for you; Python in my case. Completely indispensable and only $2.99.

Next, of course I have to thank Stack Overflow from whence I acquired some REGEX knowledge and code. Patterns comes with a great Reference Sheet for REGEX commands, but some of the descriptions still left me befuddled. Stack Overflow also linked me to…

This article by Gabe at Macdrifter, where I got the code that places the HTML on the clipboard. It was exactly what I needed, so I took it. And I would have gotten away with it if it wasn’t for you pesky kids and…nevermind.

In any case, high-fives all around. Go team.


  1. Some of what I’m describing is obfuscated by the use of Bigfoot for my footnotes, specifically the numeral for each footnote, but the problem remains. Let’s move on.  ↩

  2. Like footnotes, for one.  ↩

  3. You can learn all about MultiMarkdown Metadata here.  ↩

  4. Always invoked via TextExpander.  ↩

  5. Obviously, I need to choose a unique key for each post or this whole exercise is pointless.  ↩

  6. You do use Hazel, don’t you? Good.  ↩

  7. It’s in the upper right corner of your document, next to the fullscreen button.  ↩

  8. That’s so not a word, is it?  ↩

Open Last QuickTime File Macro

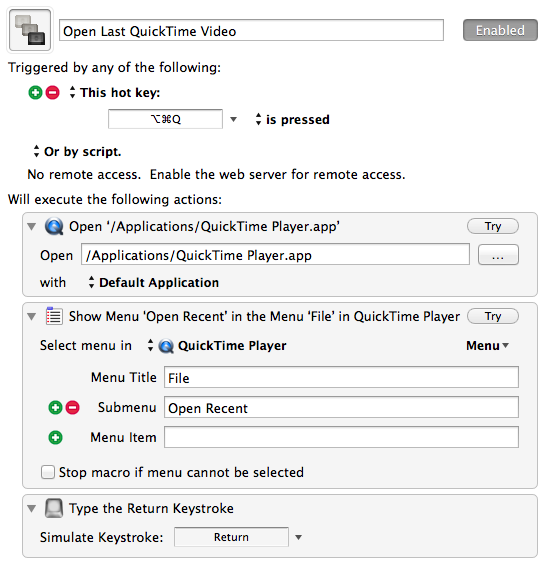
Yesterday, Dr. Drang had a nice post about creating a keyboard shortcut for the Open Recent menu item in BBEdit using Keyboard Maestro. I purchased Keyboard Maestro a few months ago and have been meaning to find some time to play with it. I’ve also been meaning to find a way to open the most recently viewed video in QuickTime with a global keyboard shortcut. Let’s skip right to the punchline.

Throughout the course of a project, I spend a lot of time referring to the most recent cut of a video alongside notes from the client. Once I know the next shot or note I’m going to address, I close the cut, my notes, and get to it. Since my notes live in nvALT, they disappear and reappear with a quick ⌃Z. Now, no matter what I’m doing, I can quickly summon the video file with a keyboard shortcut as well.

A simple tool that removes way more friction that you’d probably guess. It’s a good thing.

Managing Disk Cache (with a Hammer)

Throughout the course of a given project, I use a handful of applications to complete my work. At the moment, I edit in Avid MediaComposer and Final Cut Pro 7. I do my VFX work in NukeX. I review shots and conform sequences in Hiero. And I do final color correction in AfterEffects with Red Giant Colorista II. There’s an obvious advantage to using the right tool for the task at hand, but there’s a caveat that I almost never remember until it smacks me right in the face: disk space.

I’m not talking about the space required for digital negatives, plates, renders, or project files. No, the piece I always manage to forget is the massive disk cache each application in my workflow creates on my startup disk [1]. With single frames of a sequence ranging between 5 and 30Mb, and individual shot versions reaching well into double digits, disk cache can take up a ton of space. And since cache files are created whenever an element is changed and viewed, it’s not an easy task to estimate how much space will be used by a project ahead of time.

Most applications, including every application I use, have built in preferences designed to limit the size of the disk cache. Most also feature a big button labeled “Clear Disk Cache”. These preferences are great if you spend all your time in a single application, but are of little consolation when you’re halfway through previewing a shot in Nuke and OS X pops up telling you your startup disk is full. Once you’re in that sad, embarrassing moment, good luck getting AfterEffects to open so you can hit that “Clear Cache” button.

“To the Finder,” you say? Even if the Finder were responsive when your startup disk had less than 50Mb of free space, are you the kind of person that keeps a sticky note on your monitor listing the paths to all the buried, hidden cache folders for each application? Neither am I.

Historically, I’ve gone straight to my project’s Renders folder and deleted my 2 oldest exports, giving me about 6Gb of breathing room to go hunt down the various disk hogs. Not a great solution. What would be ideal is the ability to hit one keyboard shortcut, see a list of which applications are taking up space and, more importantly, how much space, then quickly purging the unnecessary files.

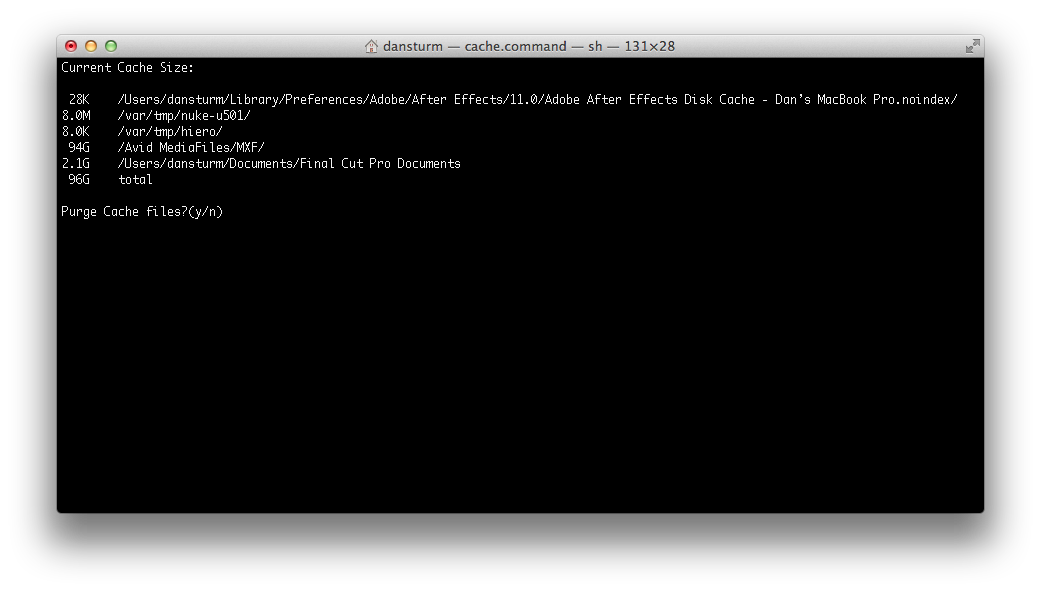
 Normally, the sizes for AfterEffects, Nuke, and Hiero are in the double digits of Gigabytes. This screenshot was taken after using the script as intended.
Normally, the sizes for AfterEffects, Nuke, and Hiero are in the double digits of Gigabytes. This screenshot was taken after using the script as intended.

The Script

cache.command:

#!/bin/sh  

clear  
echo Current Cache Size:  
echo      
du -c -h -s "/Users/dansturm/Library/Preferences/Adobe/After Effects/11.0/Adobe After Effects Disk Cache - Dan’s MacBook Pro.noindex/" "/var/tmp/nuke-u501/" "/var/tmp/hiero/" "/Avid MediaFiles/MXF/" "/Users/dansturm/Documents/Final Cut Pro Documents"  

echo      
read -p "Purge Cache files?(y/n) " -n 1 -r  
echo      
if [[ $REPLY =~ ^[Yy]$ ]]  
then
    rm -r "/Users/dansturm/Library/Preferences/Adobe/After Effects/11.0/Adobe After Effects Disk Cache - Dan’s MacBook Pro.noindex/"*
    rm -r "/var/tmp/nuke-u501/"*
    rm -r "/var/tmp/hiero/"*
    echo    
    echo Done!
    echo      
fi  

The script displays the space taken up by each application, the path to that cache folder, and a total of space used. It then prompts for a y/n input to delete the cache files.

Since managing Avid and Final Cut Pro media requires a bit more attention and nuance than a dumb hammer like this can provide, their disk usage is listed, but their files are not removed. If you modify the script to delete Avid of FCP media, allow me to preemptively say “I told you so” when your project becomes corrupted.

Details

I run the script with a FastScripts keyboard shortcut. I wanted to shortcut to open a new Terminal window to display the information, so the keybaord shortcut actually calls a second short script called cache.sh which takes care of that part:

#!/bin/sh  

chmod +x /Path/To/cache.command; open /Path/To/cache.command  

The paths for the cache folders are hard coded into the main script and, as I mentioned, not all items listed are deleted. I like to see as much information as possible, but manage the deletion list more carefully.

For me, the main offenders of disk cache consumption are AfterEffects and Nuke which, together, average nearly 200Gb of disk usage. Once I’ve dealt with those 2 applications, I don’t usually need to go hunting for more free space.

Next time I accidentally inevitably fill up my startup disk with cache files, it’ll take seconds to rectify, rather than a half hour of excruciatingly slow, manual effort.

Hooray for automation!


  1. While it’s true that, in almost every application, you can re-map the disk cache folder to any disk of your choice, the entire point of a disk cache is to have the fastest read/write speeds possible, and no disk I own is faster than my rMBP’s internal SSD.  ↩

r_ScreenComp ToolSet for Nuke

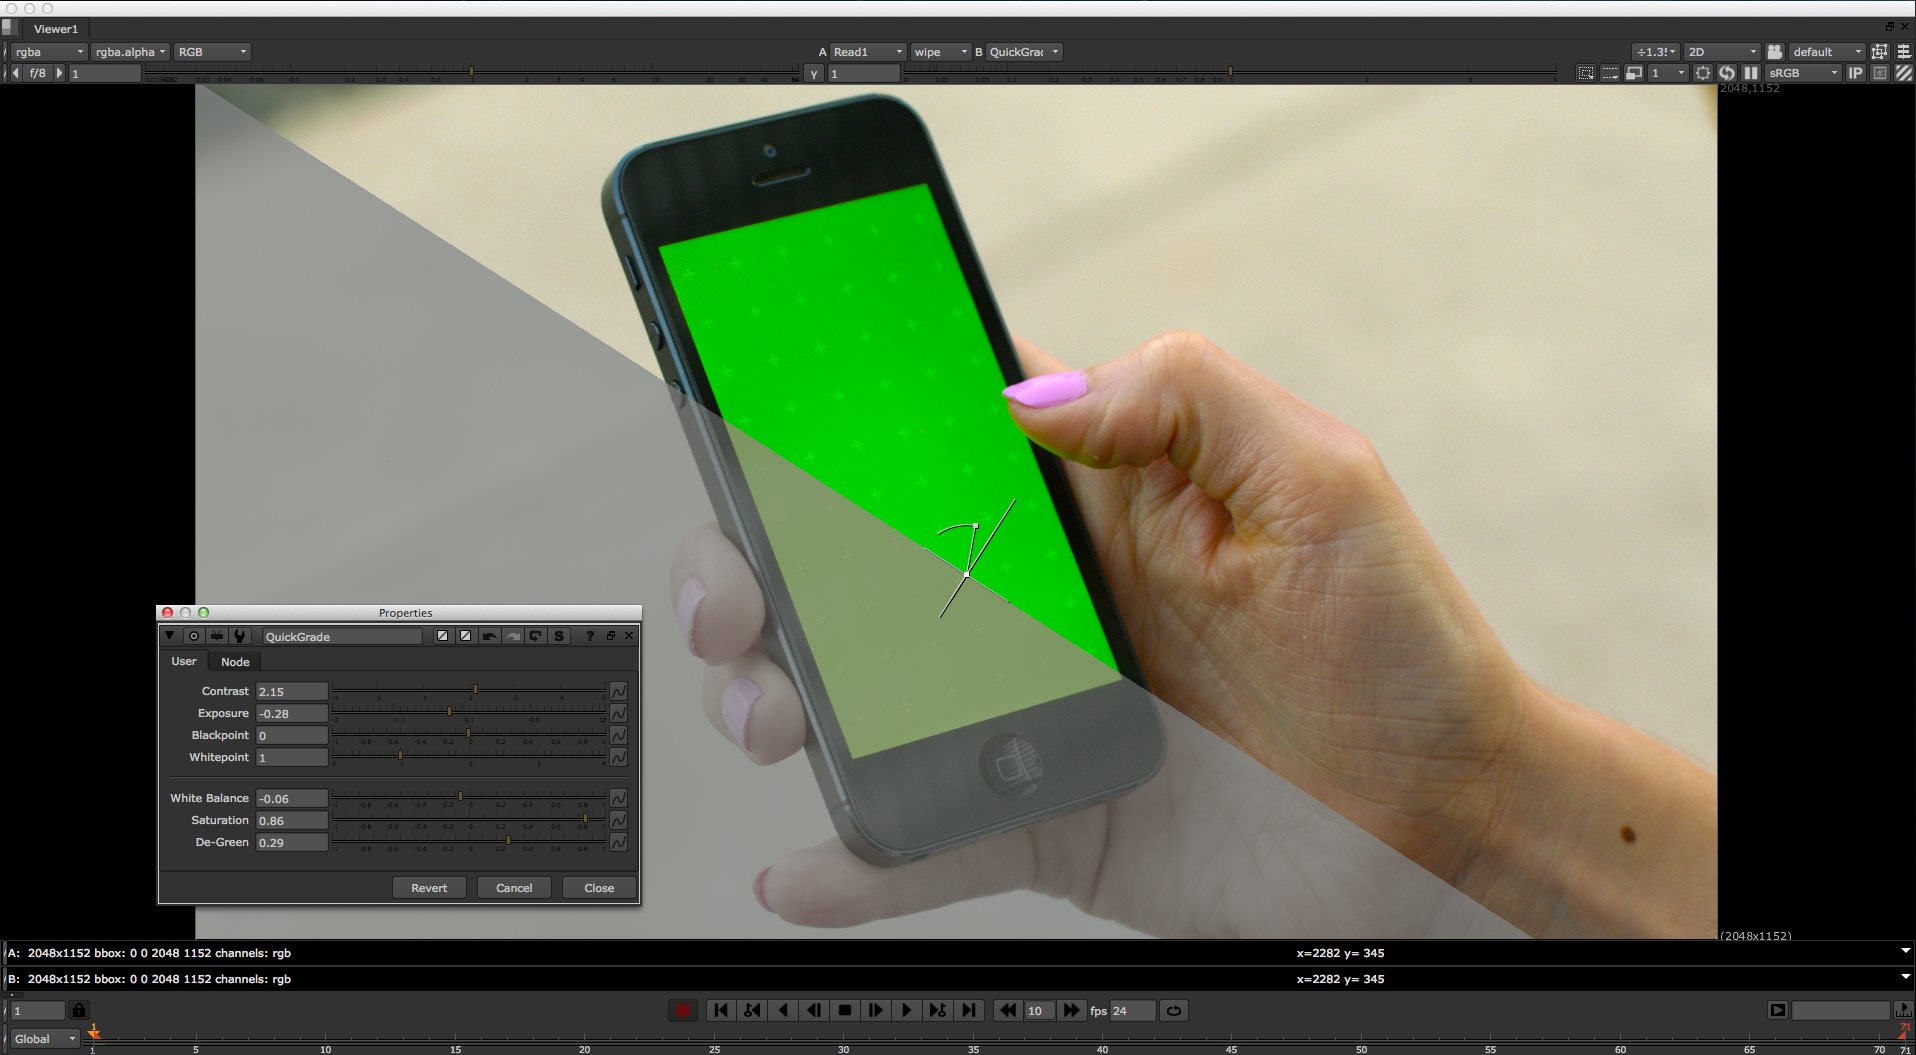
In my previous post, I said I created QuickGrade so I could quickly balance my Log footage and start compositing more quickly. Based on the footage in the accompanying screenshot, you could probably guess what came next; replacing the screen on the device.

Creating a successful screen comp isn’t rocket science, but since it’s a very (very) common compositing task and, in many cases, the entire focus of a commercial, any tool that helps you work more quickly, while maintaining quality, is worth it’s weight in met-deadlines.

In uncharacteristic fashion, I’ll turn this post over to myself in video form to explain further.

There’s no chance I could have finished the number of shots I was assigned, in the time I had allotted, if it weren’t for this ToolSet. If you do a lot of screen comps in your day-to-day, even if you don’t use my ToolSet [1], I cannot recommend highly enough that you automate as much of the process as possible.

Download


  1. Installing a Nuke ToolSet is as easy as dropping the R_ScreenComp.nk file into \.nuke\ToolSets\  ↩

QuickGrade Tool For Nuke

Lately, I’ve been doing a lot of VFX work with Alexa Log-C footage. Compositing with Log footage generally requires a Viewer LUT so you can actually see what you’re doing. I don’t like using LUT files because they’re fixed color transformations and usually need to be supplemented with additional color tools on a per-shot basis. While I was working, I found myself repeatedly creating the same “custom viewer LUT” setup, so I decided to make it a dedicated tool called QuickGrade.

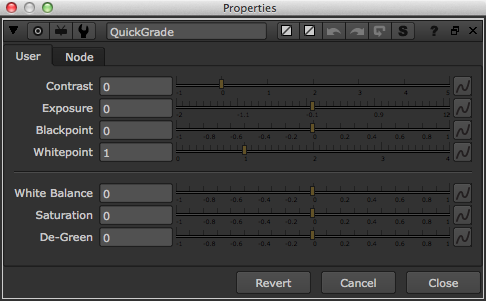
 QuickGrade default parameters.
QuickGrade default parameters.

QuickGrade isn’t really intended to be a creative color tool, it’s built to quickly balance your footage and make it look “correct”. I decided which controls were relevant by noticing that nearly all Alexa Log-C footage I encountered required the same adjustments:

  • Contrast: Obviously. It’s built to be flat.
  • Exposure: After yanking on the contrast, it usually needs an exposure adjustment.
  • Saturation: It’s not inherently overly desaturated, but it benefits from a boost.
  • Green-cast: Alexa Log-C footage typically needs a healthy amount of “de-greening”.

For added flexibility, I also included controls for White Balance, Black Point, and White Point. The controls in the top half of the node are for luminance, and the bottom half for color. Quick and simple.

Workflow

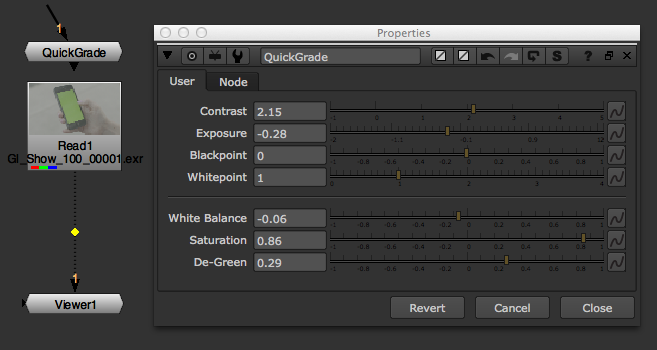
Typically, I drop this node into the Node Graph above the Read node, unconnected, and set it as the Viewer Input Process [1], but it works just as well when used like any other color correction tool.

 QuickGrade used as an Input Process.
QuickGrade used as an Input Process.

Not A Gizmo

QuickGrade is a ToolSet for Nuke, not a Gizmo. ToolSets are easier to install than Gizmos, they show up in your toolbar without needing to write any Python code, and they’re easier to modify later if you feel the need. Since the whole idea behind creating this tool was ease of use and speed, the easy, lazy, ToolSet won out over the less easy Gizmo.

To install a Toolset in Nuke, just navigate to your .nuke directory. In there will be a folder called ToolSets. Unzip the QuickGrade.nk file, drop it inside, and you’re done.

Update: 2015-08-21

Okay, so I changed my mind about the whole Gizmo thing. Gizmos, unlike ToolSets, automatically open their properties panes when added to the node graph, which is great. So, now you can choose from either option below.


Download: Nuke Gizmo


  1. Using a node (or group of nodes) as a Viewer Input Process is as easy as right-clicking on the node, selecting Edit\Node\Use as Input Process. Bam.

My Custom Nuke Defaults

After a few busy months of post work, I finally found a few days to reevaluate and improve my workflows and system preferences. Since I spend a majority of my time in NukeX, that’s where I decided to start.

I’ve got some new custom tools I built recently that I’ll share with you soon enough, but first things first, Nuke’s default state needed a little adjusting. Here are the items I added to my init.py [1] file that save me tons of time and headache.

init.py:

# Project Settings > Default format: HD 1920x1080  
nuke.knobDefault("Root.format", "HD")  

# Viewer Settings > Optimize viewer during playback: on  
nuke.knobDefault("Viewer.freezeGuiWhenPlayBack", "1")  

# Write > Default for EXR files: 16bit Half, No Compression  
nuke.knobDefault("Write.exr.compression","0")  

# Exposure Tool > Use stops instead of densities  
nuke.knobDefault("EXPTool.mode", "0")  

# Text > Default font: Helvetica Regular (in Dropbox folder)  
nuke.knobDefault("Text.font",   "/Path/to/Dropbox/fonts/HelveticaRegular.   ttf")  

# StickyNote > default text size: 40pt  
nuke.knobDefault("StickyNote.note_font_size", "40")  

# RotoPaint > Set default tool to brush, set default lifetime for brush and clone to "all frames"  
nuke.knobDefault("RotoPaint.toolbox", "brush {{brush ltt 0} {clone ltt 0}}")  

Explain Yourself

Since I don’t work in feature film VFX, the HD frame size is a no-brainer.

I do a fair amount of motion graphics animation in Nuke, so I often have the Curve Editor open. I’ve always been frustrated that Nuke never seems to be able to achieve realtime playback when looking at curves, so I ended up making adjustments, then switching back to the Node Graph to view my changes. Very annoying. The recently added “Optimize viewer during playback” button was the answer to my realtime problems [2]. Like all of these custom preferences, I use it so often, I want it to be on by default.

I comp almost exclusively in Open EXR image sequences. For me, 16bit Half Float with No Compression is the appropriate balance of file size and quality. By default, the Write node sets compression to Zip (1 scaneline) and it annoys the crap out of me to change it every time.

I love to use the Exposure tool, especially when color-correcting Log footage by hand [3]. But since I’m a filmmaker and a human being, I prefer to adjust exposure in Stops rather than Densities.

I set the Text node to use Helvetica by default and I keep the font in my Dropbox folder to make sure it’s always with me. Why? Because the default is normally Arial and seriously, are you kidding me?

I love using StickyNote nodes to write myself notes as I’m working. But because either my screen resolution is too high or I’m getting old and going blind [4], I always have to crank up the font size to read the damn things.

When I decide to use a RotoPaint node instead of a simple Roto node, it’s because I want to paint something. And more often than not, I want to paint or clone something for the entire duration of the shot, rather than just a single frame. Boom. Default.

What Else?

I would love to set the default feathering falloff in the Roto and RotoPaint nodes to smooth rather than linear, but I haven’t been able to figure out how to make that happen as of yet.

If you’d like to use these preferences in your Nuke setup, simply copy and paste the code into your init.py file in your .nuke directory. If you don’t have an init.py file in there, just open a text editor and make one.

Happy comping.

UPDATE – September 09, 2013, 04:55:04PM

As Joe Rosensteel pointed out on Twitter, another great tip is changing your 3D control type to Maya controls. I’m not a Maya user myself, but nearly all the 3D artists I work with are, and nothing makes them happier to help you out than saying, “Would you like to take stab at it? You know the 3D controls are the same as Maya’s”. And the 3D control type preference is super easy to adjust. It’s part of the GUI in the application preferences pane, under the Viewers tab.


  1. If you were unaware, you can modify Nuke’s default state by creating a file called init.py in your .nuke directory. The application loads your preferences on launch and it’s easy enough to add/remove settings without screwing up your install. More info on page 18 of the Nuke User Guide  ↩

  2. I don’t remember exactly which version introduced it, but it’s the button that looks like a snowflake to the left of the playback controls.  ↩

  3. Yes, I’m familiar with the concept of LUTs.  ↩

  4. Rhetroical.  ↩

Fountain Cheat Sheets Revisited

TL;DR: Click here for an online version of this Fountain Cheat Sheet

Thanks to recent releases of awesome apps like Highland and Slugline, Fountain, the plain text screenwritting syntax, has been getting a lot of attention. As Fountain newcomers are getting up to speed on the syntax, many have been searching for a Fountain cheat sheet for quick reference.

Highland and Slugline both include features that allow you to “just write” without having to think about syntax, but the promise of Fountain is its ability to be used in any application that takes text input. Thus, a quick reference guide may be of some use to recent plain text converts.

A little over a year ago I reproduced the Fountain syntax guide in a Cheaters page. And then I promptly forgot about it. It wasn’t until the release of Highland that I realized why I never used my own cheat sheet; it wasn’t a cheat sheet. It was a complete syntax reference manual; something that’s almost never useful when writing a screenplay.

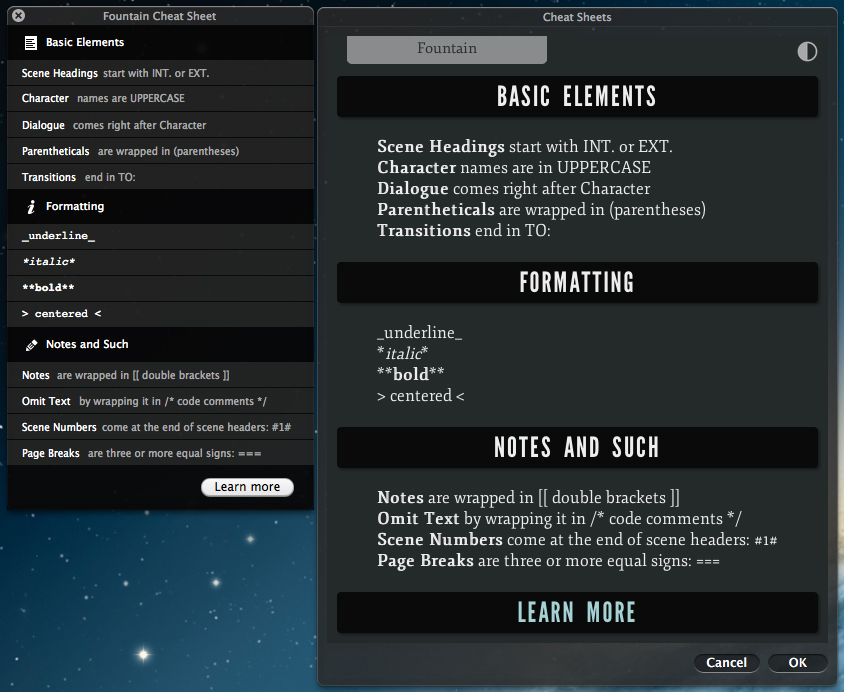
Highland ships with a beautiful built in Fountain cheat sheet. It’s short, simple and easy to use at a glance. So, naturally, I ported it to Cheaters so I could have it available at all times.[1]

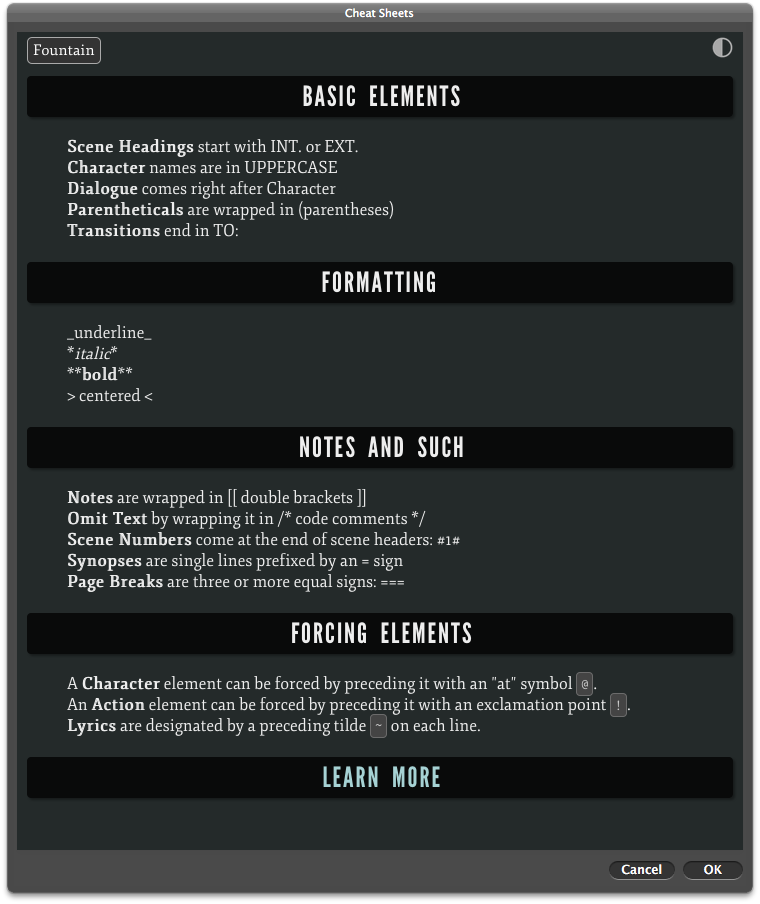
 Left: Highland Cheat Sheet, Right: Cheaters Cheat Sheet
Left: Highland Cheat Sheet, Right: Cheaters Cheat Sheet

If you’d like to use it, here’s the new Fountain cheat sheet and the previously created CSS file. Toss those files into the Cheaters cheatsheets and css folders, respectively, and add the link to the Cheaters app in the index.html file with the line:

<li data-preserve-html-node="true"><a data-preserve-html-node="true" href="cheatsheets/fountain_h.html">Fountain</a></li>

For more information on customization, head over to the Cheaters page on Brett Terpstra’s site. Happy writing and welcome to Fountain!


  1. I even included the “Learn More” link to the full Fountain syntax guide, should the need arise.


Update - 09/05/14

The cheat sheats have been updated with a Forcing Elements section to match the Fountain 1.1 spec.