Home

You're Doing That Wrong is a journal of various successes and failures by Dan Sturm.

Annotation Manager for Preview

During the process of making a video, I annotate a lot of images. For our outsourced paint and roto work, or for notes on a work-in-progress VFX shot, I'll draw on a video frame to illustrate what work needs to be completed.

Over the years, I've built some pretty handy tools to streamline this work. It typically starts from my timeline in Nuke Studio. As I scrub, when I see a shot that needs work, I hit a keyboard shortcut which does the following:

  1. Exports the frame I'm parked on, with burned-in slate information included
  2. Names the file with the name of the shot and the frame number
  3. Puts the file in a dated folder within the outbox of the project folder
  4. Opens the image in Preview
  5. Activates Preview's annotation tools

Not bad.

It's usually one or two dozen shots that I end up annotating per video. But recently, we had a project where that number hit triple digits. That project put a huge spotlight on some remaining friction in this process.

Oftentimes, there are multiple shots that need at least some of the same work done. These five shots need that thing removed. Three of them also need this other thing fixed, which is in these other seven shots, too. Just two of them need this thing over here. It's a lot of that.

Can I just annotate one image and write out a list of what needs to be done to which shot? No. Exacting clarity saves time, money, and sanity — none of which I typically have in surplus. So, I annotate a frame for every shot that needs work.

But it’s not that bad. I can copy and paste annotations from one image to another when there’s duplicate work [1] . This means I often have dozens of images open at once and use CMD+~ to move between them [2] .

Even better, I'm a responsible nerd with a clipboard manager (LaunchBar), so reusing lots of annotations is no big deal, right? This brings us to the actual problem.
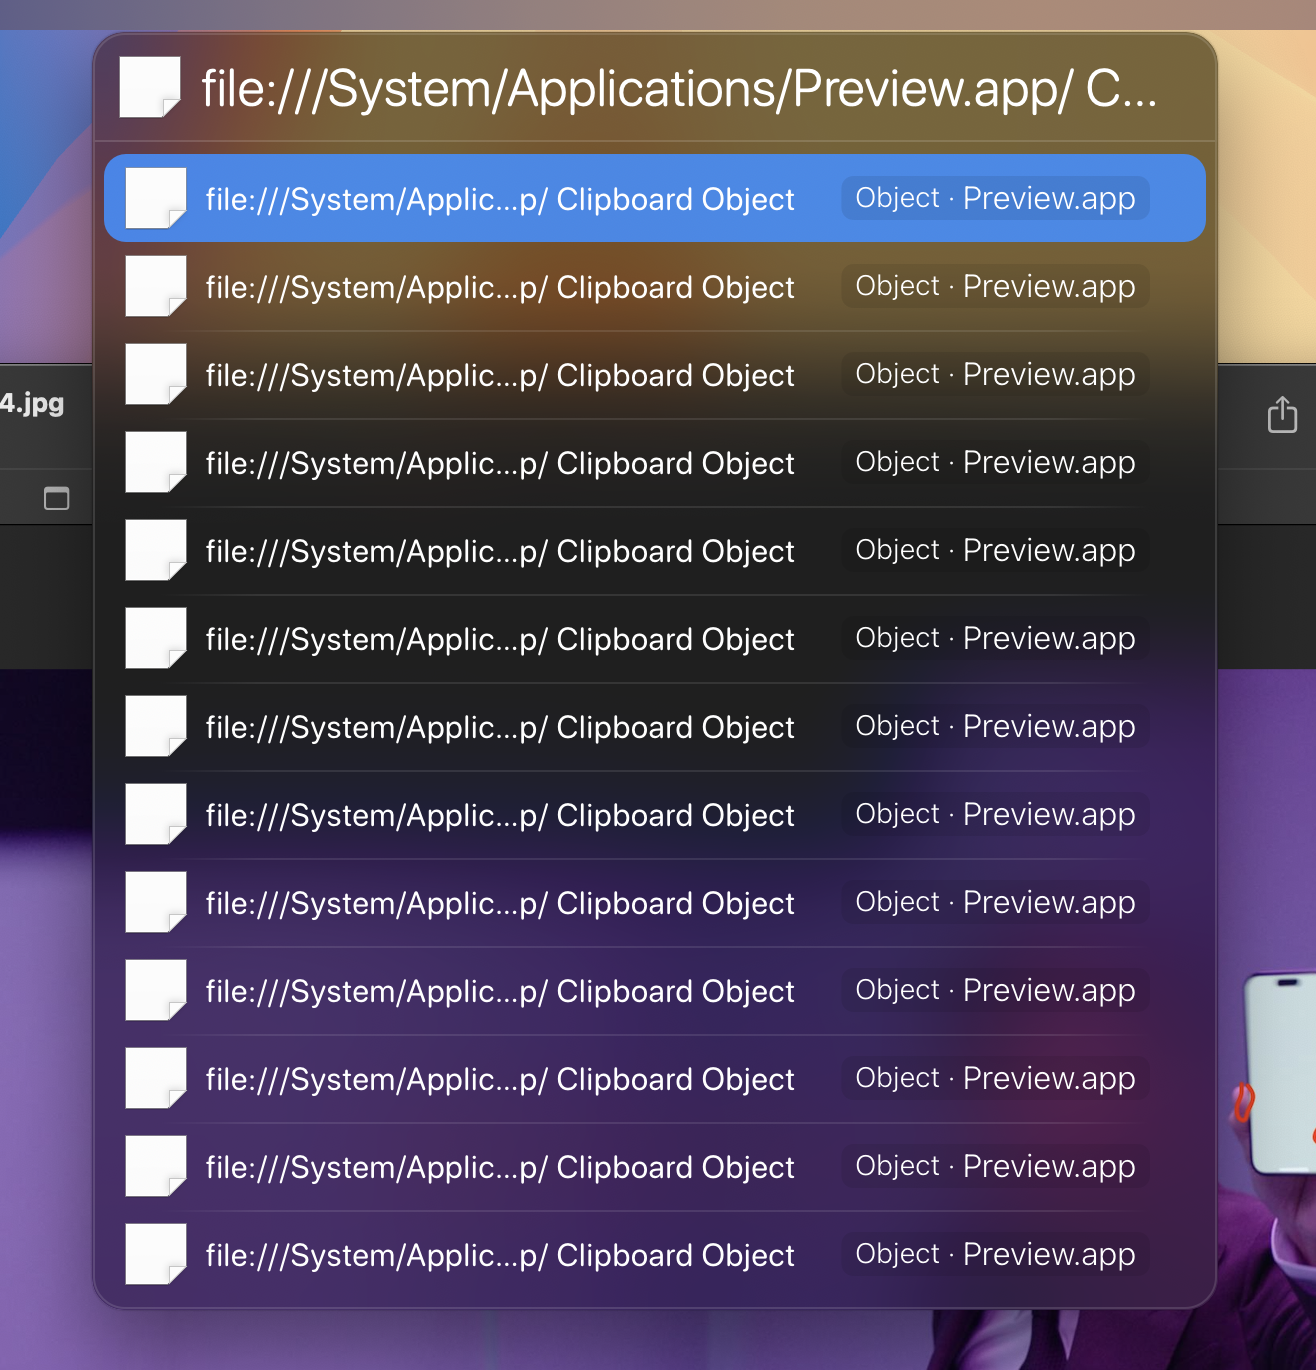
Which one of these is the text label and circles for the dirt on the left wall? Which one is for the dust on the laptop screen? Even if I did remember, as soon as I select and paste it, the order of the clipboard history is now different. Good luck playing the worst game of Memory ever.

What I needed was a clipboard manager that could copy groups of annotation objects from Preview, keep them in order, and allow me to add a label so I know what they are.

Usually, Python is my weapon of choice for automation. I've made plenty of little GUI tools with Qt, and I probably could have done the same here. But this time, I decided I'd try to make a Real Mac App, because why not.

This is what I came up with:
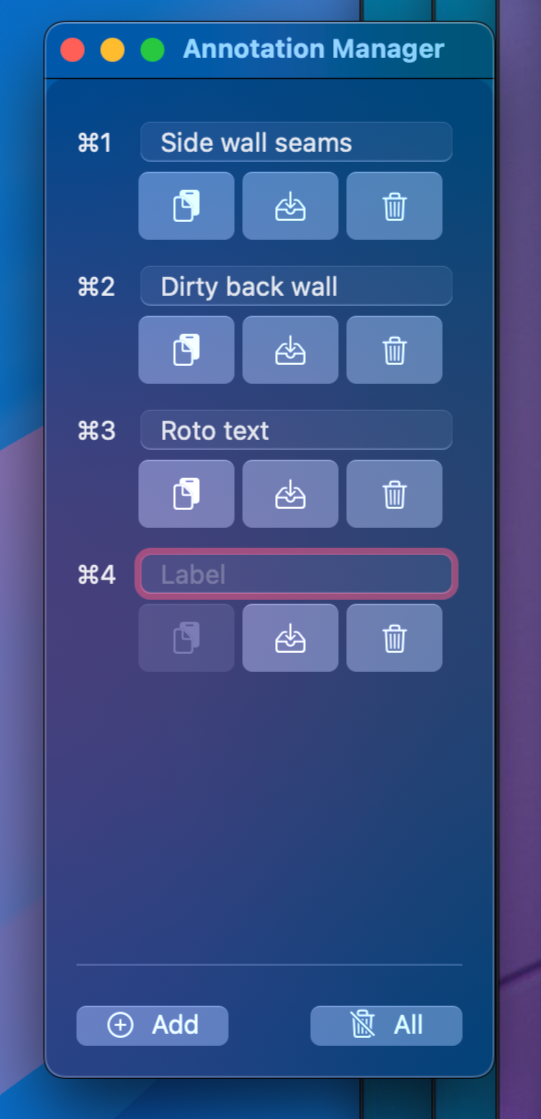
The app is always on top of my other windows for quick access. I can create and store as many annotations as I'd like. There are keyboard shortcuts for copying and pasting.

Each slot can hold any number of Preview annotation objects. Whatever annotations are selected when I hit "save" are stored as a single group, but once pasted into a new image, they're all still individually selectable and movable. The annotation slot can also be updated later, if needed.
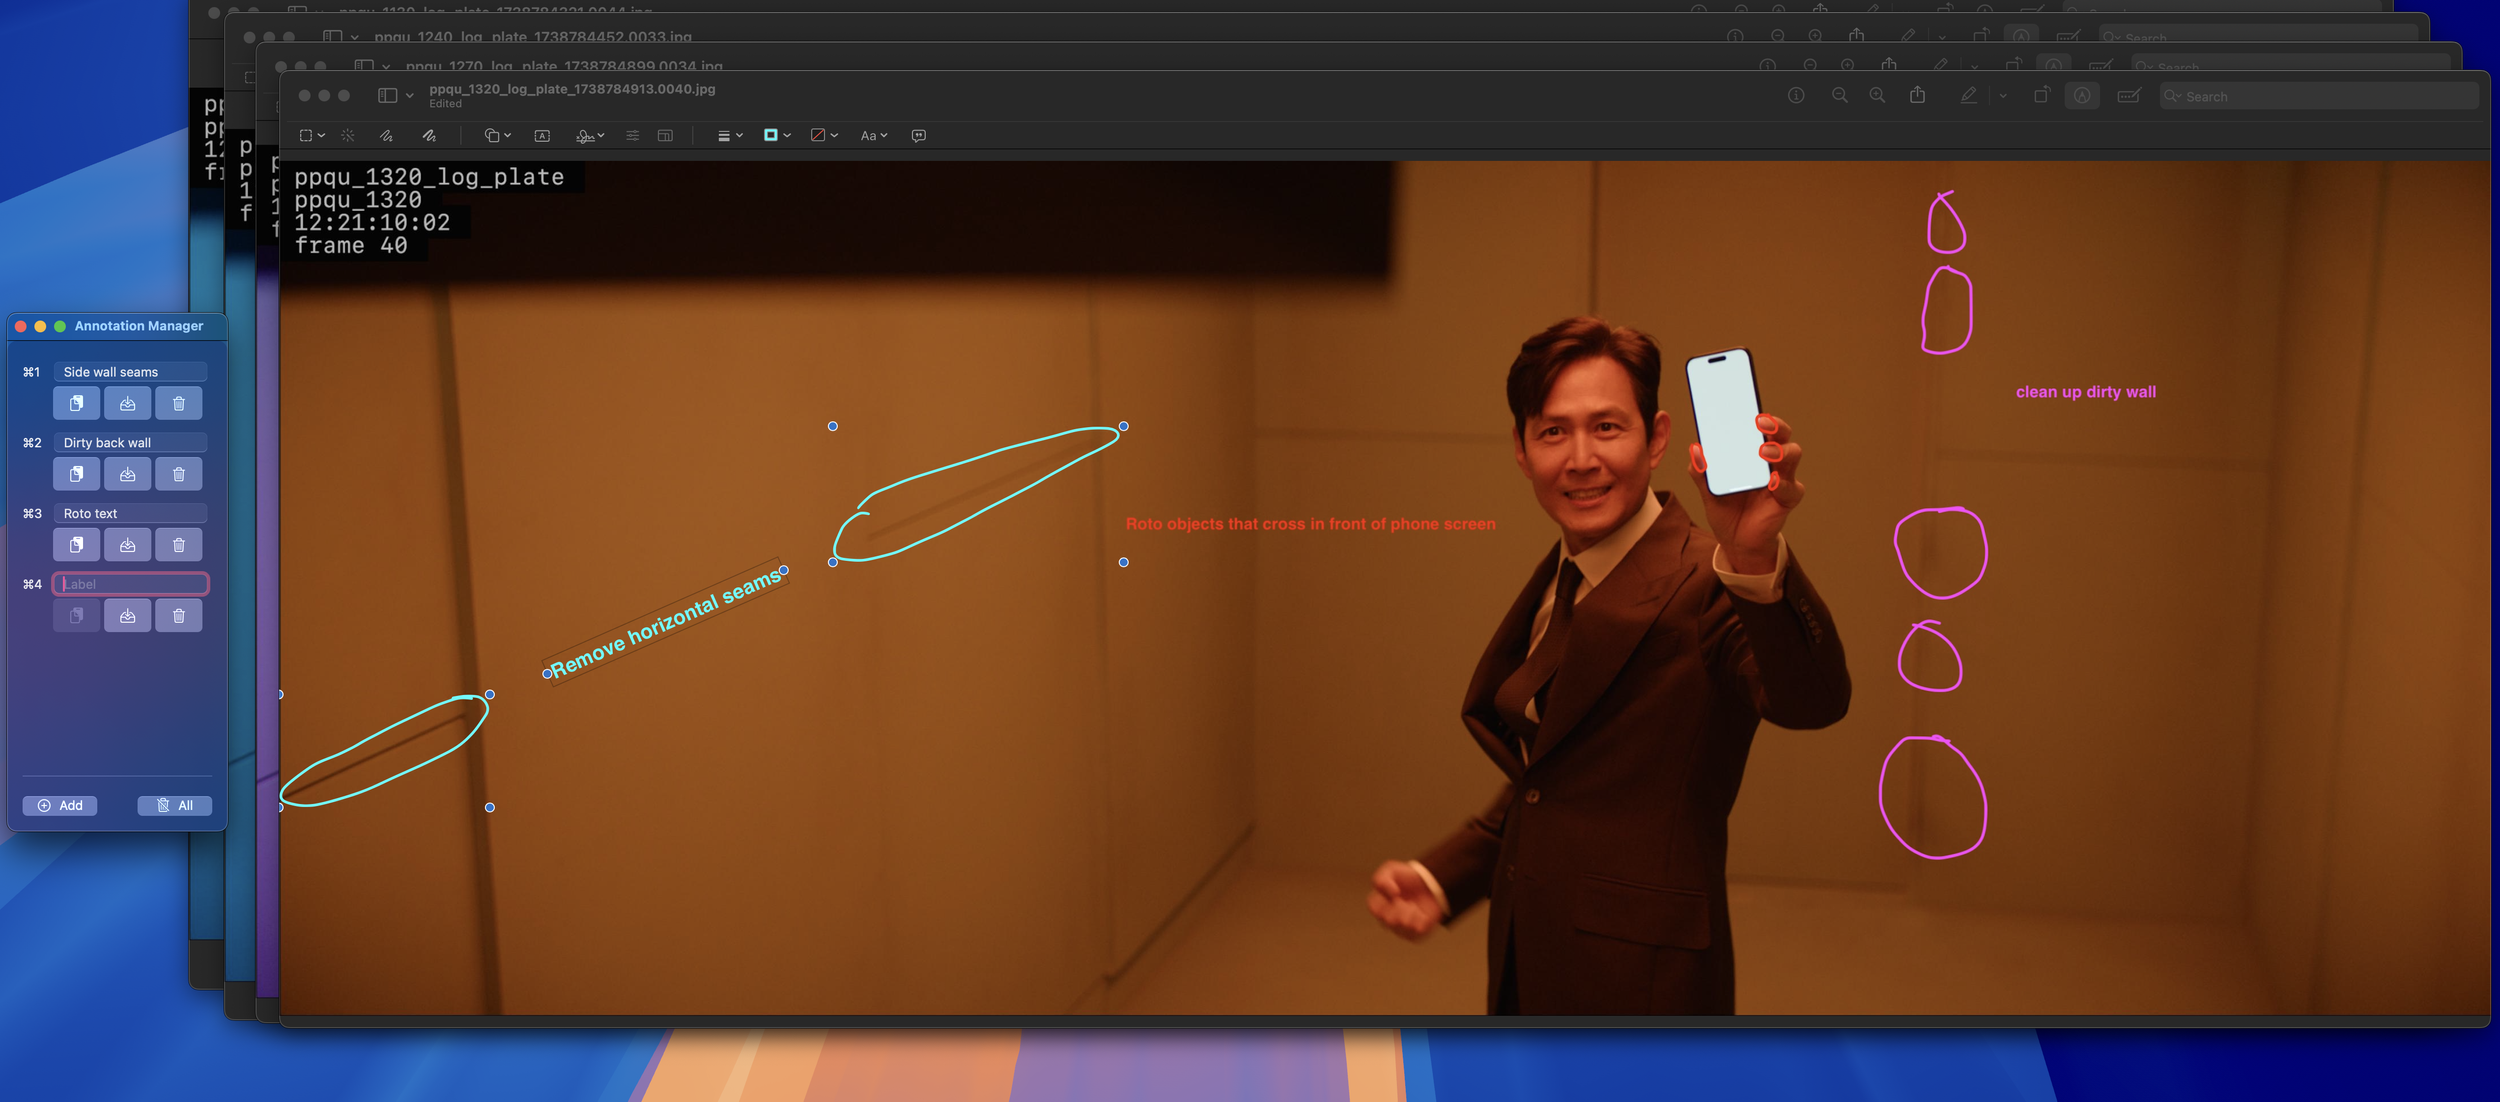
If there's anything about the app that bugs me, it's that it has to activate Preview in order to run the copy command, so there's a little flicker as it switches to Preview and back. Aside from that, though, this little utility has saved me so much time and headache.

That being said, making this as a Mac app was not especially simple or enjoyable, so I'm not sure I'll be making many more.


  1. That is, as long as I haven’t closed the image yet because Preview will flatten all the annotations and they will no longer be selectable. Drives me nuts.  ↩

  2. By the way, did you know that sometimes Preview just reverses the order you’re moving through files with CMD+~ and to keep going in the order you started with you have to switch to CMD+Shift+~? That’s a fun little quirk.  ↩
Incrementing File Versions with Keyboard Maestro

File version management is one of the most important tenets of an efficient, sane post-production workflow. That's why most of the apps we use for our work have built-in tools for "increment and save" or scanning for new versions of an asset. Which makes it pretty odd that I haven't universally quashed this minor annoyance with some simple automation.

Primarily, when I need to version-up a file in Finder, I'm hitting CMD+D, deleting "copy" from the end of the file name and then manually incrementing the version number by typing. What am I, a farmer?

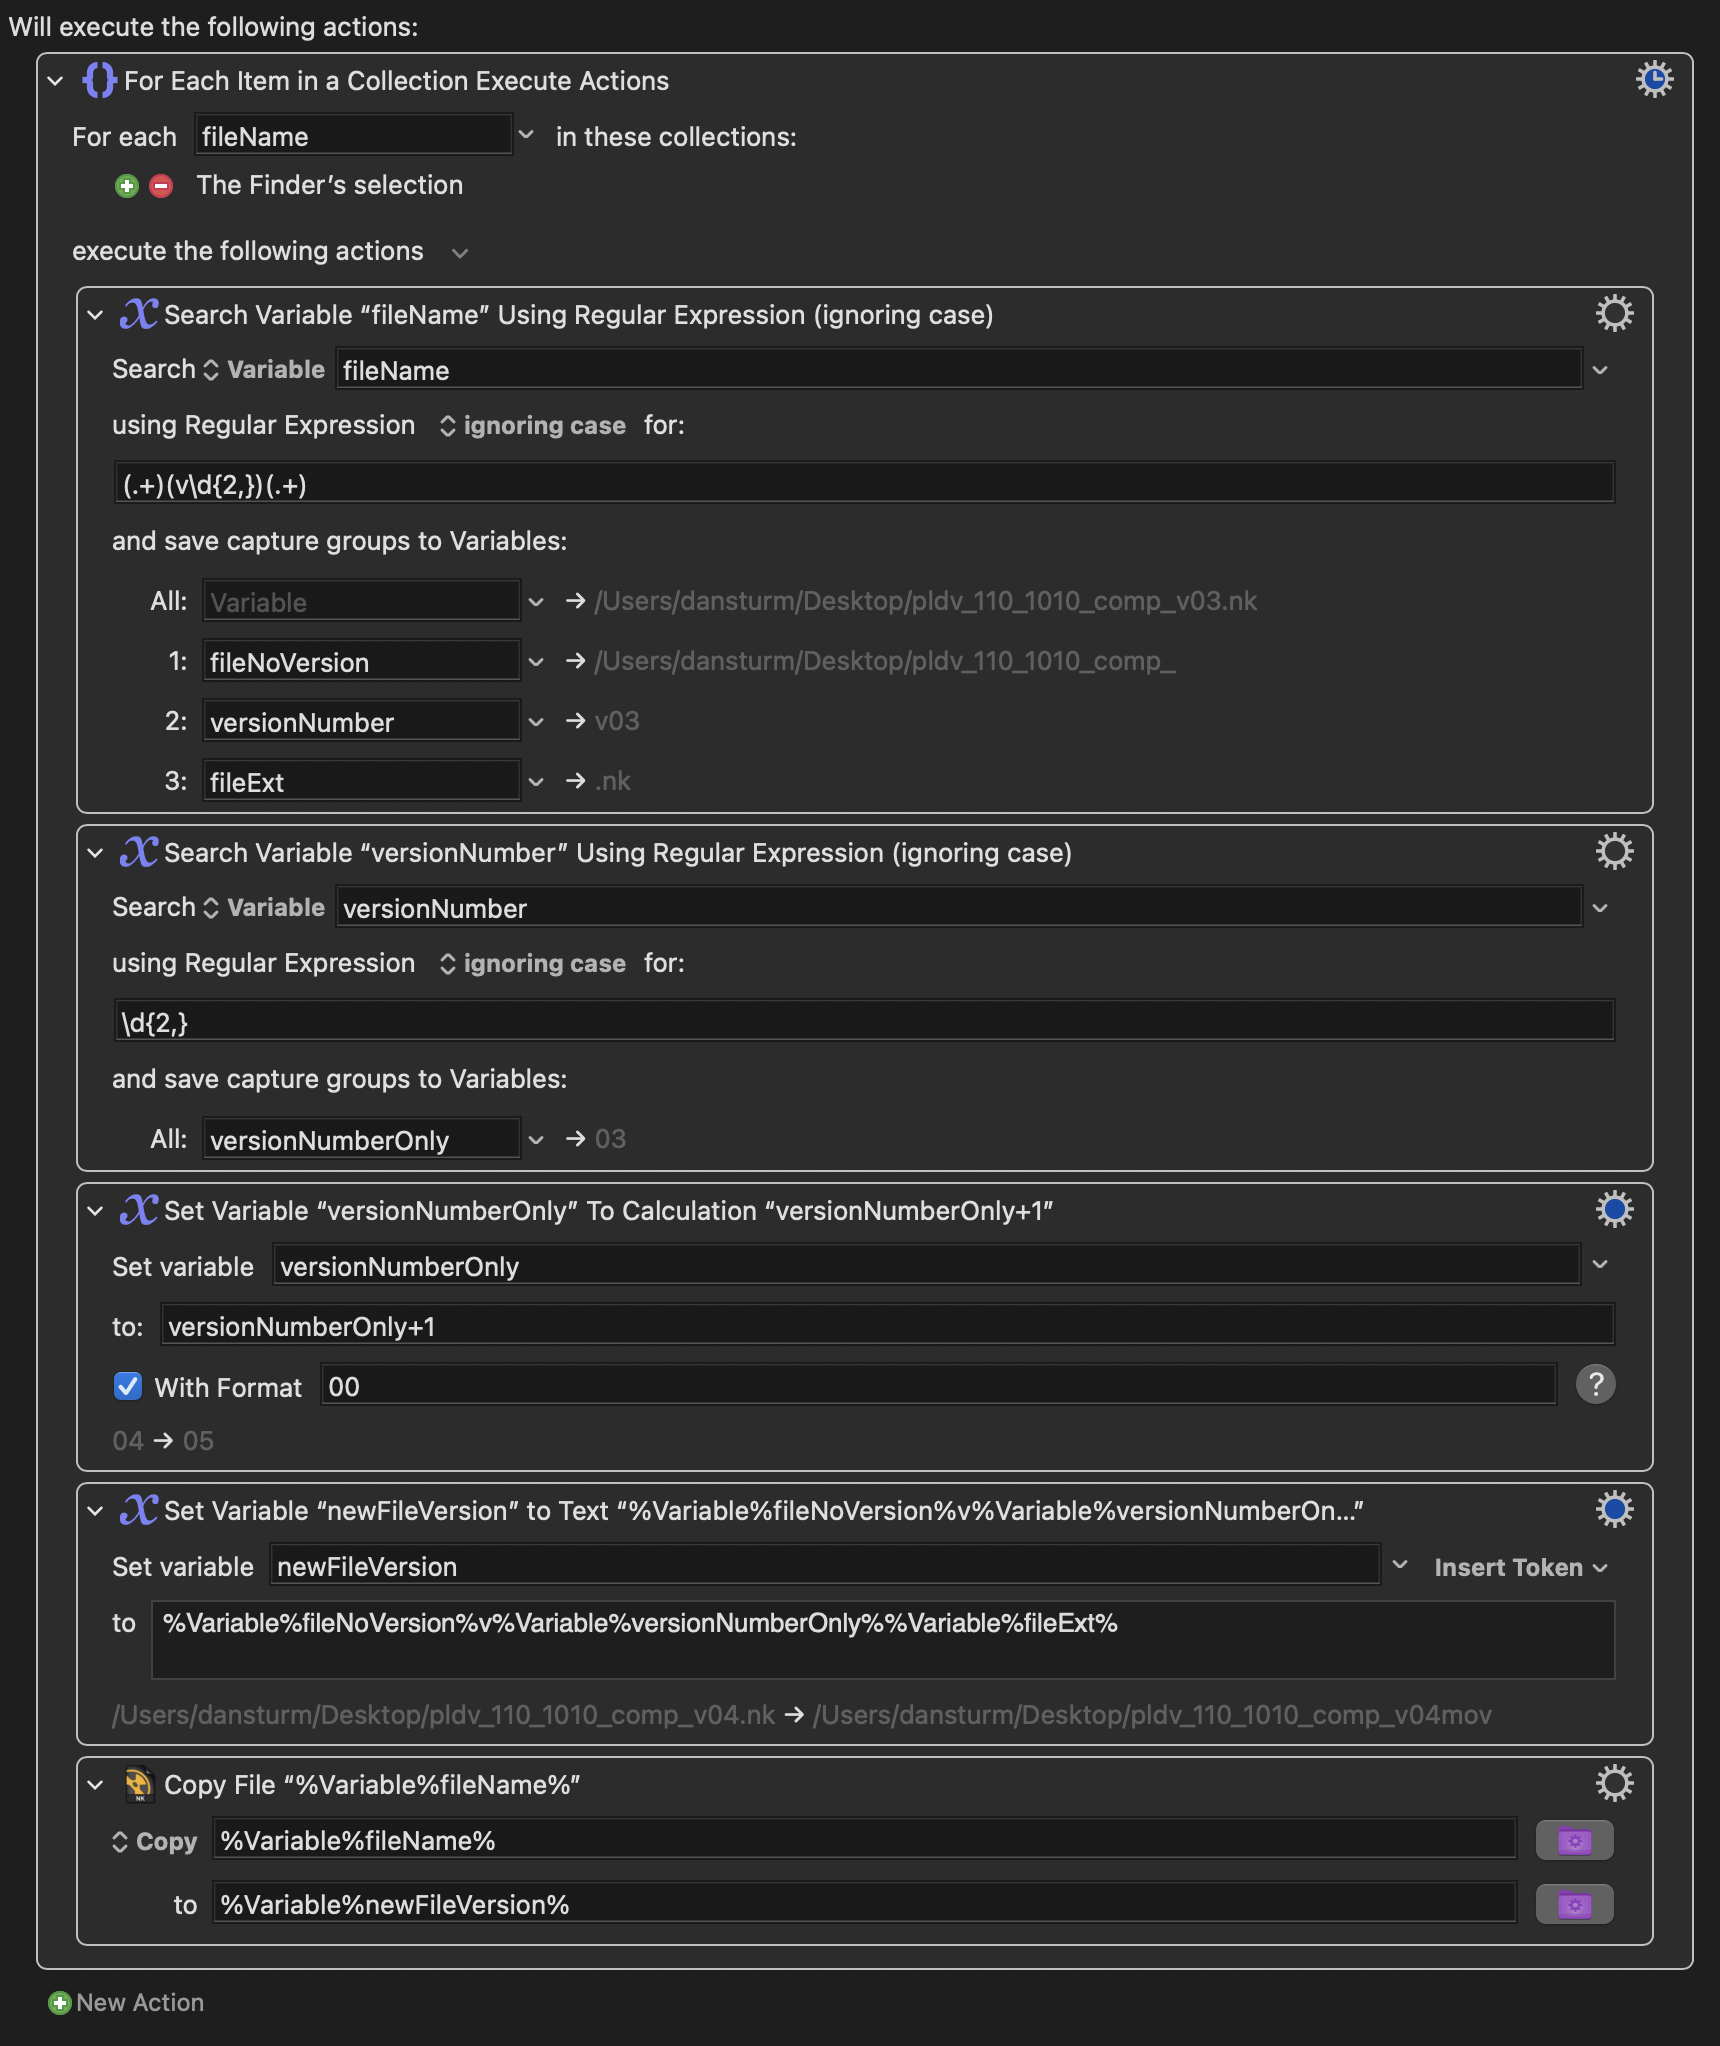
Bound to a hyperkey shortcut, this Keyboard Maestro macro makes it super quick to version up a selection of files in Finder.

Steps

  1. Get the selection of files in Finder
  2. Split the file path into three pieces: everything before the version number, the version number, and everything after the version number
  3. Drop the "v" from the version number. It's cleaner.
  4. Increment the version number with two-digit number padding
  5. Assemble the new file path and name
  6. Copy the original file to its new destination

An Improvement

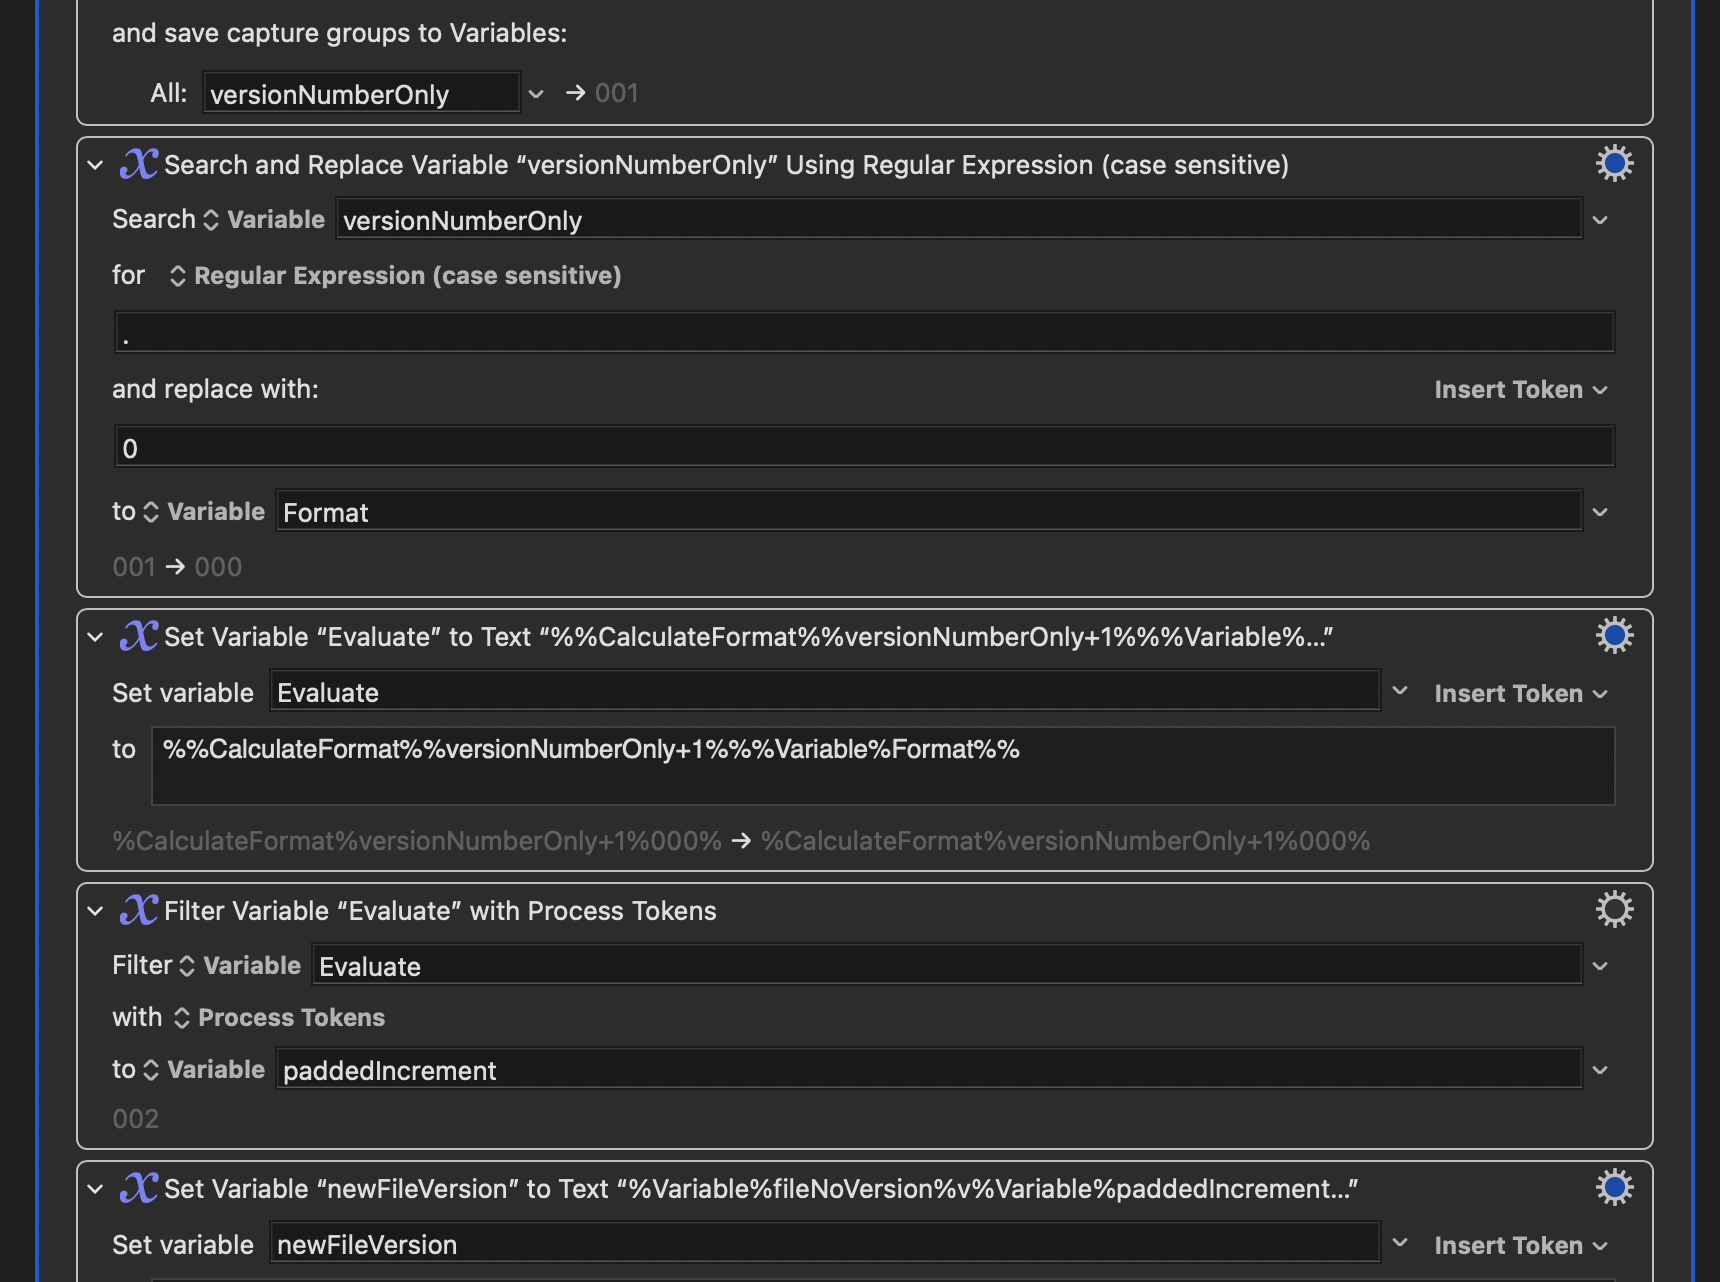
One thing I don't love about this macro is that it uses rigid two-digit number padding for the version number, no matter the padding on the original file. A factor of the way Keyboard Maestro variables and calculations work.

As much as I disagree with using more than two digits in a file version number, consistency and predictability are far more important to me. So, after a quick chat with the folks over on the Keyboard Maestro forum, I swapped out the "Set Variable to Calculation" action in Step 4 with the following actions, suggested by The Keyboard Maestro himself, Peter N Lewis:

  1. Replace all digits in the version number variable with zeros to create a "padding format"
  2. Build the calculation with KM Variables and our new padding format
  3. Evaluate the calculation

If this change seems overly-complicated and nearly identical to the original version of the macro, it is. The reason we're doing it this way is that the "Set Variable to Calculation" action does not currently support tokens in the "Format" parameter (though Peter says that's fixed in the next version). Building our own calculation formula out of variables and evaluating that formula with a Filter action is functionally the same, but with the extra flexibility we needed. Neat.

iSight Scripting Redux

I was looking through some old photos on my iPhone the other day, reminiscing. Unfortunately, there weren’t a lot of photos from the period of time I was scrolling through. My craving for personal nostalgia was not fully satisfied. Luckily, I remembered another place I might find a few more memories to peruse: my iSight Capture folder in my Dropbox archive.

To spare you the headache of reading that meandering, ill-framed, eight-year-old blog post, here’s the gist of what I built back in 2012.

I set up a bash script and launchd task that used a CLI tool I found called isightcapture to take a photo through my MacBook Pro’s iSight camera every 2 hours, and put them in a Dropbox folder.

I had some grand idea that this would help me locate my laptop if it were ever stolen; giving me photographic clues to its location. Which was incredibly stupid.

But, in setting up this little script, I inadvertently created a sort of photo diary for myself. These incredibly unremarkable images gave me a consistent snapshot of my day-to-day life that, as the months and years passed, became an incredible record of one of the more interesting (to me) periods of my life.

The photos themselves are terrible quality. They’re 640x480 resolution. They’re dark, grainy, and usually framed badly. In some cases, you can barely even see me. But I can see me.

I can see the frustration and immaturity on my face in 2012 — my last year at Intel — before I left to pursue…something I hadn’t worked out yet.

I can see myself doing everything in my power to suppress a sea of self-doubt when I found myself working in the Sandwich Video office for a few weeks in 2013. I was absolutely exhausted driving back and forth between Phoenix and Los Angeles probably a dozen times over the course of a few months. But I was (and still am) so grateful for everything I learned from that experience.

I can see the unexpected enthusiasm on my face as I taught two semesters of post-production finishing and vfx at the film school at Scottsdale Community College; taking over for a professor who had moved away.

There are the backstage photos of those sales and marketing conferences I worked. The ones where we basically didn’t sleep for three days, shooting and editing around the clock.

I see my temporary office setup in the family room of my dad’s house where I lived for a month after moving back to Phoenix from San Jose. Behind me in the photos are the dozens of moving boxes my now-wife and I couldn’t unpack until we found a new place to live. (I really didn’t plan that career/life transition well at all.)

I can see a whole lot in those crappy, automated webcam photos.

May 26, 2016

I don’t remember why, but in May of 2016, my script broke. This is the last photo it took.

I figured I’d find a way to fix it, at some point. Eventually, though, I just gave up and moved the folder of images into my unsynced Dropbox archive folder.

But, looking through those old photos gave me the motivation to give it another shot.

ImageSnap

In the years since my script broke, isightcapture has been abandoned. I found a thread in a forum somewhere mentioning ImageSnap as a potential replacement, and it turned out to be perfect for my needs.

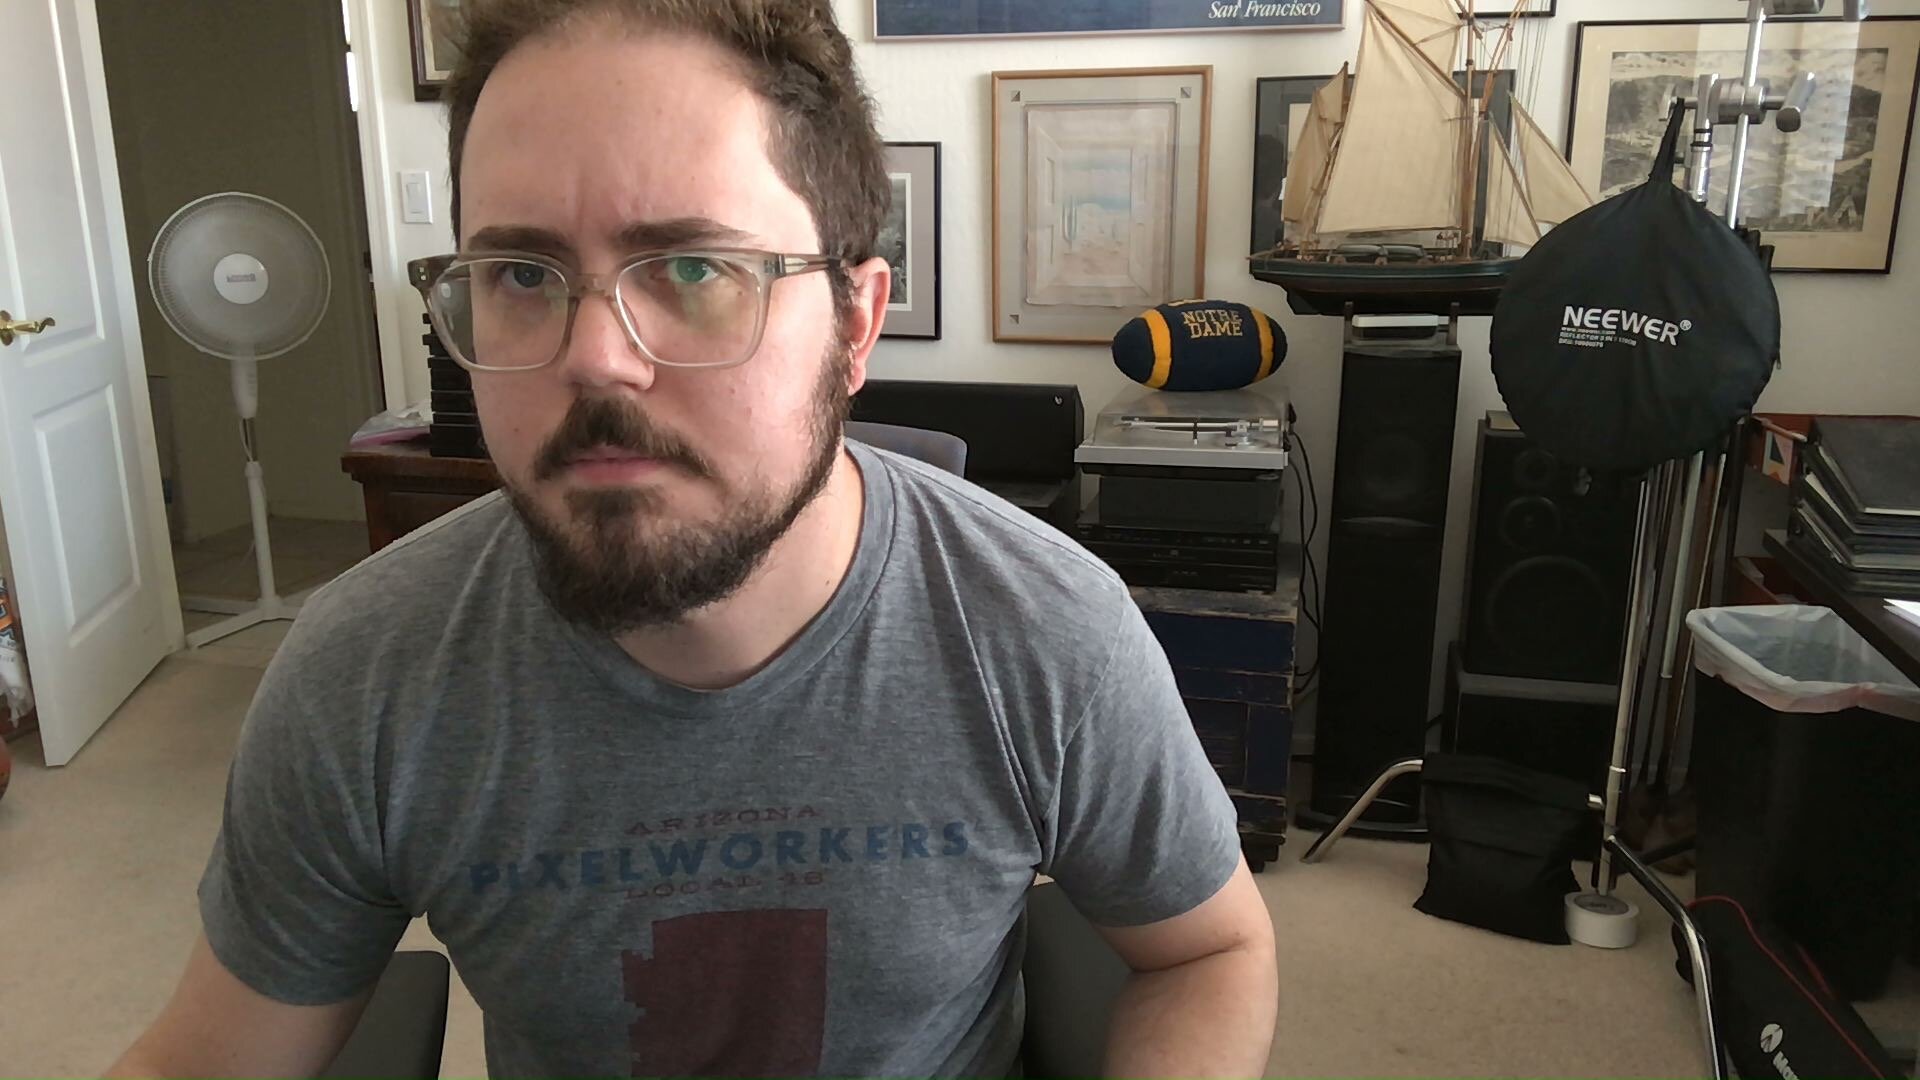
First of all, it’s able to capture the full resolution of my 2020 iMac’s new 1920x1080 FaceTime camera. Still, each photo is only about 250 KB.

Second, it’s much faster than isightcapture. Both apps, when taking a photo, activated the camera’s green “active” light (as they should). But with isightcapture, I was occasionally able to notice the green light in my peripheral vision, look at the camera, and pose for the photo. So far, no matter how quick my reaction time, each photo taken by ImageSnap has been captured before my eyes were able to dart up to the camera. Which is exactly what I want.

I’m genuinely surprised just how fast it is. Especially because the command I’m using to take the photo includes a one second delay to let the camera “warm up”. The hardware (apparently) needs that to avoid occasionally taking an underexposed image.

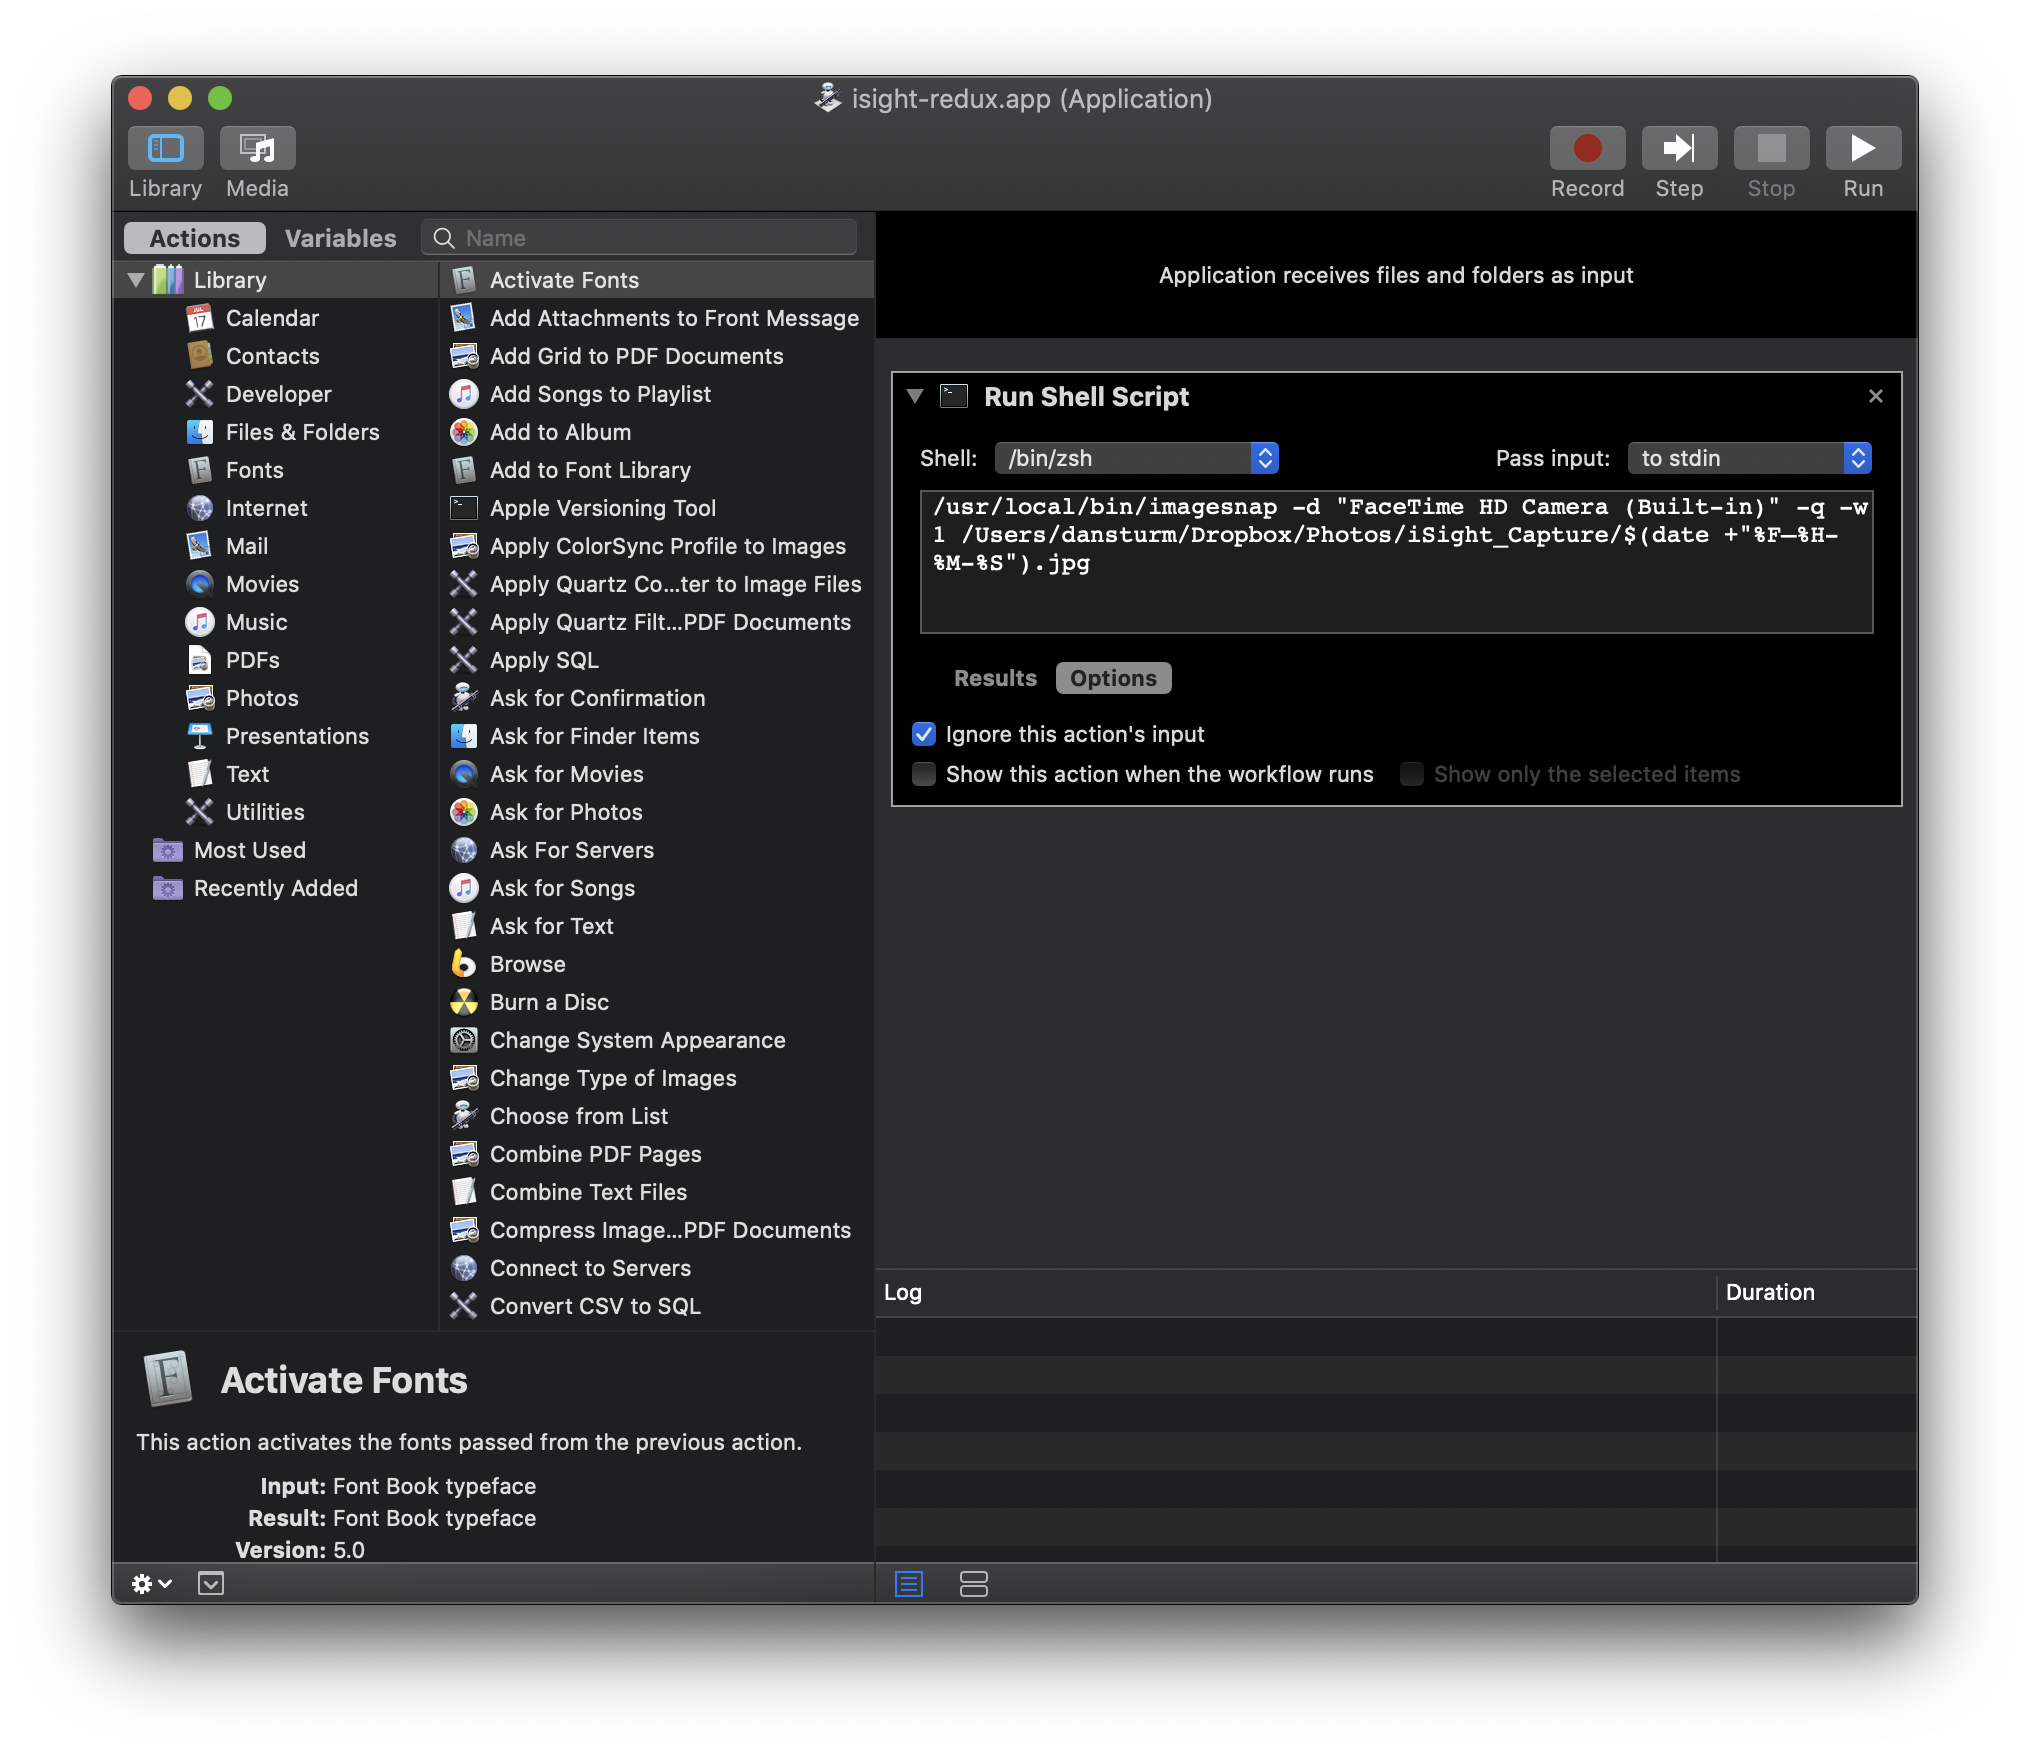
Here’s the single-line shell script that takes the photo:

/usr/local/bin/imagesnap -d "FaceTime HD Camera (Built-in)" -q -w 1 /Users/dansturm/Dropbox/Photos/iSight_Capture/$(date +"%F—%H-%M-%S").jpg

Automator?

I’m running this script by way of an Automator “Application” because, thanks to macOS Catalina, things that access the camera of my Mac need to throw a macOS system permissions dialogue box so I can grant them explicit access to the hardware. Currently [1], running the command directly inside Keyboard Maestro does not cause the system to prompt for camera permissions, so the command fails.

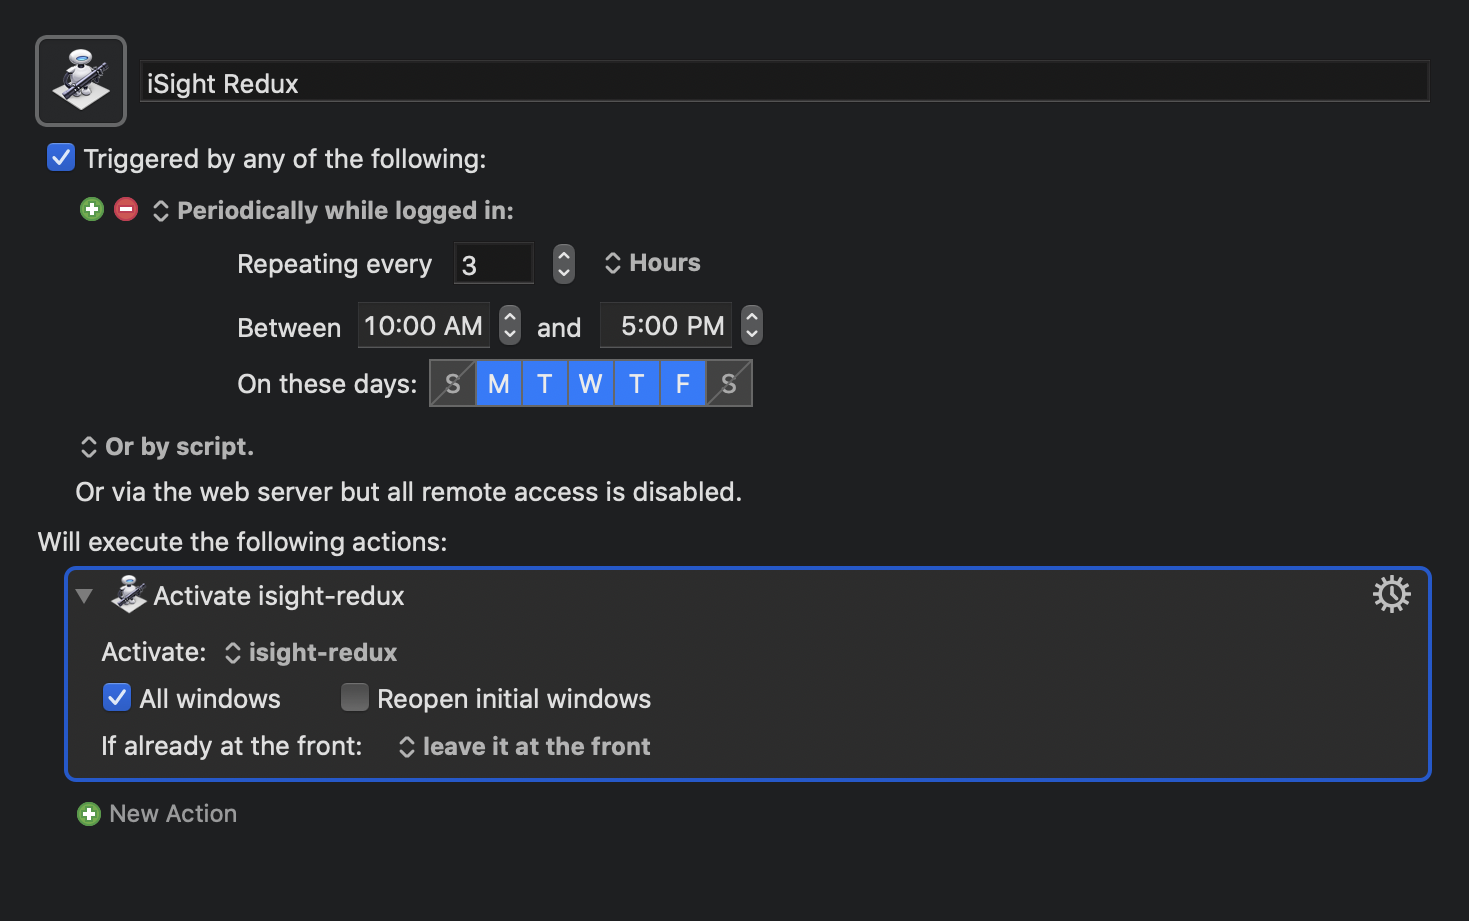
Not to worry, though. We’ll use Keyboard Maestro to launch the Automator application at the interval of our choosing because it has great trigger options.

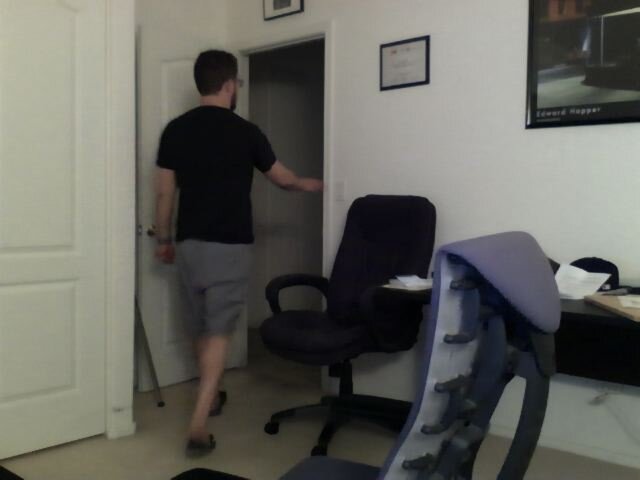
Having the app take a photo every two hours was never ideal. A full third of the images are just black because they were taken in the dead of night. And another third were of my empty office chair. Not terribly interesting.

So, this time around, I set the macro to trigger at 10am, 1pm, and 4pm. Three times I can almost guarantee I’ll be sitting at my desk, in front of the camera. And the Keyboard Maestro trigger is flexible enough that, if I decide later to expand the window of time or frequency of images, it’s an easy adjustment.

It’s a little strange how excited I was to get this thing working again. My life is far less unpredictable than it was eight years ago, and it’s likely that I’ll just end up with hundreds of photos that looks exactly the same, featuring nothing of any real interest.

But, you know, that’s exactly what I thought the first time I set it up.


  1. Thanks to Dr. Drang and Peter N Lewis for helping me diagnose this issue. And it sounds like Peter is working on a fix.  ↩

Project Folder Structure and Task Management

For my work, producing videos, it’s incredibly important to keep my files and tasks organized. Managing multiple versions of sequences and shots across thousands of files, hundreds of gigabytes in size, can and will get unwieldy very quickly. The better organized I am from the start, the less likely I’ll be banging my head against my desk in the eleventh hour.

Here’s a brief overview of what I do and how I do it.

The Folder Structure

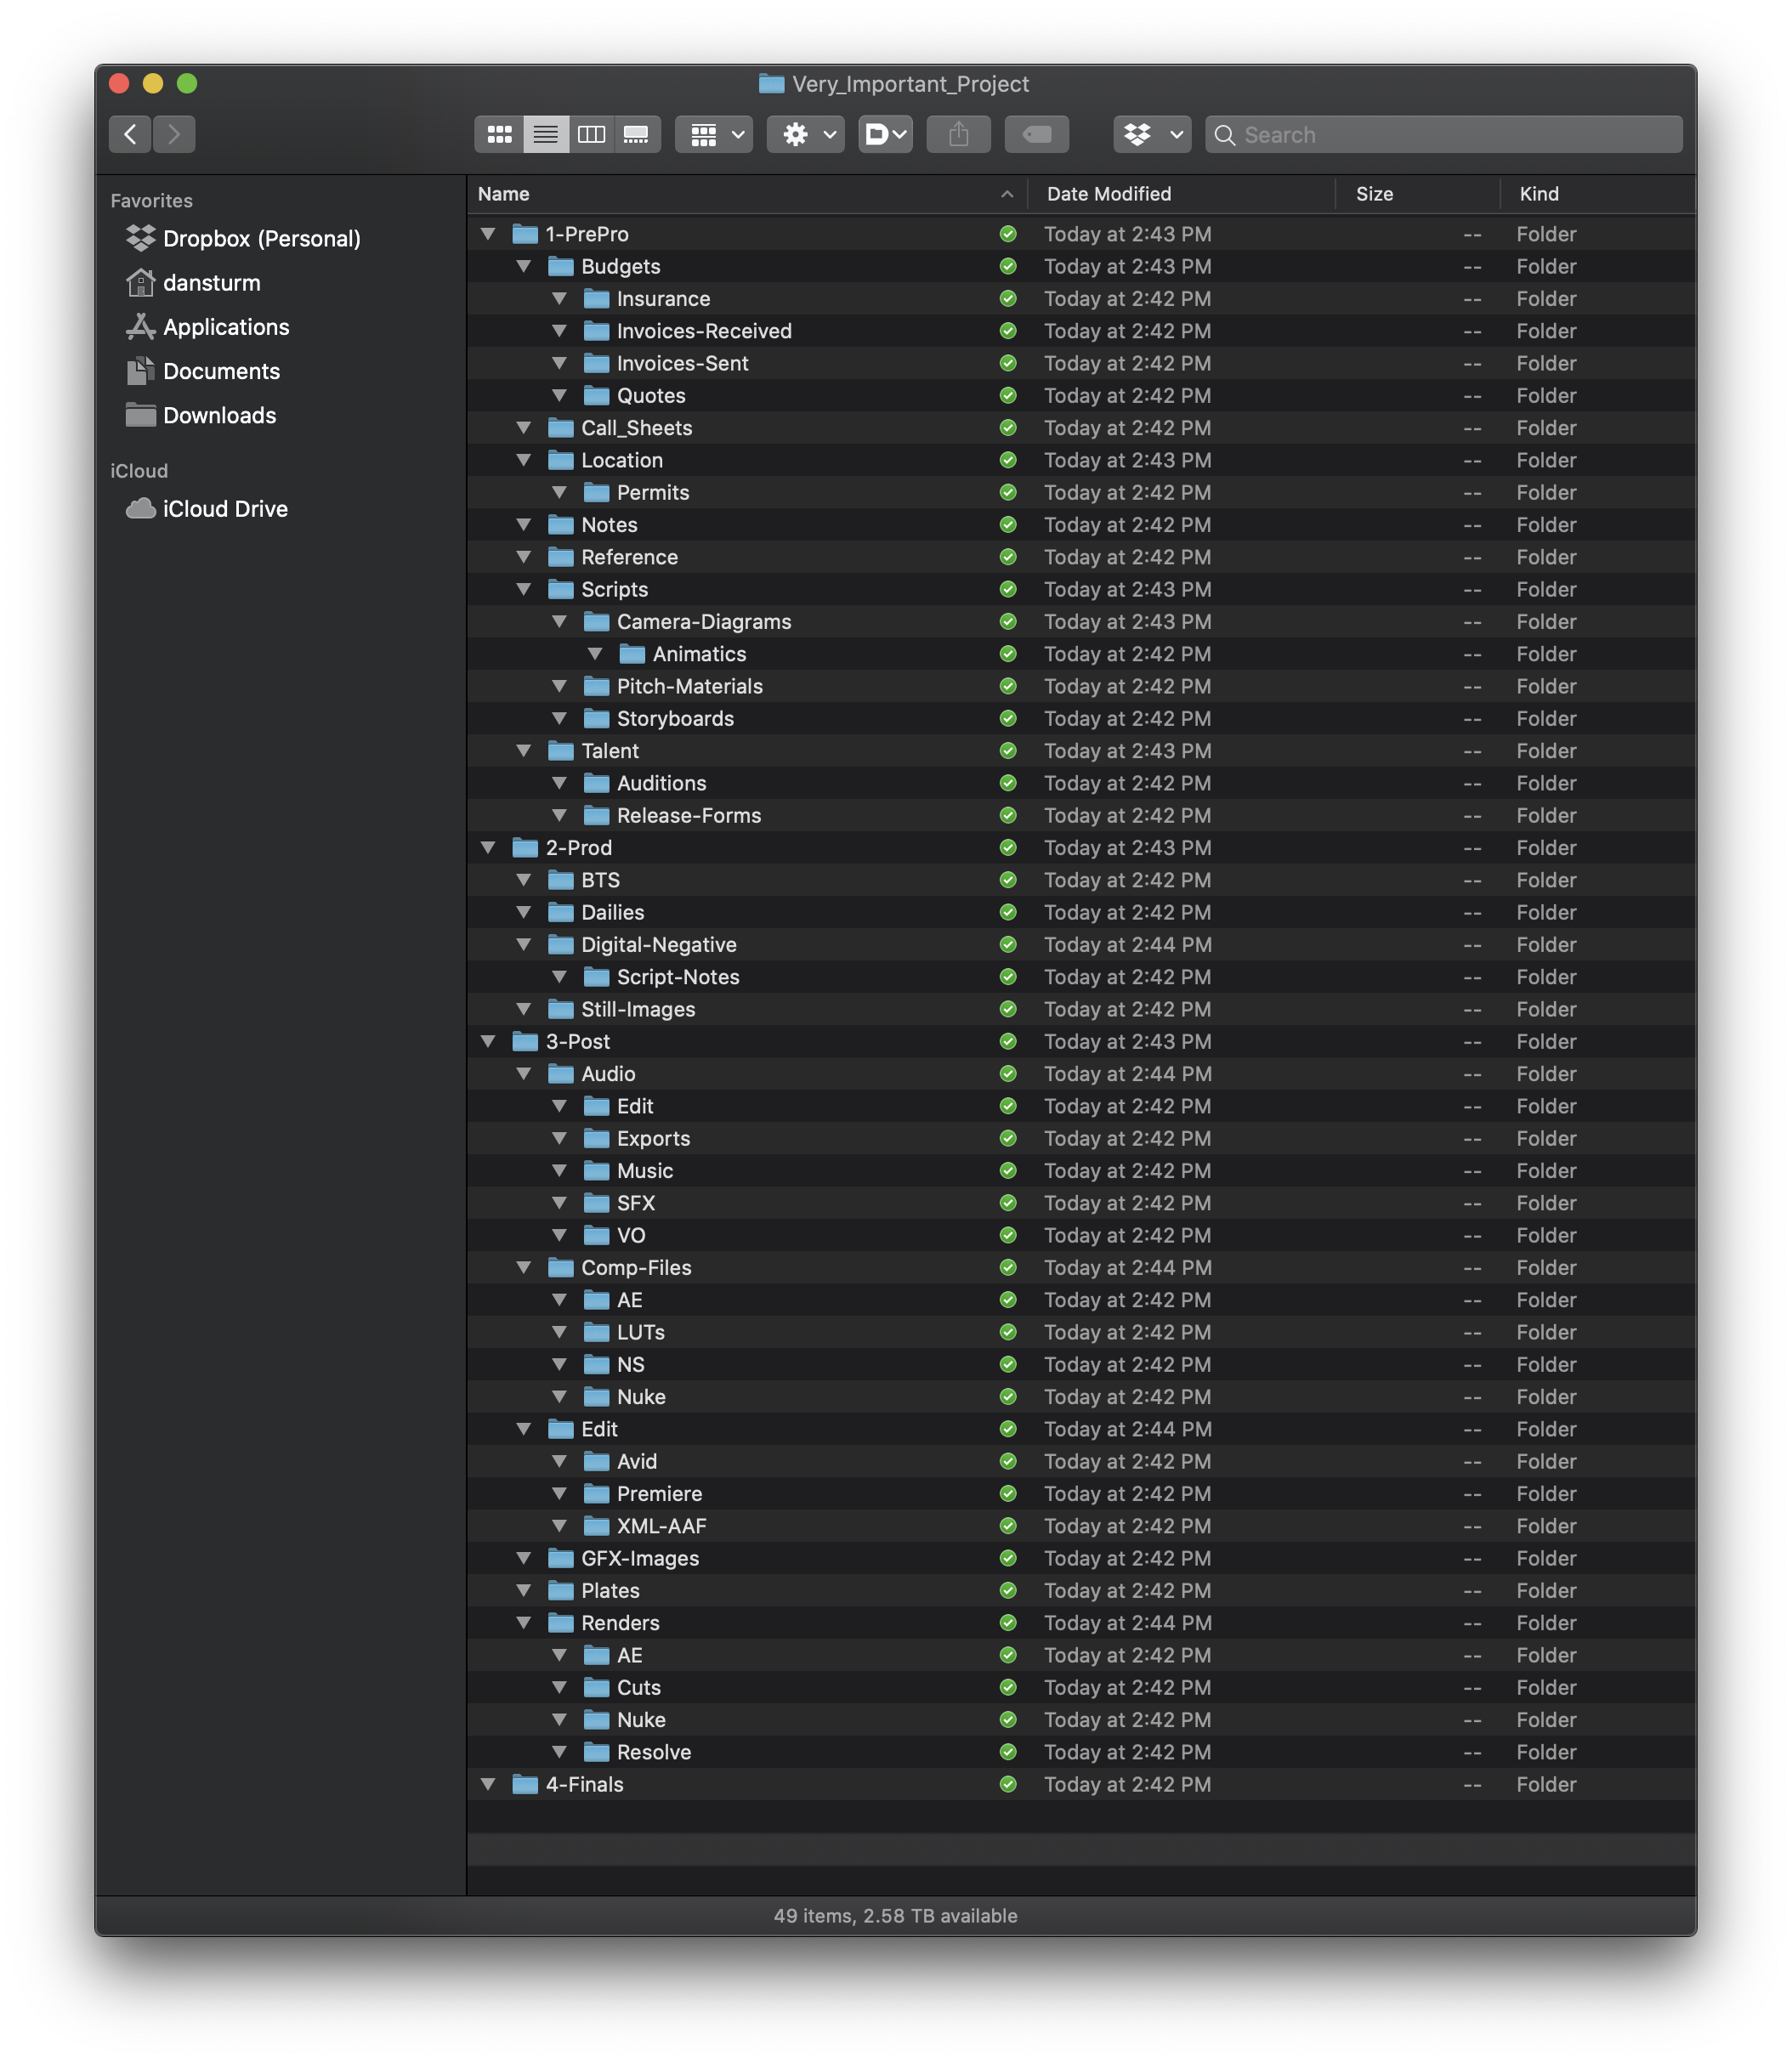
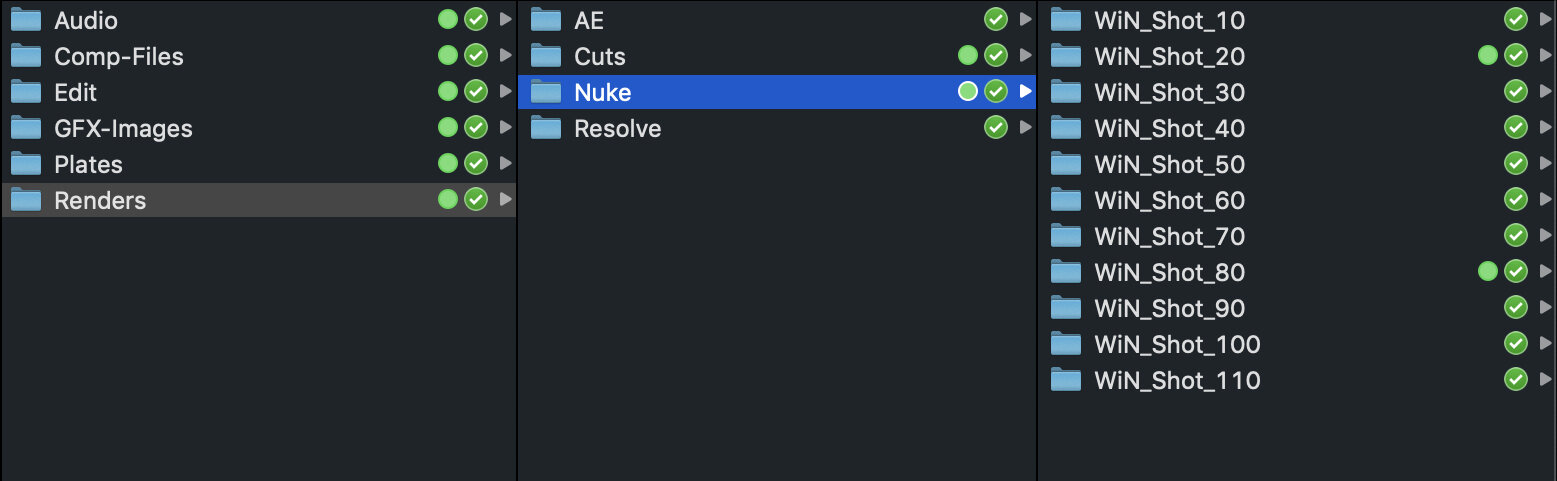
I’ve been using roughly the same folder structure for my projects for the better part of a decade now. Here’s what it looks like:

 For the record, I hate the macOS list view and I never use it while working. I'm only using it here to show you the whole folder structure in one image.
For the record, I hate the macOS list view and I never use it while working. I'm only using it here to show you the whole folder structure in one image.

I have high-level folders for the key stages of production: pre-production, production, post-production, and final deliverables. Within each of those folders are subfolders corresponding to specific types of assets that will be gathered or created along the way.

It’s worth mentioning that this folder structure is just the starting point for each of my projects. Not every folder will be used on every project. And, for some projects, many additional folders will be added. For example, a project that includes vfx work (most of them) will have files and folders programmatically created for each vfx shot within the Comp Files, Plates, and Renders folders [1].

Launchbar

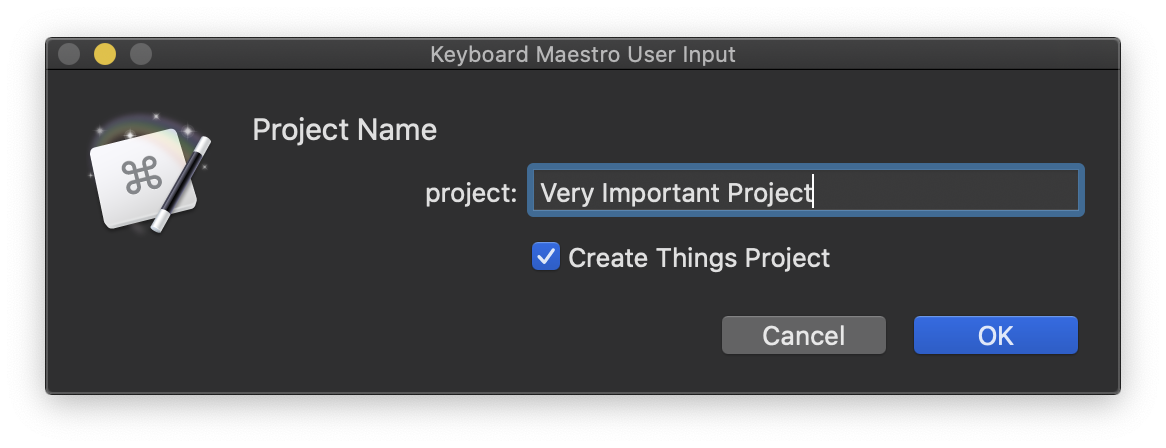
To create that folder structure, I run a Keyboard Maestro macro — from Launchbar — that gives me this little pop up:

I give the project a name, hit Return, and the new folder is created in my “Projects” folder in Dropbox.

As an aside, the Launchbar Action I run to activate the Keyboard Maestro macro is called “Planter” because I first began automating my folder structure creation with Brett Terpstra’s great, free application Planter, and I’m a big fan of maintaining muscle memory regardless of whether or not it makes any actual sense [2].

The Things Project

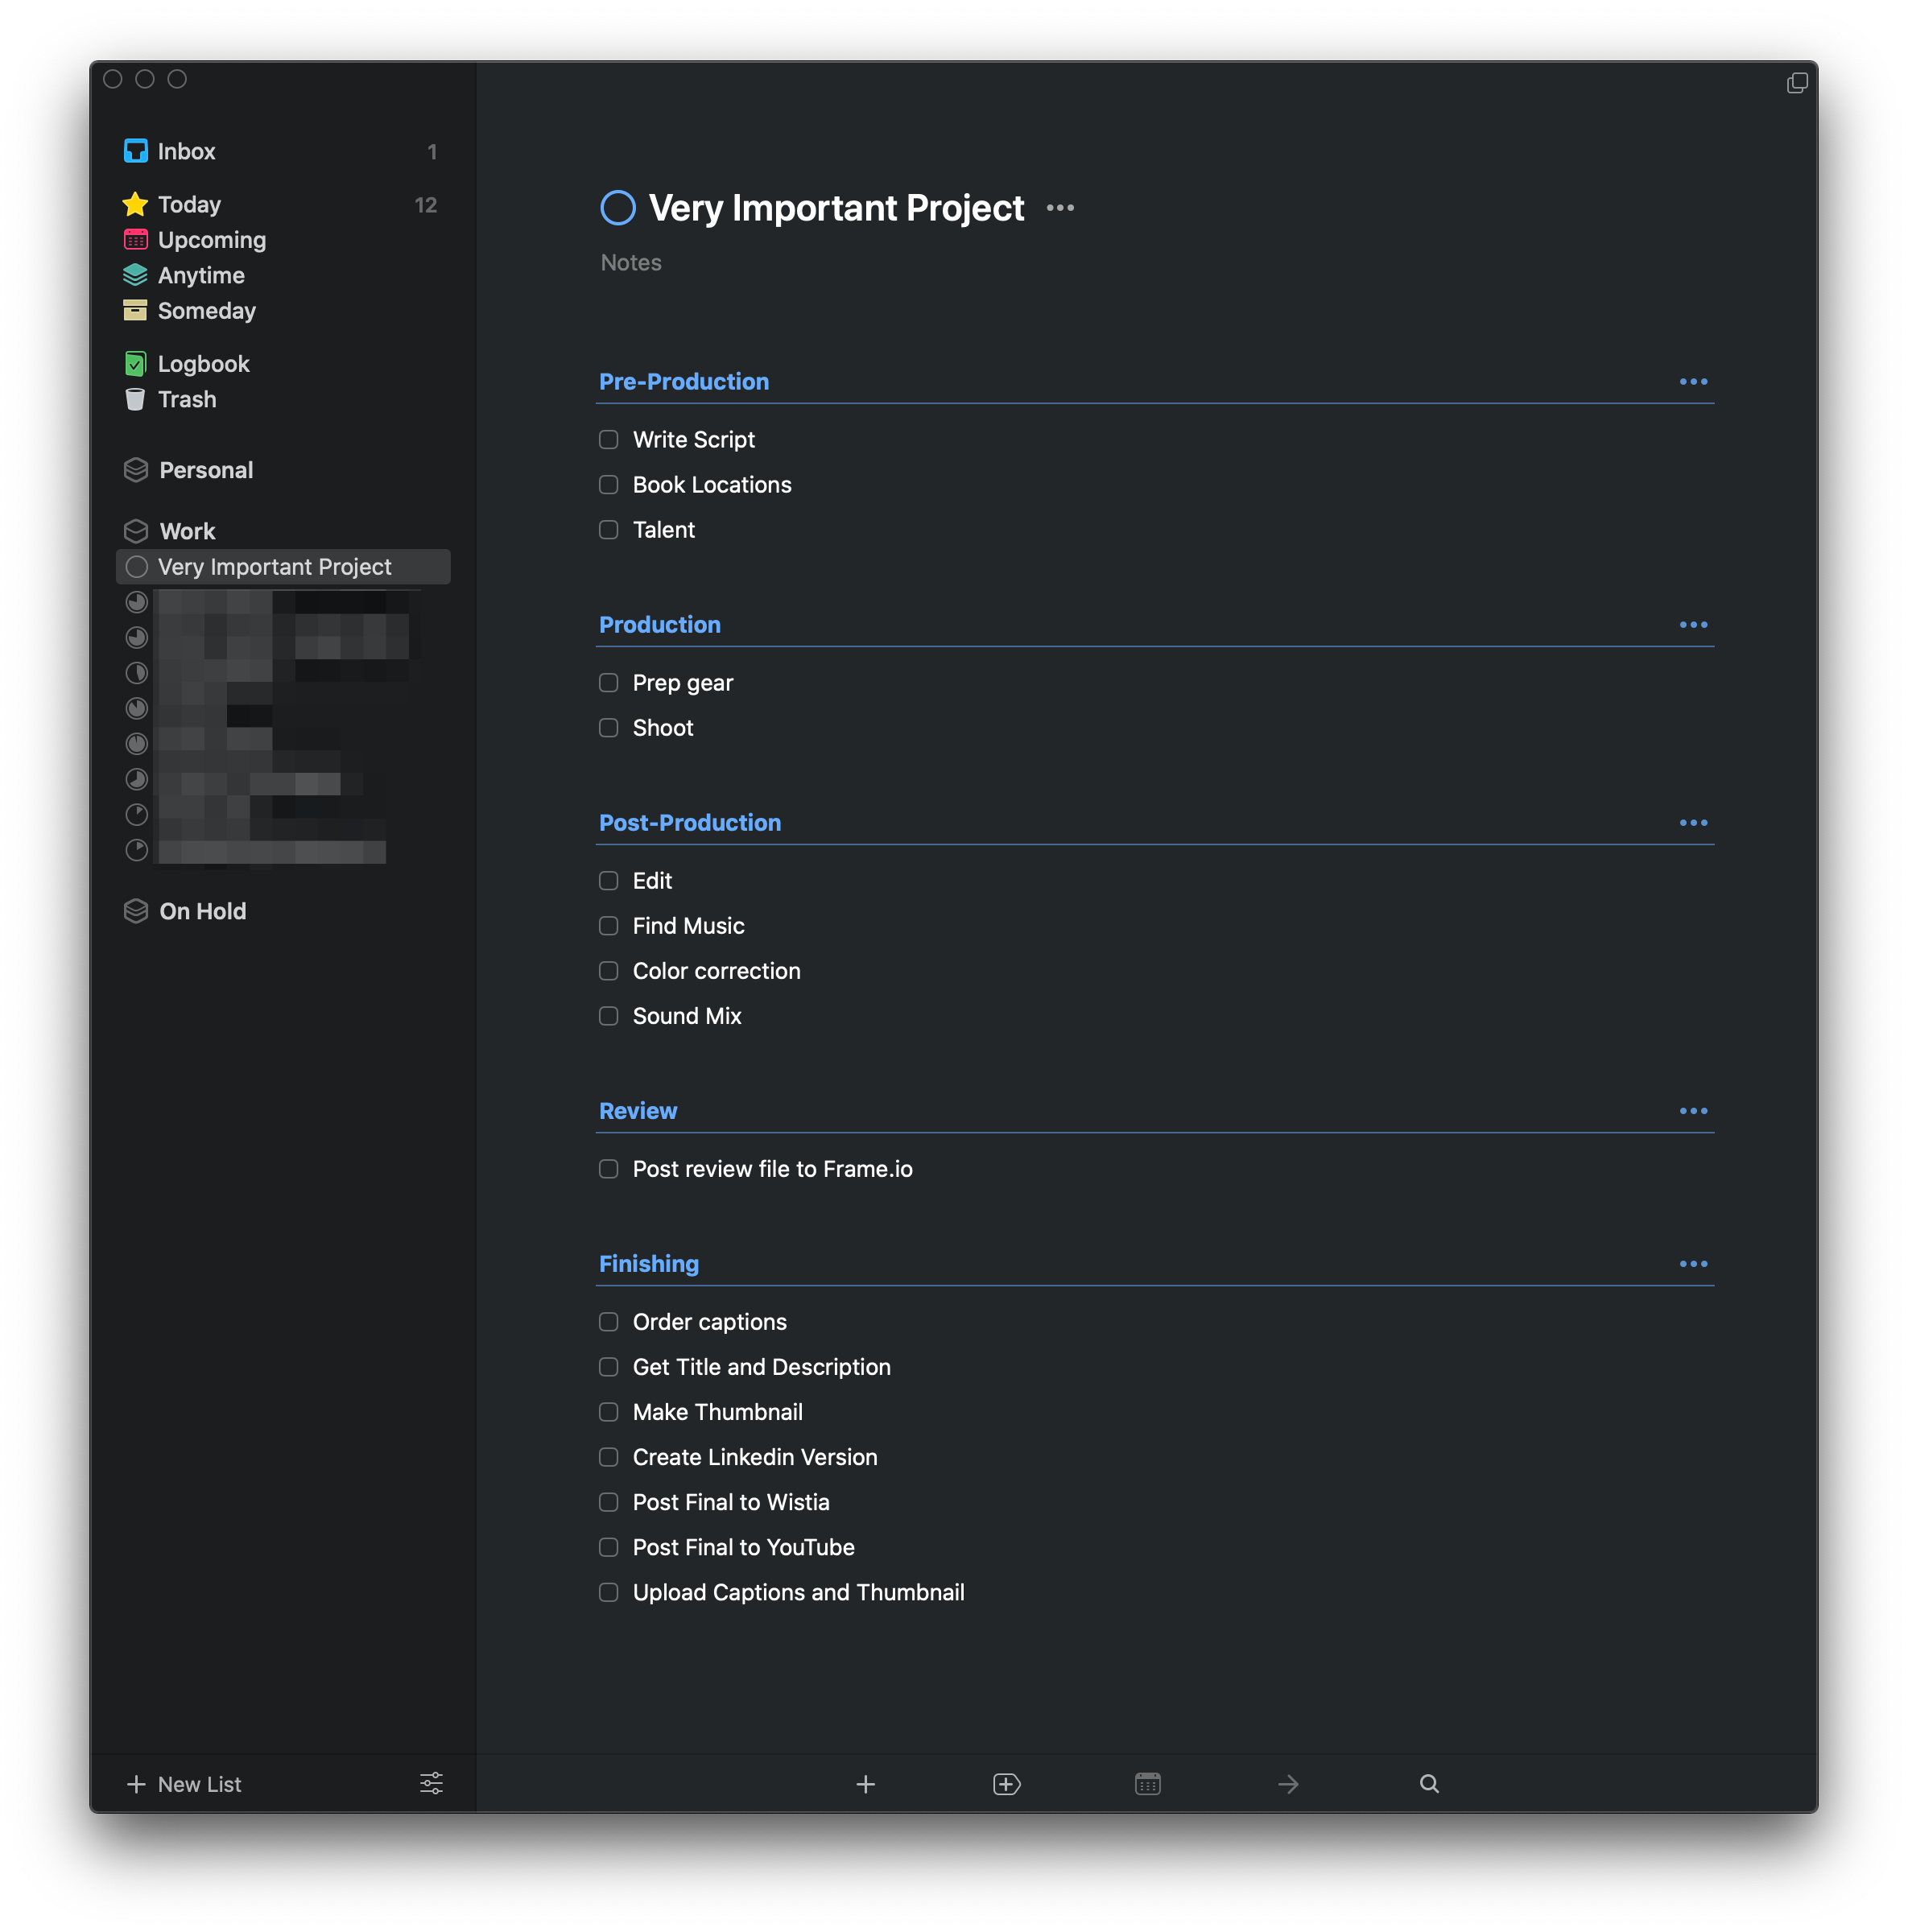
I’m sure you noticed the checkbox on the “New Project” dialog box. Yes, that does what you think it does. If checked (the default), it creates a new project in Things in my “Work” Area with the designated name of the project, and pre-populates it with a standard set of tasks. Again, this is just a starting point. Some tasks may not be required, and many more will likely be added. Regardless, after I hit Return on that dialog box, this is what shows up in Things.

The Tags

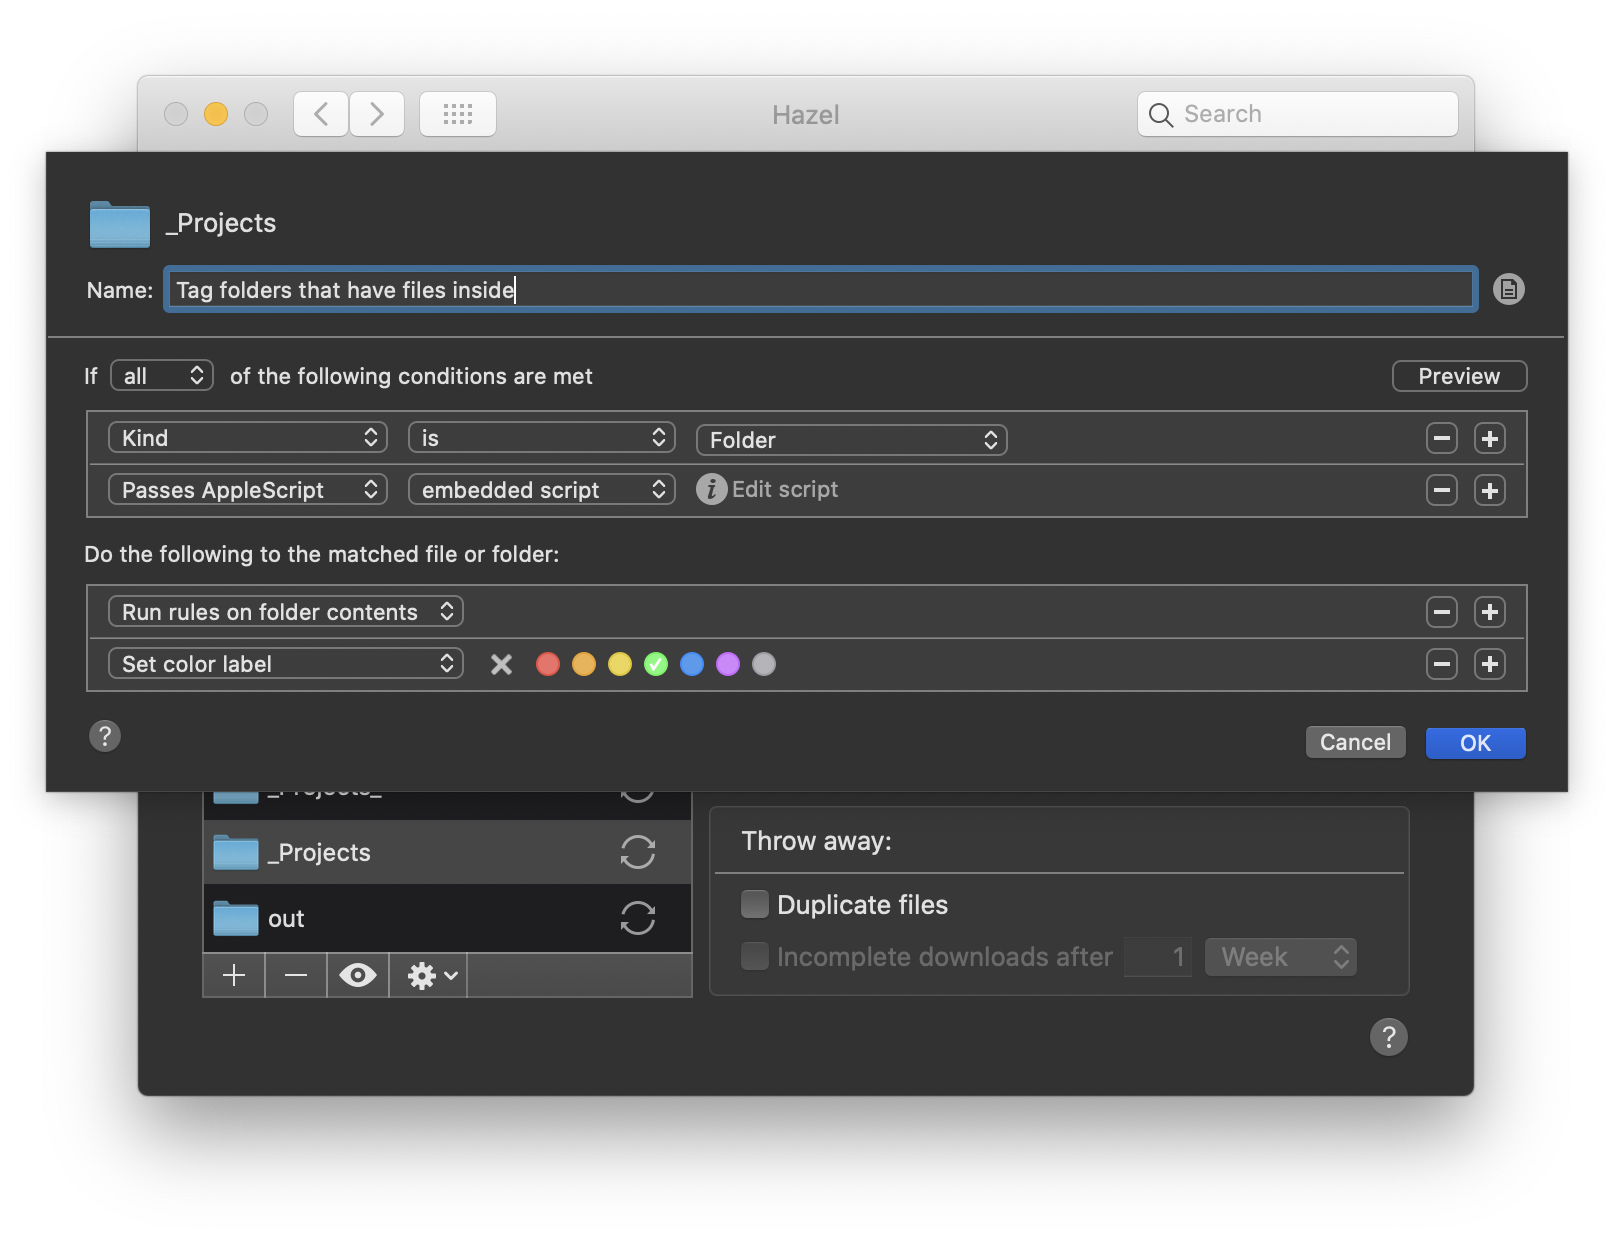
There’s one other trick I added to this setup a few years ago that I really like. When navigating through dozens of folders, often with very similar names, it’s easy to get lost. Something that helps me find what I’m looking for more quickly is a Hazel rule that looks through my folder structure and adds a macOS green tag to any folder that is not empty.

This way, after I’ve programmatically created a series of folders that will receive my yet-to-be-rendered vfx shots, I’ll more quickly be able to see which shots have been rendered and which have not.

It doesn’t tell me anything about what’s going on inside that folder, but I find it makes navigation a little quicker and easier, especially with a tired brain.

The Technical Bits

Alright, let’s get to the part with all the images and the scrolling.

The folder creation and the Things project creation are done with two separate Keyboard Maestro macros to attempt to keep things as tidy-ish as possible [3]. The folder creation macro calls the Things macro (if the box is checked) at the end of its steps.

The Folder Creation Macro

 Click through to see the whole enchilada.
Click through to see the whole enchilada.

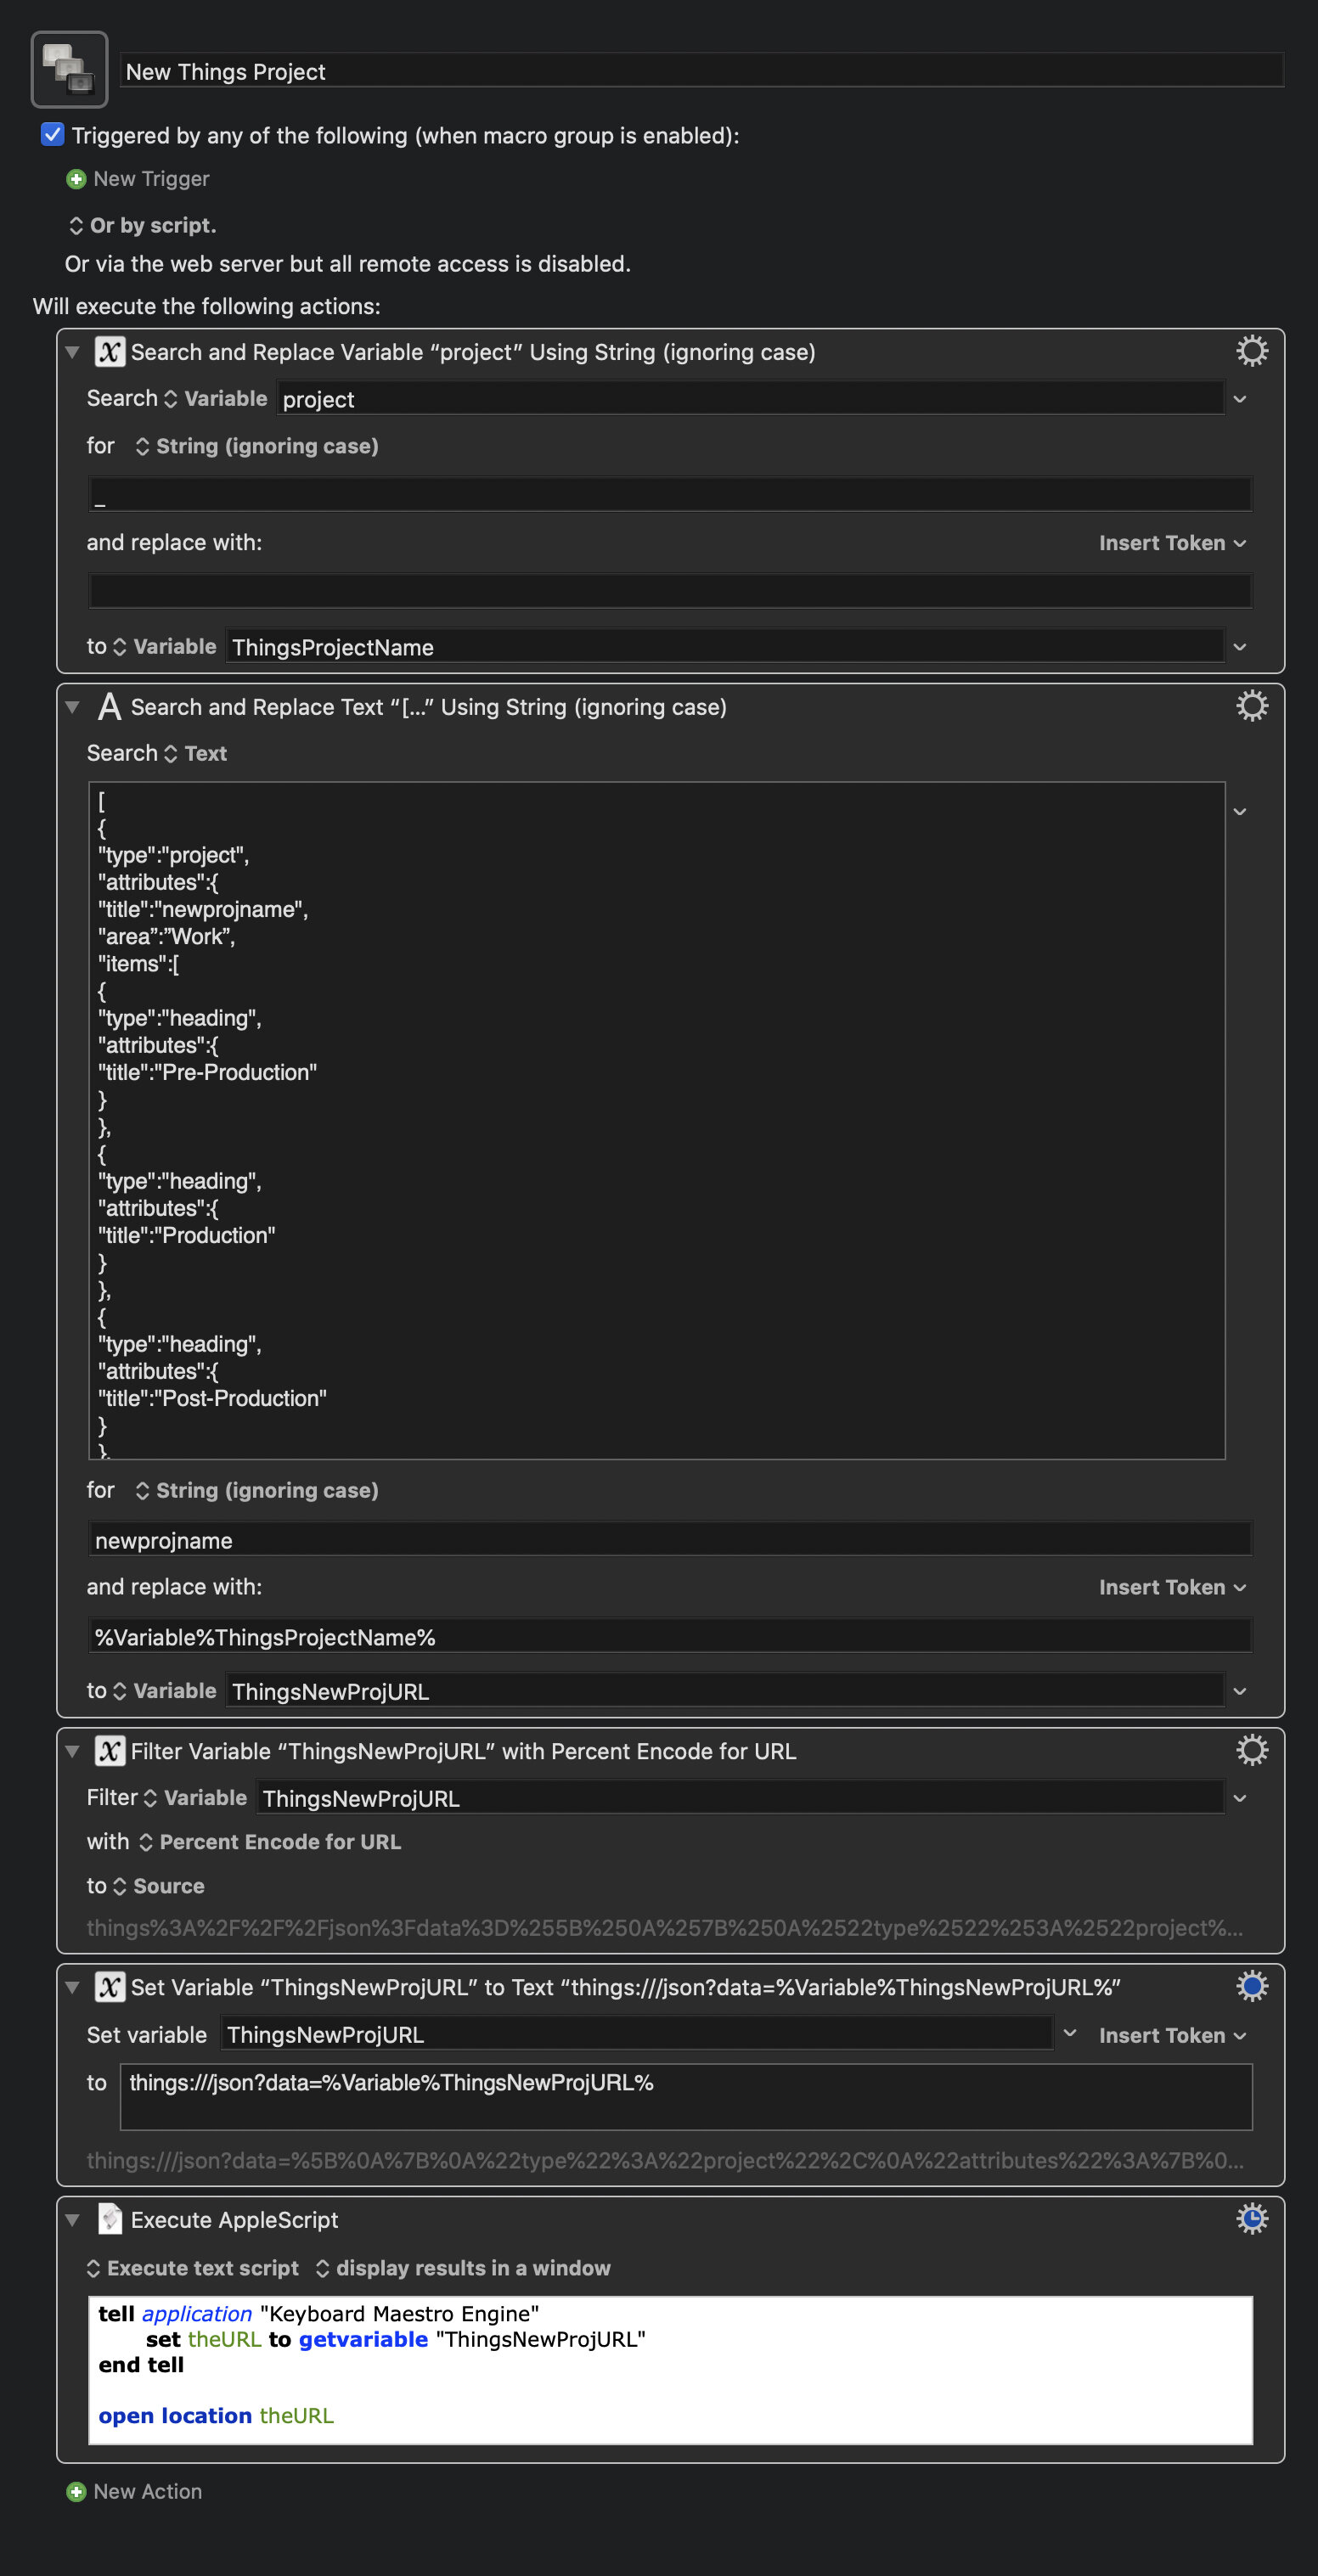
The Things Macro

 Click through to see the full image.
Click through to see the full image.

The “New Things Project” macro is built using Things’ JSON based commands, rather than the more limited URL Scheme commands. It’s much more flexible, faster to modify, and is the only way to access certain features like Headings.

If you’re curious, you can see the full code inside that second block of the macro here.

The Hazel Rule

The Hazel rule is fairly simple:

The AppleScript in the second Condition is:

set root_fol to theFile

tell application "Finder"  
    set files_ to count files of entire contents of root_fol  
end tell

if files_ is 0 then  
    return false  
else  
    return true  
end if

I honestly have no recollection of where I found this script on the internet. However, I can tell you with a fair amount of certainty that I did not write it.

This Hazel rule is running on my entire “Projects” folder, so any new folder that’s added will automatically be analyzed and tagged.

All That’s Left to Do Is Everything

So, that’s it. That’s how I begin work on every project. Once a project has a name, it gets a folder and a Things project. Then the actual work can begin. Hooray…


  1. These files and folders are created by the project management tools inside Nuke Studio and that is absolutely a post for another time. Or maybe not because sheesh.  ↩

  2. See also: I use the abbreviation “ch” to launch Safari with Launchbar despite having switched from using Chrome as my primary browser probably 7 years ago. It’s fast and my hands are used to it, so I’m sticking with it.  ↩

  3. lol  ↩

The One With Dropbox and the Symlink

I’ll be honest, this post is more for me than it is for you. I’m writing it so the next time I’m setting up a new Mac, I’ll know exactly where to find the solution to one of Dropbox’s most puzzling idiosyncrasies.

Dropbox users, like myself, who have both a personal Dropbox account and a business account, have the ability to link those two accounts and sync both folders to a single computer [1]. When you do that, your folder previously-named Dropbox is renamed to Dropbox (Personal) and your business account is named Your Company Dropbox. Which…seems silly to me, but okay, I guess.

Aside from being an unattractive folder name, Dropbox (Personal) is pretty terrible for automation and general usability. Spaces? Parentheses? It’s like they’re trying to break all my scripts and customizations.

And before you ask, no, you can’t just rename the folder back to Dropbox. Once you install the Dropbox app, the computer belongs to them, you’re just allowed to use it. Them’s the rules.

Now, when I first linked my two Dropbox accounts, I could have gone through all my Keyboard Maestro macros and shell scripts and done some find & replace work to make everything work again. But as fun as that sounds, I opted for the lazy route: creating a symlink called Dropbox that pointed to Dropbox (Personal) so all my stuff would just work again.

If I were smarter and better versed in the ways of the Terminal, I wouldn’t have to look this sort of stuff up when I needed to do it. Alas, this isn’t the sort of thing I need to do more than once every handful of years, and this knowledge will leave my brain the second I close that Terminal window.

I’m Writing It Down to Remember It Later

Here’s what I did:

  1. Make a symlink to “Dropbox (Personal)” and place it on the Desktop, thusly:
    ln -s "/Users/dansturm/Dropbox (Personal)" /Users/dansturm/Desktop

  2. Next rename the symlink on the Desktop to just “Dropbox”.

  3. Move the symlink into your Home directory, next to the ugly folder.

  4. Hide the symlink so you can forget you ever had to do this whole stupid thing:
    chflags -h hidden /Users/dansturm/Dropbox

And now your scripts, automations, file paths, etc, will function just as they did before Dropbox decided to get cutesy with the name of the folder where you keep everything you’ve ever created on your Mac for the past 10+ years.


  1. You can link one personal account to one business account and that’s it. You can’t have two personal accounts or two business accounts or three of any combination. Kinda makes you think this whole linking thing was a bit of an afterthought.  ↩

Custom URL Redirects with Rebrandly and Keyboard Maestro

For better or worse, the primary way I share files with clients, other artists, whomever, is sending Dropbox links. With features like password protection and link expiration, Dropbox links are pretty great. But there are two areas where they fail: one, they’re long and ugly, and two, they’re absolute and unable to be redirected to a different file after you’ve shared them.

Yes, in a perfect world I wouldn’t notice problems with my files after I hit send on my emails. Luckily, I can mitigate embarrassing link misfires by creating a custom short URL redirect that I can change later if necessary.

Redirect, Your Honor

I own a couple of short domain names I’ve used to create custom redirects for years. I used to create the redirects directly in the Hover domain dashboard. Which, as you can probably imagine, is not the quickest process.

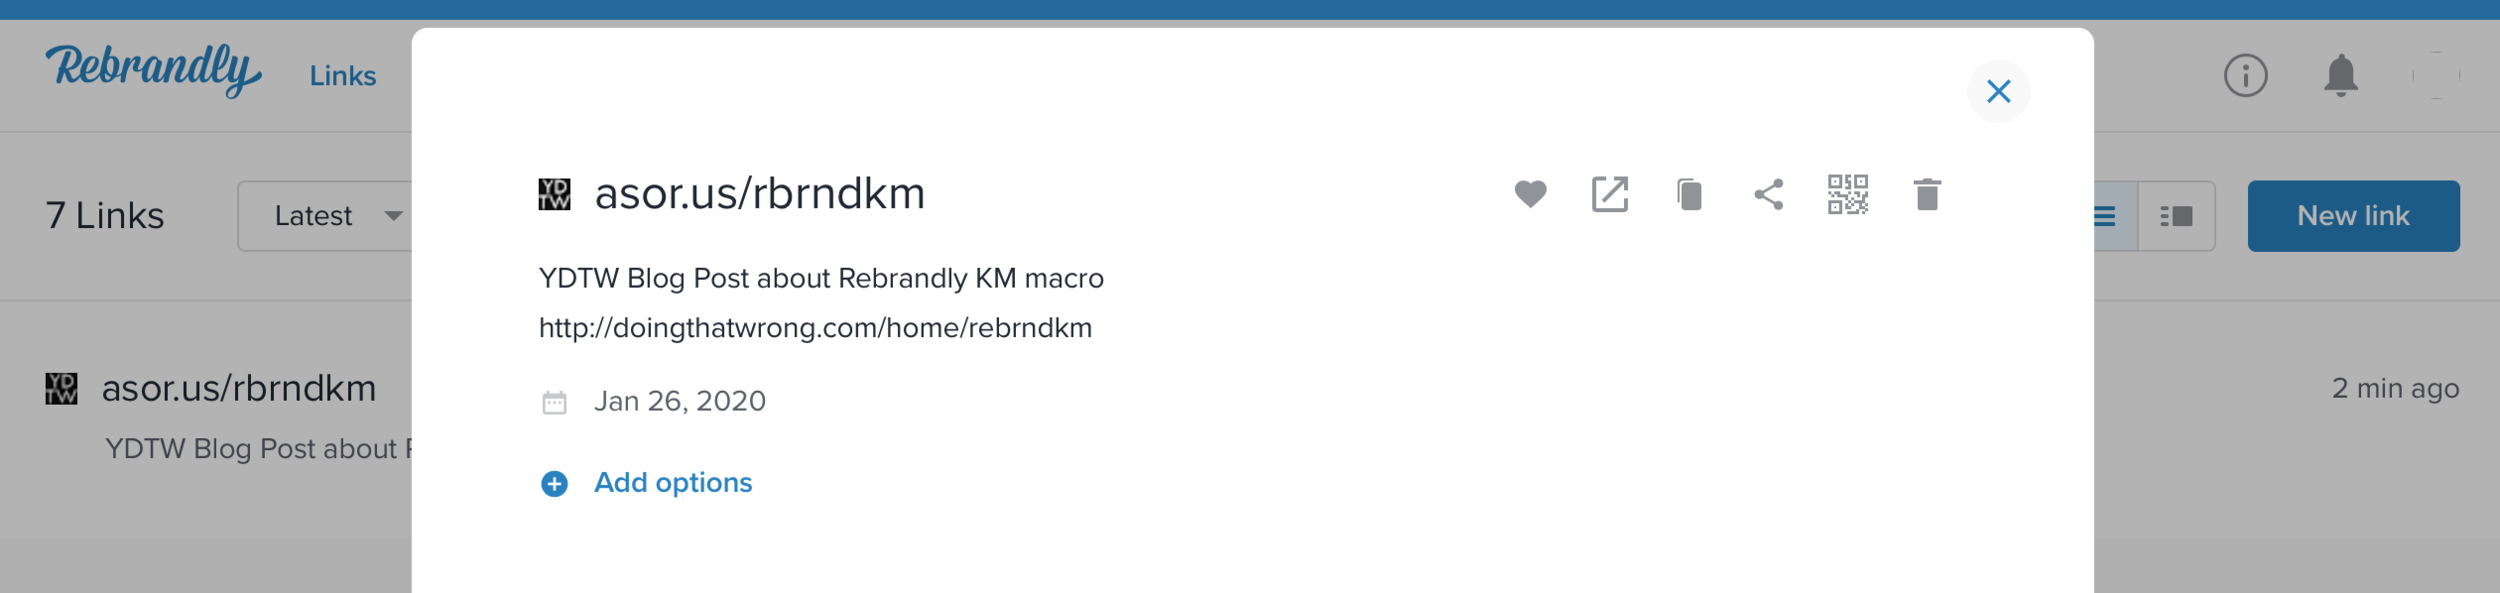
Recently, however, I was introduced to Rebrandly by my pals Jeff Hodges and Zach Hobesh. Rebrandly is a service for creating and managing custom shortened URL redirects. It connects to your domains quickly and easily, and makes re-branding URLs super easy.

When creating a shortened URL redirect with Rebrandly, the three 1 main components are:

  1. The destination URL
  2. The shortened URL path, which Rebrandly calls a “Slashtag”
  3. A short description of the link, for organizational purposes

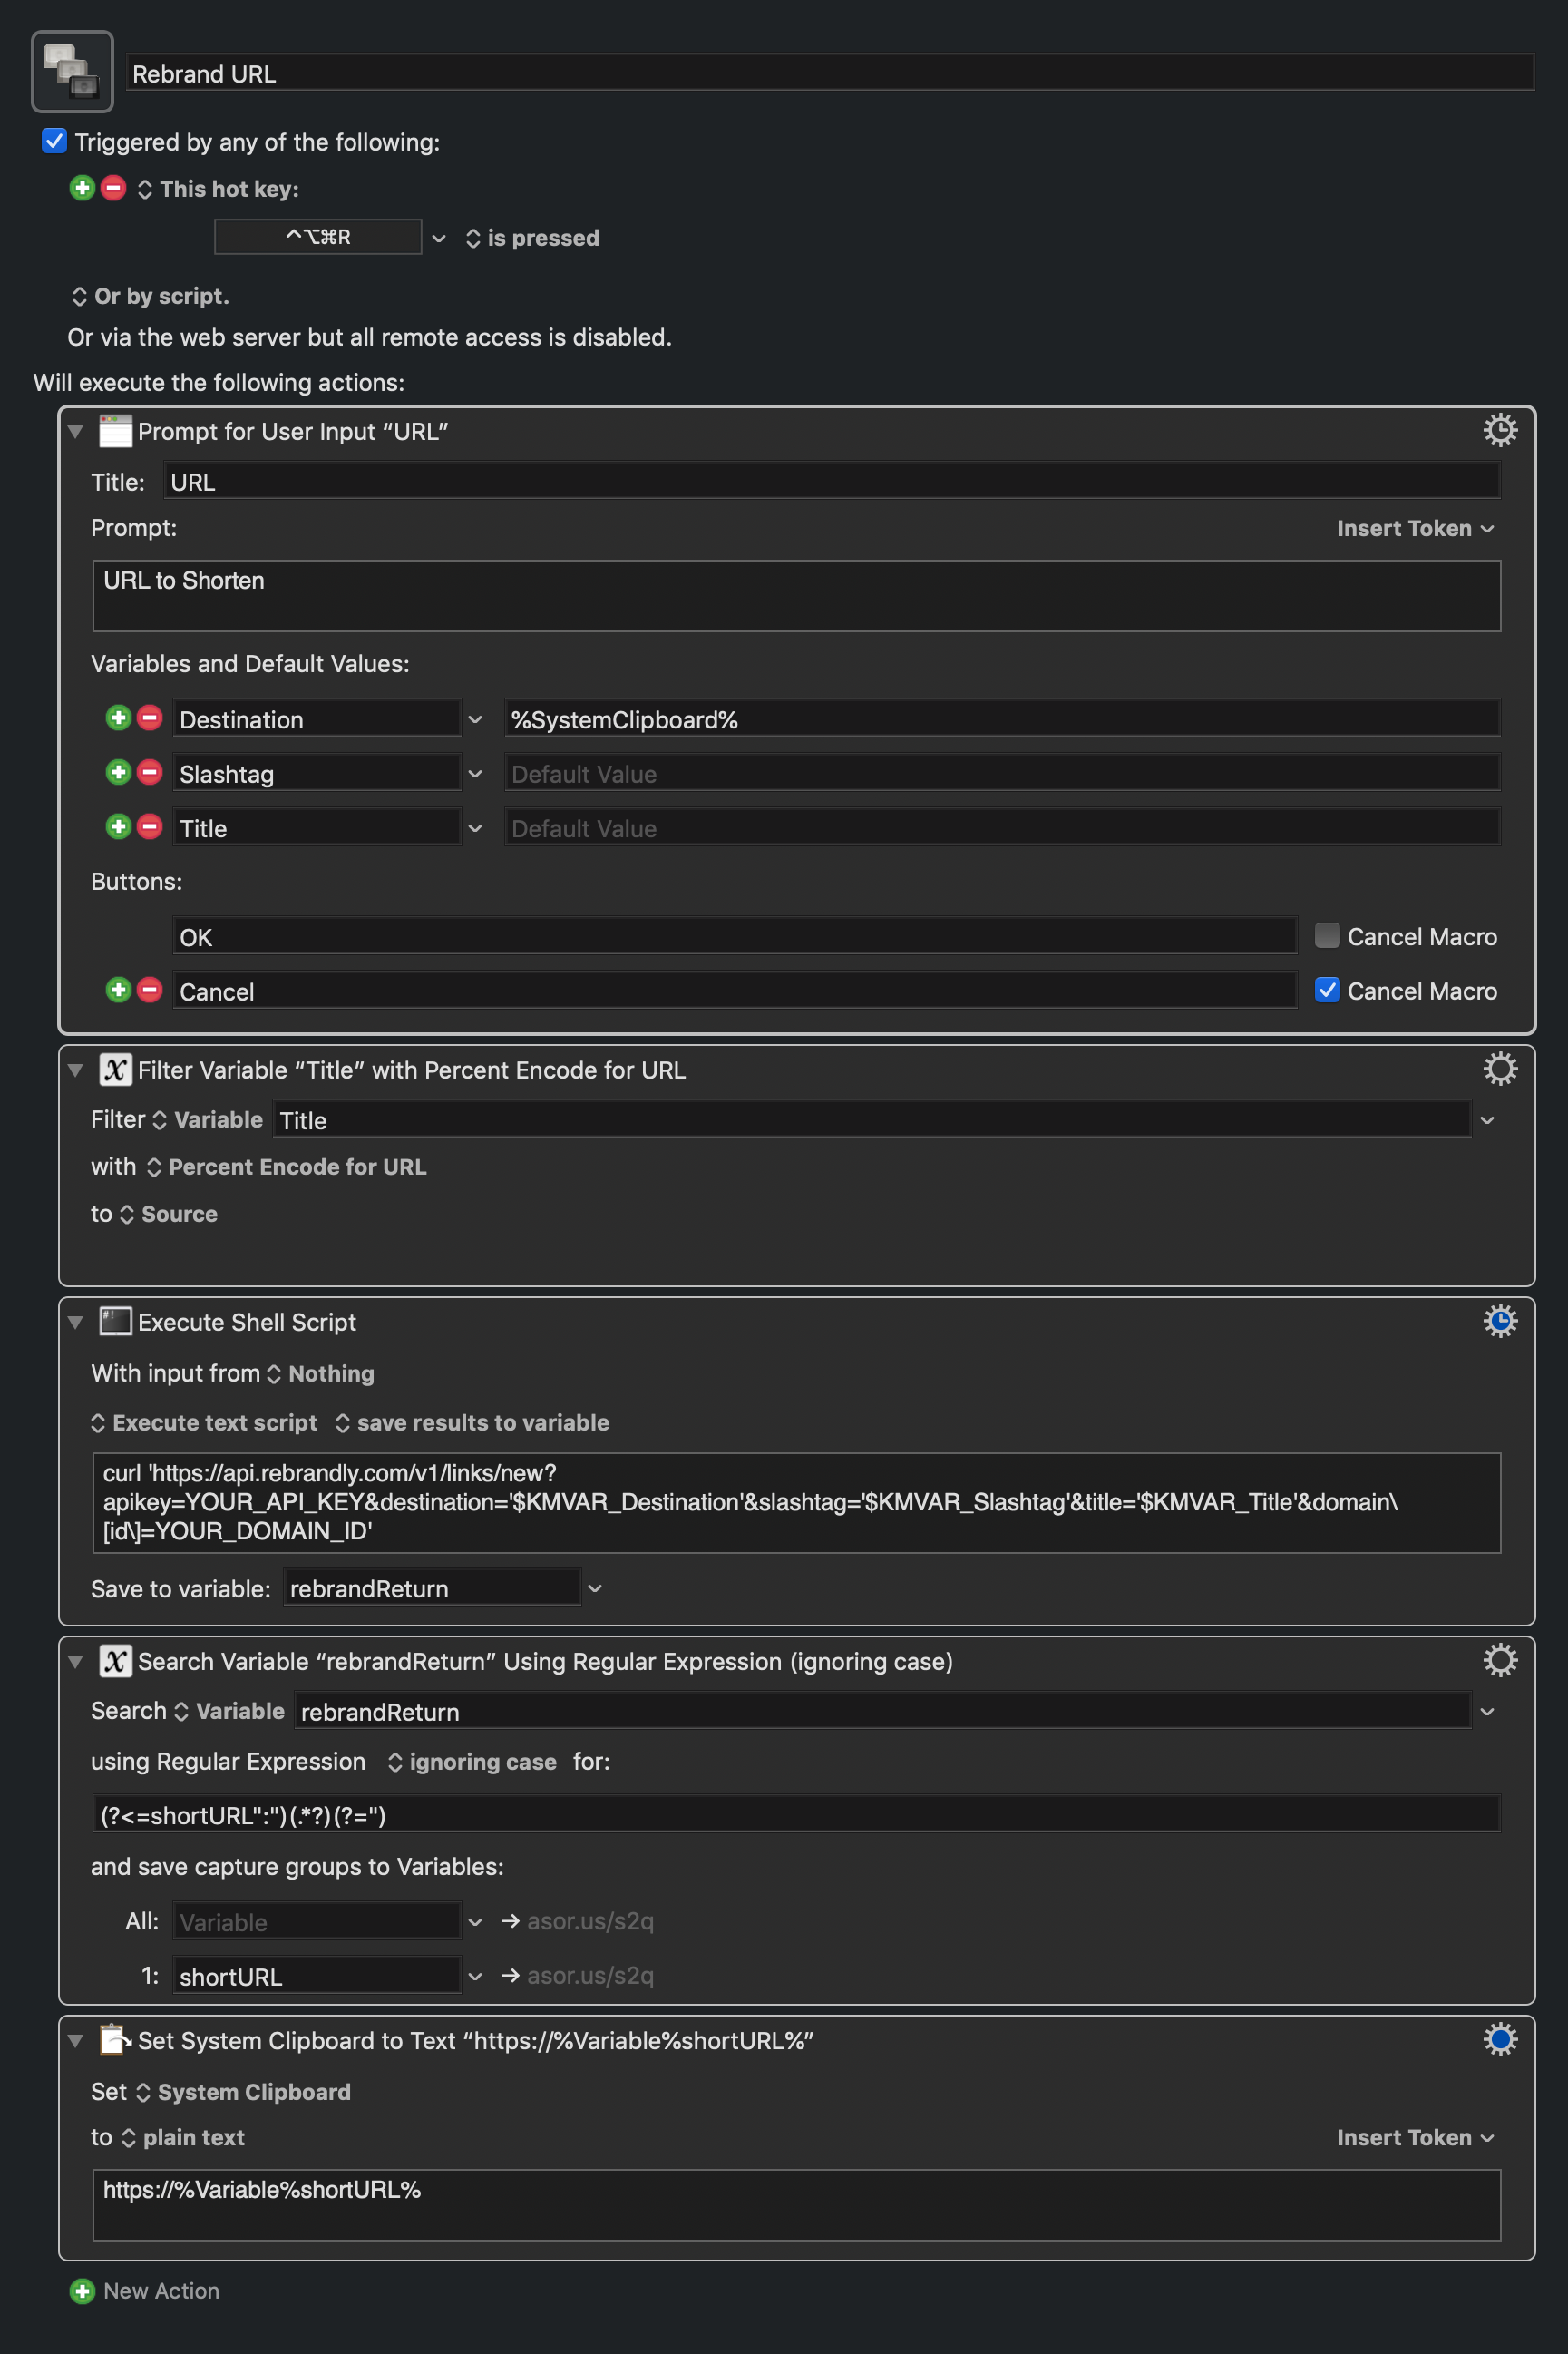
Rebrandly’s API documentation is full of example code that made it very easy for me to create a Keyboard Maestro macro that uses their service for shortening my links.

Wrkflw

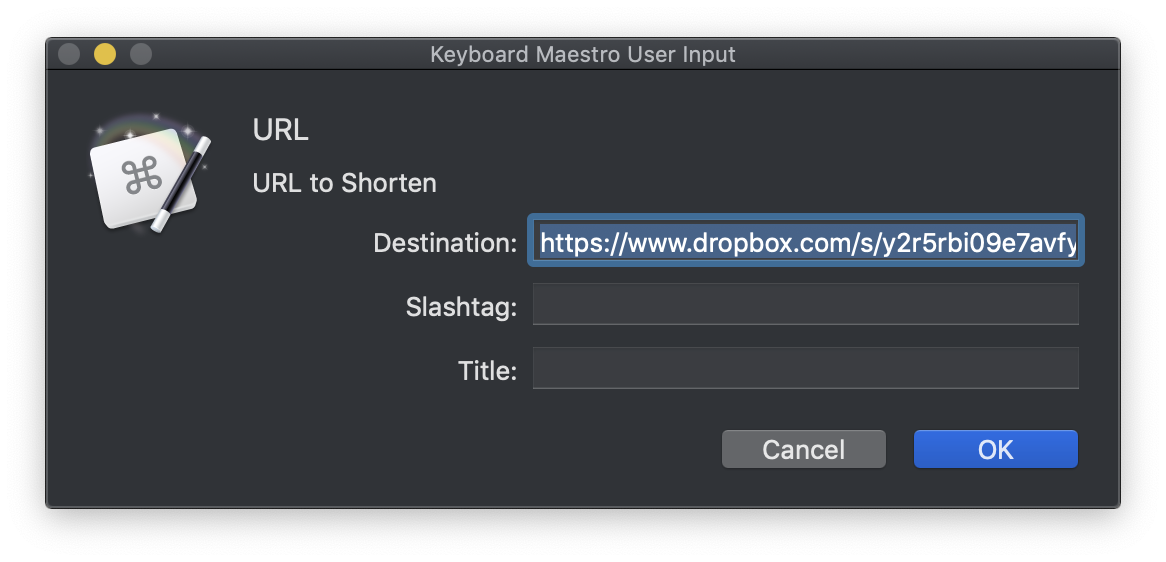
Creating a rebranded URL with the macro is as simple as:

  1. Place the destination URL on the clipboard.
  2. Press the keyboard shortcut.

A dialogue box will pop up, prefilling the destination URL from the clipboard. There are 2 optional input fields for the Slashtag and the Description. If left blank, Rebrandly will create a random Slashtag that's as short as possible.

Pressing Return will create the shortened URL on Rebrandly, and place it on my clipboard, ready to be pasted into my email, Slack message, or wherever.

I’ve only been using Rebrandly and this Keyboard Maestro macro for a short time, but I’ve been very happy with how fast and easy it makes rebranding URLs.


  1. Technically, the Slashtag and the Description are optional. ↩

Open on Which Mac for Mac

The names of these things are getting pretty bad. But the Open on Which Mac iOS Shortcut I created is still one of my favorite automations I’ve created. I use it every day to send links from my phone to whichever computer suits the context for the content I’m saving for later.

But I don't only discover interesting links on my iPhone. Occasionally I’ll come across something while I’m at work and want to send it to my home computer so it’s open, waiting for me when I sit down.

The flexibility of having built the OOWM service on Plaintext files, Dropbox, and Hazel means I don't need to modify any of the existing automation steps in order to add a new source to the mix. All I need to do is create a fast method for saving a url to a specifically-named text file in a specific location, and the Hazel rule will see it and act on it, just as it does with links from my iPhone.

Keyboard Maestro, Duh

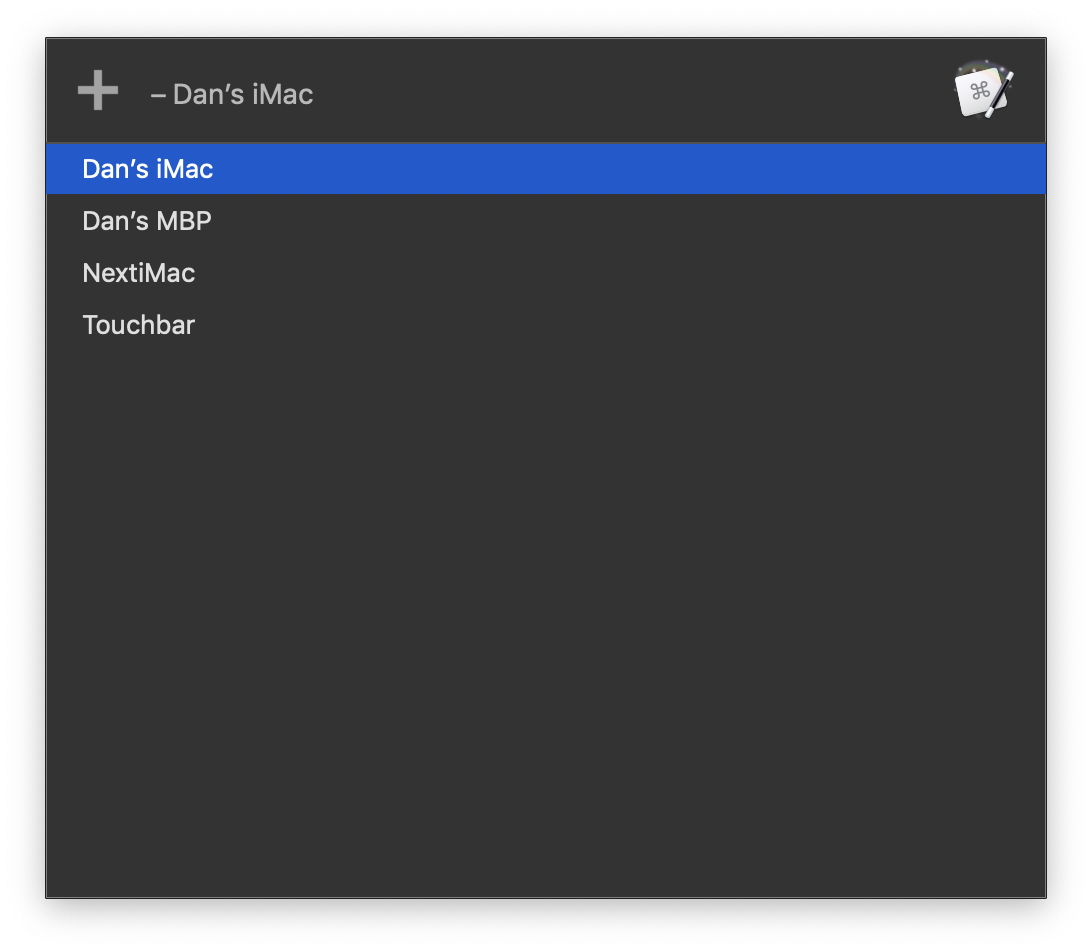
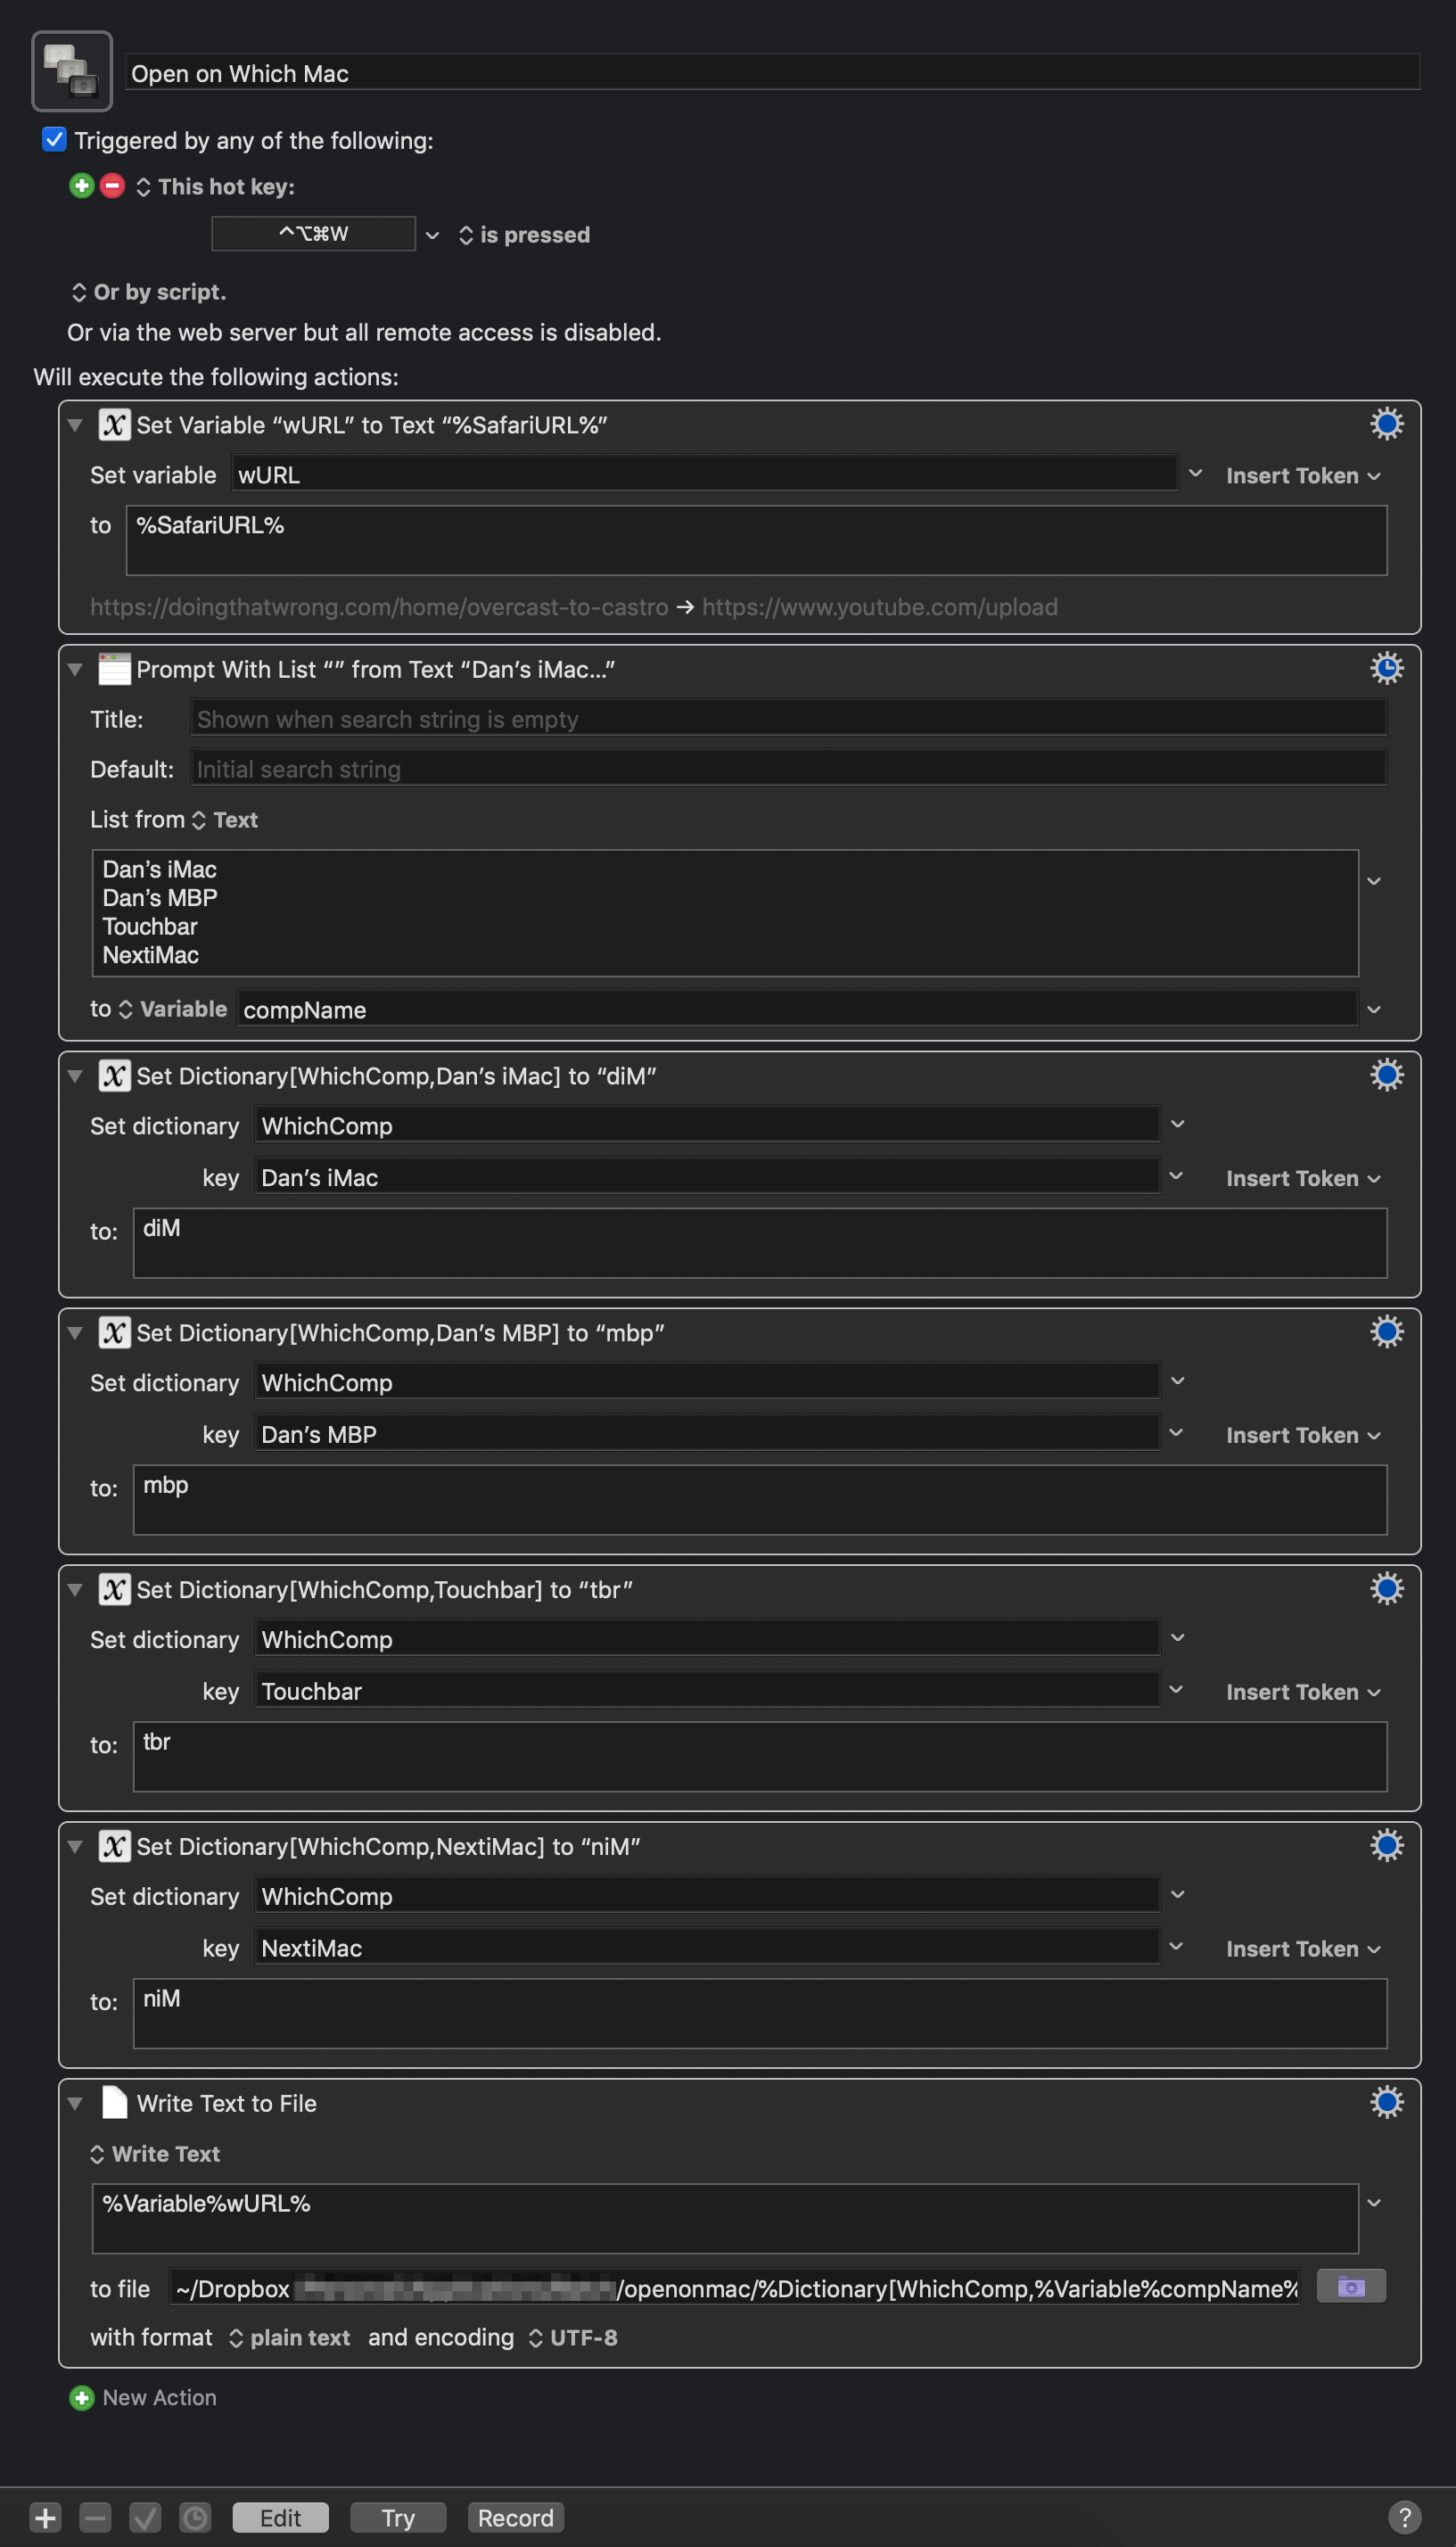
The Keyboard Maestro macro follows the same structure as the iOS Shortcut. First, it grabs the url from the active Safari tab. Then it presents the user with a list of computers to choose from for the destination of the link. Once a computer name has been selected, it uses a dictionary of computer name short-codes to create the specific text file name, then saves the file to the OOWM folder in Dropbox.

The filename — since it's too long to read in the screenshot — is:

%Dictionary[WhichComp,%Variable%compName%]%-URL-%ICUDateTime%yyyy-MM-dd%.txt

It really is that simple. And since this is running on a Mac, it’s much faster than its iOS counterpart.

And with that, one of my favorite automations just got more favoriter.

Remote Screen Sharing Automation

I’ve always found it fairly easy to manage my multiple Macs with tools like Dropbox, the Mac App Store, and iCloud. But trying to manage Macs that are in different physical locations, on different networks, has really put some of my workflows to the test. There are, it seems, some workflow issues that can’t solved by just putting things in Dropbox. Go figure 1 .

For the past few weeks, I’ve been looking around for ways to “get to” my home iMac from my iMac at work. I quickly found I needed more than just “access to the data” on that computer. I needed to control it via some form of screen sharing.

I tried Screens . It didn’t like my company’s port mapping. Nothing I can really do about that.

Someone in our IT department recommended Royal which, according to my research, is an application that does…something.

In true You’re Doing That Wrong fashion, the solution that had the most success was texting my wife at home and asking her to click “Accept” on the iMessage Screen Sharing request that I was sending from my work computer. But after about a half-dozen requests, I knew I needed a better solution.

Solutioneering

The Screen Sharing tools built into iMessage are great. They’re simple, easy to use, and (miraculously) they just work. I don’t need to open ports on my router or run a private VPN, I just open iMessage, select the person I want to Screen Share with, and click “Ask to Share Screen”.

Given my propensity for making very bad, very unsafe automations, you may be imagining that I just created a Keyboard Maestro macro that would watch for the “Incoming Screen Sharing Request” notification and click “Accept”. But even I realized what an awful idea that would be.

Luckily, there’s another menu item in iMessage, just above the “Ask to Share Screen” item. It’s the “Invite to Share My Screen” option. So, I set about making a tool that I could activate remotely, that would call me from my home iMac and offer to share its screen.

Shortcuts & Hazel

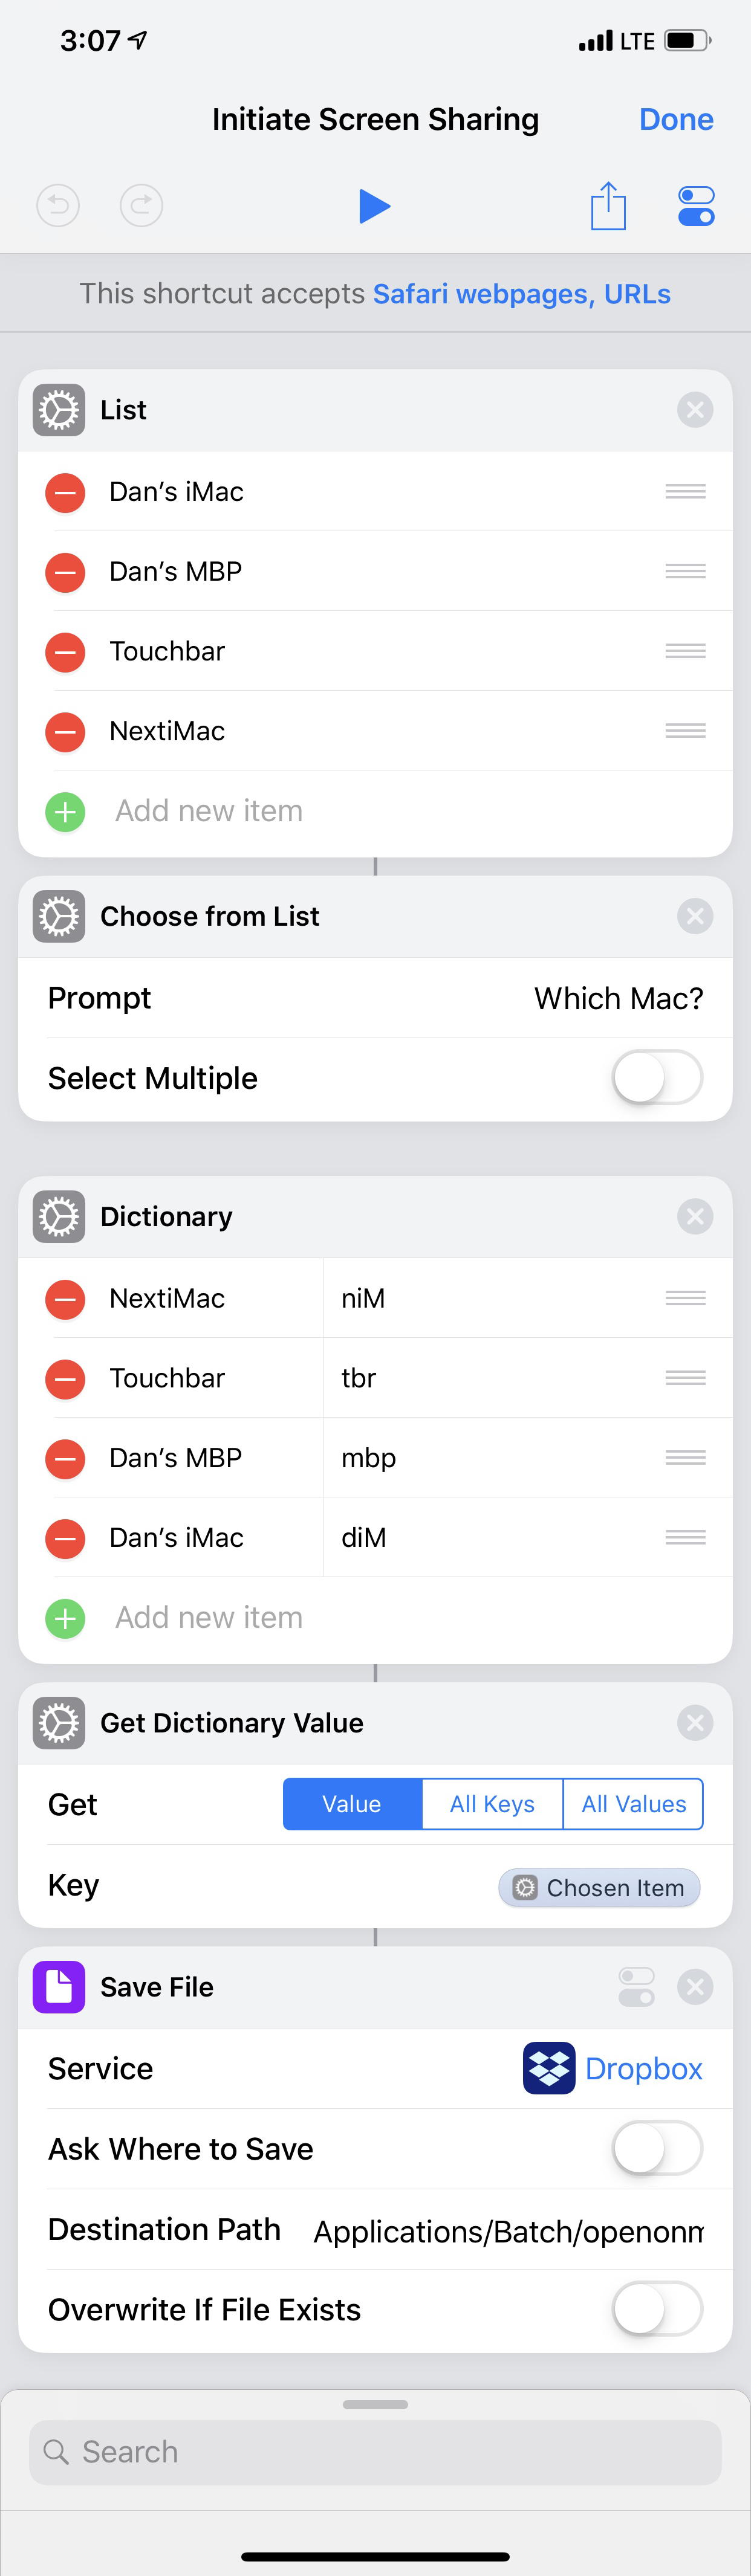
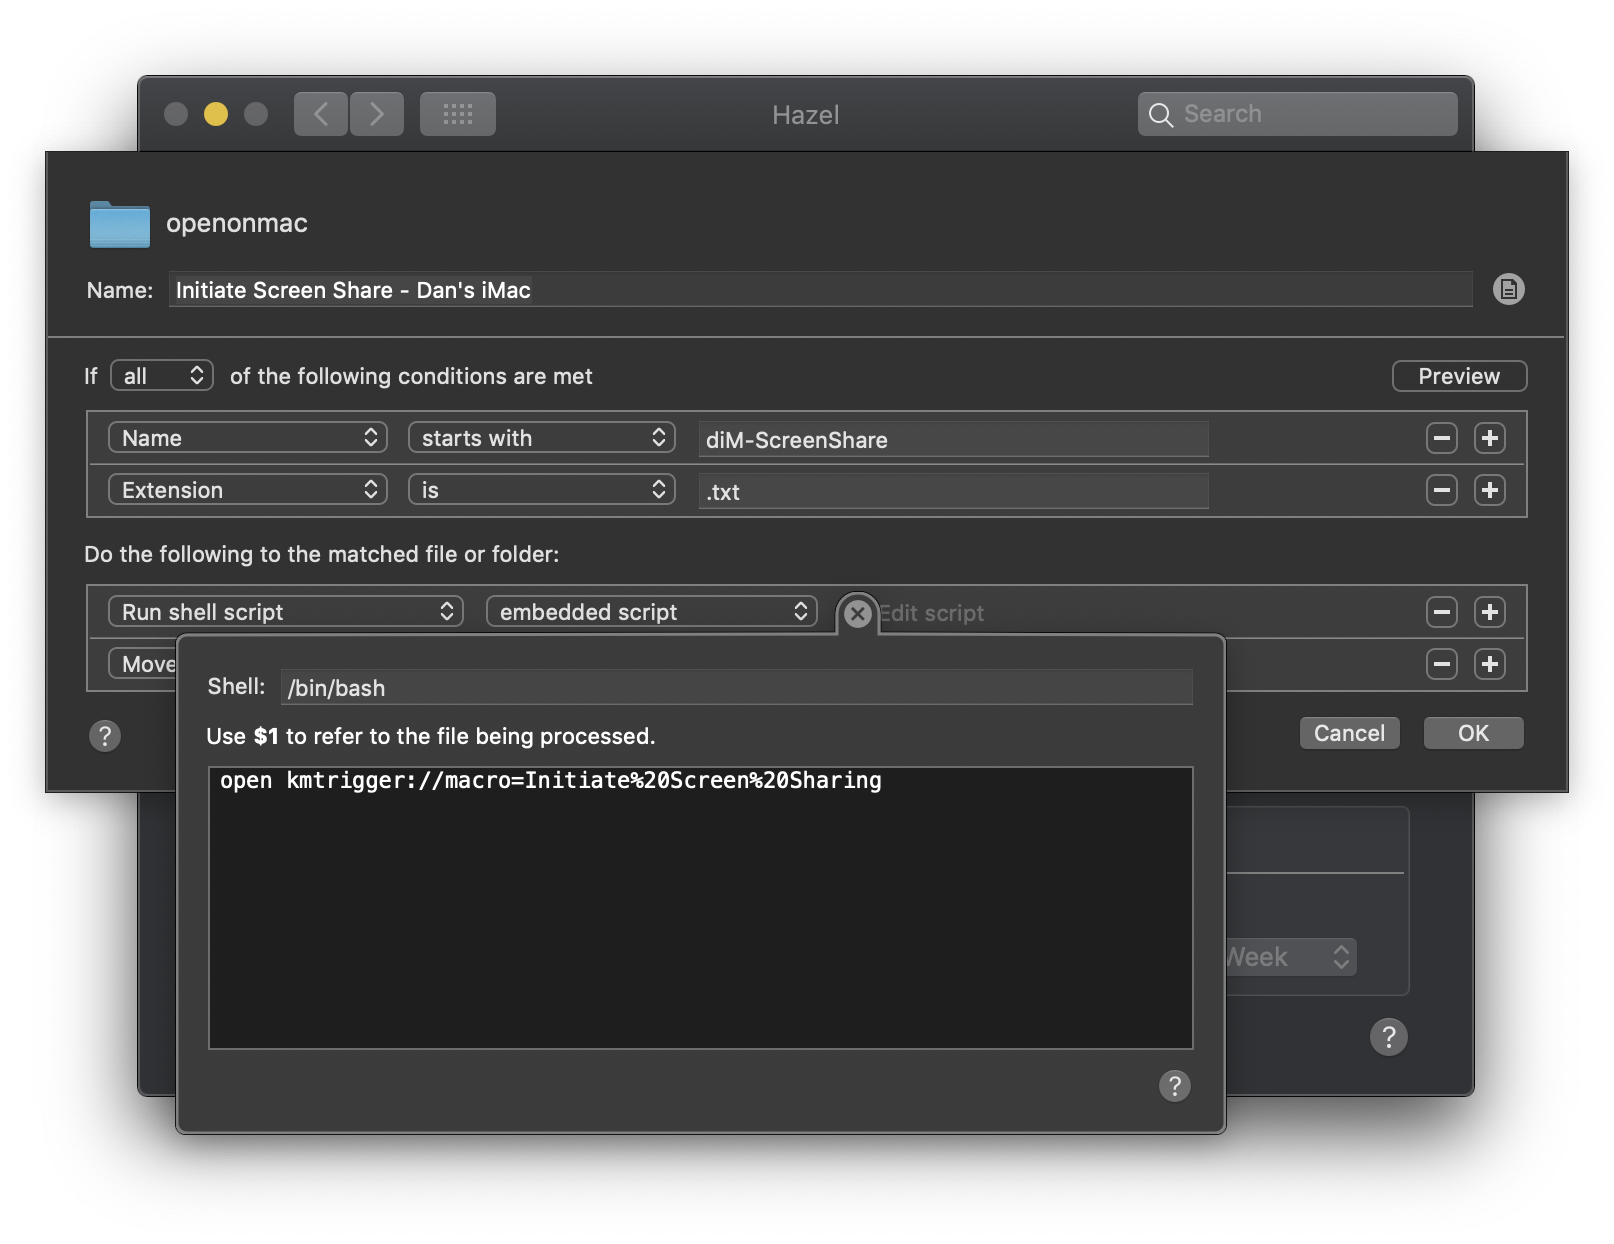
The easiest way to get things up and running was to duplicate a few of the things I’d created for my Open on Which Mac tool. I duplicated the iOS Shortcut I’d use to trigger the whole thing, and the Hazel rule watching for the Shortcut’s input.


  1. Sometimes Dropbox is the issue. But that’s a post for another time. ↩

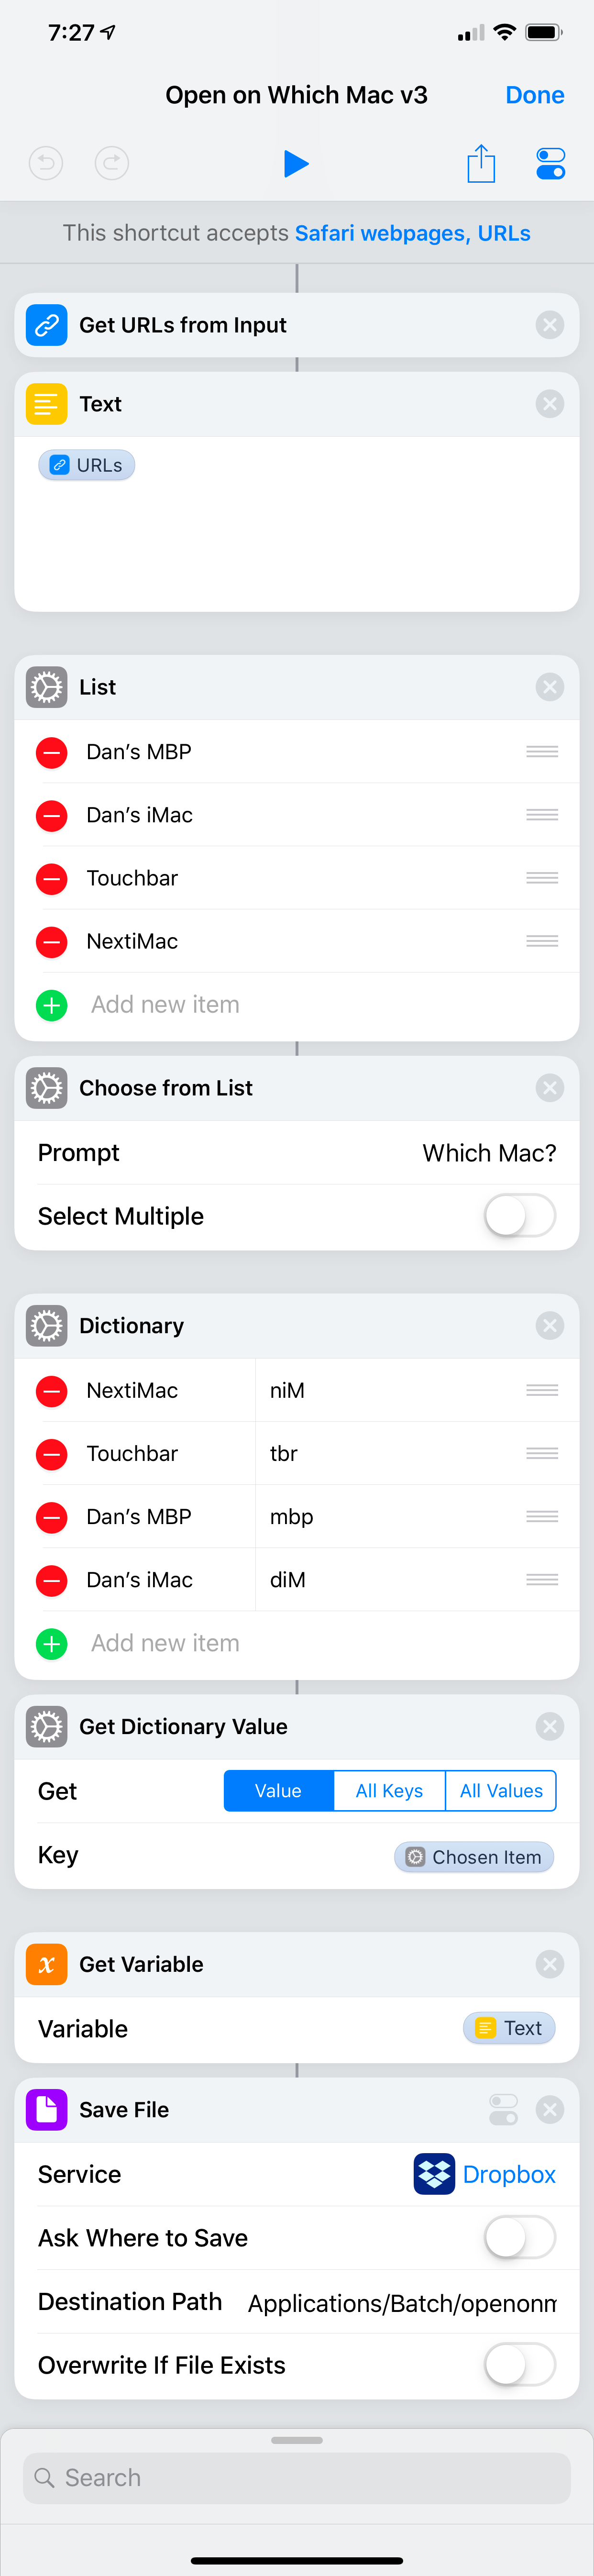
The only thing I needed to change in the Shortcut and Hazel rule was to swap “URL” for “ScreenShare” in the filename. So, the Destination Path in the shortcut reads: Applications/Batch/openonmac/Dictionary Value-ScreenShare-Current Date.txt .

While I’m currently only going to use the tool to remote into my home iMac from work, leaving the rest of the Shortcut intact will allow me to more easily 2 add the ability to remote into other computers later.

Keyboard Maestro

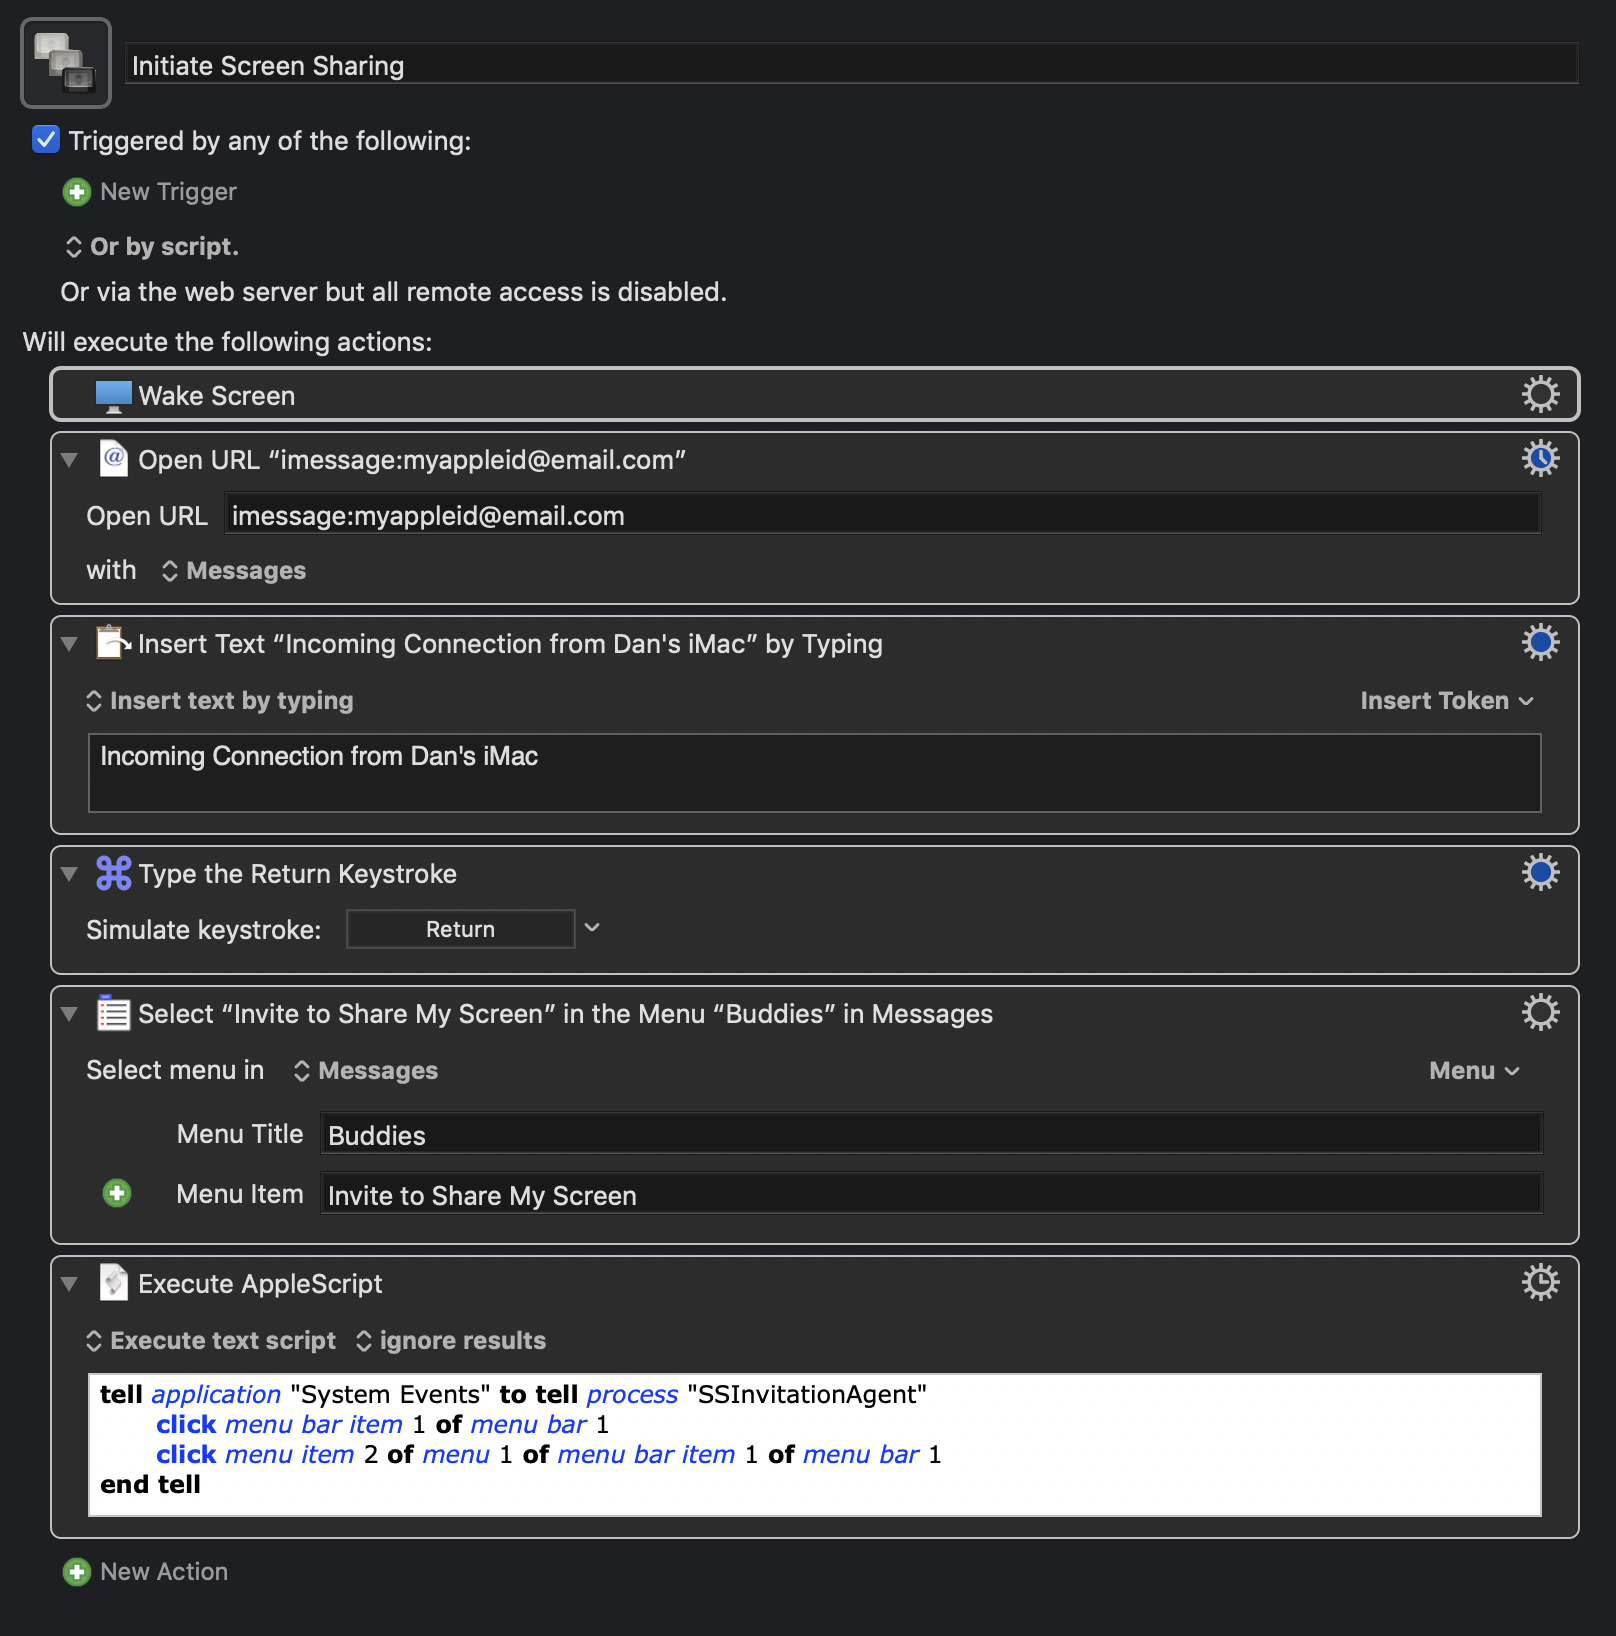
Now on to the meat of the thing. We start by using the macOS URL scheme for Messages.app to send a message to my Apple ID. By hard-coding my Apple ID into the macro, there’s no way I can accidentally send the invitation to someone else. Which would be very bad.

By opening the url imessage:myappleid@email.com , KM will open Messages.app and create a new iMessage to my Apple ID. Now, it turns out, it’s not enough to just create a new message with a recipient selected. The Screen Sharing menu items aren’t accessible until you actually send something. So I took this as an opportunity to add a bit of transparency to the process. The macro types out the words “Incoming Connection from Dan’s iMac” and hits Return . In addition to making the Screen Sharing tools accessible, I will get an iMessage (everywhere) letting me know that the Screen Sharing Invitation is imminent and it’s coming from the computer I expected.

Next, the macro opens the “Buddies” menu and selects “Invite to Share My Screen”. Within a few seconds, wherever I may be, and invitation to share the screen of my home iMac appears on my desktop and I can click “Connect”.


  1. With one potentially major hurdle. ↩

That was…surprisingly simple.

Not quite

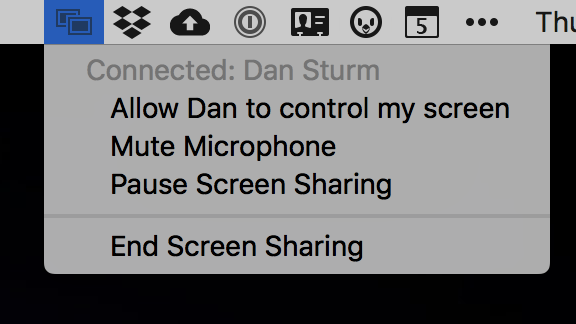
Since Apple is very good about keeping things safe and secure, the Screen Sharing session activates in “Observing” mode. Which is not terribly helpful. Additionally complicating matters, the only way to approve “Control” of the Screen Sharing session to a remote user is to click on the Screen Sharing menu bar icon that indicates a connection is active.

Initially, I tried to click the menu with Keyboard Maestro’s “Click at Found Image” action, but the menu bar icon flashes when connected and it failed more often than it succeeded. After a bit of googling, some poking around in Activity Monitor, and a brief consultation with Dr. Drang , I discovered I could activate the menu and select “Allow Dan to control my screen” with some basic AppleScript. Which looks like this:

tell application "System Events" to tell process "SSInvitationAgent"
    click menu bar item 1 of menu bar 1
    click menu item 2 of menu 1 of menu bar item 1 of menu bar 1
end tell

Limitations and Improvements

There is one big limitation to this tool. You may have already guessed it. The tool, as it exists here, doesn’t work when the computer is locked. So I resorted to turning off “Require Password” in System Preferences on my home iMac. Which sounds like a huge security risk not worth taking for the benefit it provides but, frankly, if an untrustworthy person is sitting at my desk in my home office, I have bigger problems than whether or not there’s a password on my iMac.

This does, however, preclude me from using this particular solution for the reverse procedure of connecting to my work iMac from home. Turning off my system password definitely isn’t going to fly with our IT department. So, at the moment, this is at best half a solution.

Another thing I’ll probably change in the next iteration of the tool is to remove Hazel from the process entirely. Recently, in the process of debugging a Hazel rule, I recreated it from scratch inside Keyboard Maestro. KM’s ability to watch a folder and act on files that appear inside worked well enough for me to consider migrating more “watch folder” actions over there in the future. Its debugging tools are better, too.

Something else that could use improving is the speed of some of the actions. Currently, depending on how long it takes for me to accept the screen sharing session from my work iMac, the screen sharing menu bar icon may not be available in time for the AppleScript action to find it and grant me “Control” access. My current workaround is to just run the whole process again while I’m in “Observe” mode. It only takes a few second and it works fine.

Speaking of the AppleScript step, there’s also an odd delay of a few seconds between opening the menu bar app and selecting the “Allow Dan to Control” item. In my conversation with Dr. Drang, he pointed me to this post on Stack Overflow which both explained and solved the issue, so that seems like an easy fix for the next version.

By the way, it would seem (to me) that none of this would need to exist if there was some mechanism by which iMessage could tell that the Screen Sharing request was coming from my Apple ID, sent to my Apple ID, and allow me to automatically authenticate those interactions. Hell, prompt me for my iCloud password if you want to keep it safe. Seems like a reasonable request to me, but what do I know. I’m just some idiot with a blog.

"Open on Which Mac" Shortcut v3

Two whole days ago, I posted an updated version of my Open on Mac Shortcut. When I post my hacky automation tools online, the absolute best possible response I can hope for is being corrected by someone much smarter than I am.

Like when I posted v1 of the shortcut and Jason Snell pointed out that I had inadvertently created a way for anyone with access to my Dropbox account to execute arbitrary code on my computer. Which is a pretty bad thing, to be honest. Luckily, he modified the shortcut and posted a much better version on Six Colors.

When I posted v2 of my shortcut on Tuesday, in the caption for the (very long) shortcut image, I wrote:

These If statements are terrible and ugly and there’s got to be a better way to do this, but I don't know what it is.

A few hours later, I received a lovely Twitter DM from Dr. Drang with the answer to my question.

To avoid the nested if statements, set up a dictionary with the Mac names as the keys and the file name prefixes as the values. Then assemble the file name by looking up from that dictionary after the Choose step.

— Dr. Drang, Famous Internet Snowman

The file name in the Destination Path of the Save File action is "Dictionary Value-URL-Current Date.txt. The shortcut is now much shorter, easier to understand, faster, and generally less bad.

Thanks, Doc.

Proxy Workflows are Dead, Long Live Proxy Workflows

As I've been working my way through all the blog posts, podcasts, and twitter hot takes on this year's WWDC announcements, one topic keeps coming up that I think could use some additional exploration. Apple announced a PCI card they're calling "Afterburner", built to decode ProRes and ProRes Raw footage in real time.

Which is a great idea. I think the Afterburner card is going to be a very useful tool for post-production folks and, should I be lucky enough to end up with a new Mac Pro on my desk, I would love if it had one inside.

The problem I have is with the way they're pitching the product. On the Mac Pro page on apple.com, it reads:

Afterburner allows you to go straight from camera to timeline and work natively with 4K and even 8K files from the start. No more time-consuming transcoding, storage overhead, or errors during output. Proxy workflows, RIP.

This message has been repeated in almost every conversation I've heard about the Afterburner card and I think it's based on a fundamental misunderstanding of post-production workflows.

We don't edit with "proxy" files because it's slow. We do it because it's the smarter way to do things. I love the idea that working with ProRes files will be faster, but I have no intention of editing with camera native files. It's just not a good idea.

This isn't new

Hardware acceleration of video decoding is not new. When I saw this product announced, I described it to a coworker who missed the keynote as "Apple made a Red Rocket card for ProRes".

I'm not denigrating the product with that comparison. The Red Rocket card was a huge advancement for post-production workflows when it came out. Rather than waiting a day (or 4) to get our R3D files into an NLE-friendly format, we could have it in about as long as the duration of the footage. And I'm excited at the proposition of having that same speed improvement for workflows using ProRes.

A side effect of that increased speed was the ability to edit directly with our R3D files in our NLEs. While technically possible, it was a terrible idea that caused more pain than it solved. Rather than describe all the dumb technical gotchas related to editing R3D files natively, let's look at the idea from a higher level view; one that takes into account an entire workflow, if you will.

Disclaimer: this next section is going to have a lot of my personal opinion built into it. But that opinion is based on a couple decades worth of professional experience, so you can totally trust me.

Safety First

The first step after shooting a professional video project is making an untouched backup of your camera negative files. We don't work from these files, we don't import them into Premiere or Avid. We don't look at them. They go into a safe place on an expensive hard drive array with drive redundancy and, if we're smart, it's backed up off-site.

Because if something happens to these files, we're done. We've lost potentially millions of dollars worth of material that, in most cases, cannot be recreated as it existed previously. It's not a risk worth taking. We're making at least 2 copies.

VFX

I love ProRes as a format. I live in ProRes all day. But ProRes is not the best format for all tasks to be performed over the course of a project; hardware accelerated or not.

Unless we are a video production company of one, with an unlimited amount of time and money, we're going to use multiple file formats in our production pipeline. Because we're smart people who do things with intention, not just because our hardware enables us to do it.

When an edit is completed and ready to be sent to someone to add VFX or Motion Graphics, we're not going to send the entire, uncut shot length to that person. We're going to send them exactly the section of the shot they need to work on (plus a few frames of handles because, again, we're smart).

This may come as a surprise to some of you, but the best file formats for VFX are image-sequence-based formats. That is, a folder full of still frames, each representing a single frame of video. Yes, in 2019.

You've all heard the statistics from VFX or animation facilities that a single frame of a shot from a movie can take hours or days to render. That's not because they don't have a ProRes accelerator board in their computer, it's because there's a lot of work being done to the shot.

Also, what happens if your render crashes when it's halfway done? If you're working in ProRes, that means you start over. With an image sequence, you pickup where you left off. Time is money. Deadlines are as tight as they are important.

This is also one instance where the term "proxy workflow" is silly because, in most instances, the image sequence format we're using is higher quality than any ProRes format.

And, let's not forget that the majority of shots in movies and commercials will go through a vfx pipeline. Whether it's to add giant fighting robots, or to remove a Starbucks cup someone left in the frame, or to correct some lens distortion or camera bounce. It's going to be worked on, so let's do it smartly.

Shared Storage

Once your post-production facility grows beyond a handful of folks, you're going to need to keep your files on a centralized SAN so everyone can work off the same material and pass things back and forth while working in parallel.

With your footage on a shared network, there are a whole lot more considerations for which format you use for which part of the post-production process. Is your network fast enough to serve up these massive files to everyone who needs them at the same time?

And since we're making multiple copies of our footage (for safety), and we're keeping our working files in a shared location, it's unrealistic to say we're saving space by using our camera original format for our work. Whether your duplicates are H.264 (they should never be) or ProRes 4444, you're already using a "proxy workflow". And since we're realistic, responsible professionals, we're going to use the best smallest format for the job at hand. This is one of the main reasons some VFX facilities still use DPX sequences instead of EXR sequences.

ProRes is a Proxy Workflow

One of the best things about the ProRes format is that it's actually a half dozen or so formats of varying bit-rates and depths. The reason there are so many flavors of ProRes is so we can choose – at every step of the production and post-production pipeline – the right format for the project and task at hand.

Much like the new Mac Pro, we like our workflows modular and flexible. That does not mean we're going to use a single copy of our camera native ProRes files from start to finish. That's MacBook Air thinking in a Mac Pro world.